
Hello friends!! I hope you are well and that you had a good weekend. We took some walks and bike rides. Yesterday there were dramatic clouds looming all around, but the sun was shining for most of the day. It was great photo weather.
Today I have an Artist Trading Card to share, with both heat embossing, stamping and using mica, real and synthetic. You can use the techniques for other types of projects too.

This week at the Simon Says Stamp Monday Challenge Blog our theme is 'We're All A-Buzz'. Don't miss the project by our May guest designer Cath Wilson, with her gorgeous blog Inky Fingers.

I always enjoy doing ATCs and don't do them often enough. The small size is fun to work on and it is also great if you have a small stamp or die which you want to be the focal point of a project. On an ATC even small items look big. We have two bee keepers in the family, so bees are close to our hearts and they are very important for the environment. On this ATC I wanted a warm, golden look of both honey and pollen. The background is embossed with layers of embossing powders.

Start by cutting a piece of cardstock into the size of an ATC (2.5 x 3.5 in). Glue it to old book paper with matte medium. When dry, tear the edges.

Stamp the honeycomb pattern from the Darkroom Door Buzzing Bees set with Vintage Photo ink. I embossed it with clear powder, but you can skip that step.

Ink the card with Fossilized Amber and Vintage Photo.

Before the ink is dry, sprinkle the card with clear embossing powder. Remember to be very careful when heat embossing. Do NOT touch the melted powder until it has cooled down completely.
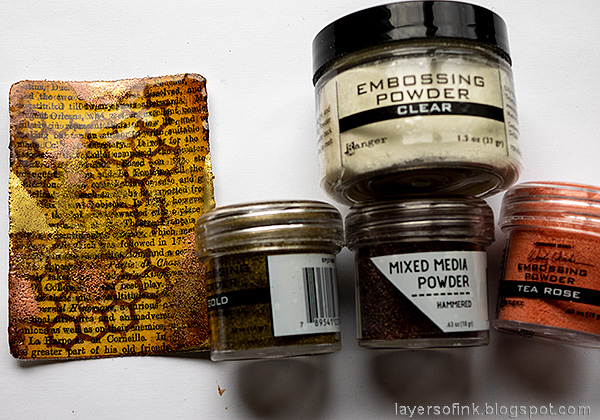
Continue with another three or four layers of clear powder. You might need to add embossing ink in between. Add some colored powders, especially around the edges. I used gold metallic, Hammered Mixed Media and a tiny bit of Tea Rose.

The metallic and colored powders seem to float on top of the clear powder, creating depth and dimension.

Stamp one of the bees from Buzzing Bees on white paper and color with Prismacolor colored pencils.

Add Glossy Accents to the wings and sprinkle with a little Rock Candy glitter. Add Glossy Accents to the eyes too, but don't sprinkle glitter there. Let dry.

Color Tim Holtz mica flakes with Butterscotch alcohol ink. Place the mica flakes in a plastic bag and drop in a few drops of ink.

I also used real mica, which I found on a recent walk. It was glued to the background together with three Prima flowers from Moon Bay Golden Coast and Meadows Pretty Pale. Add matte medium here and there and sprinkle on the colored mica flakes.

Cut out the bee, ink the edges with brown ink and glue it to the layers of flowers and mica flakes.

Here you can see the real and the synthetic mica flakes together.

The glossy accents and glitter add a nice touch to the wings.

I found two Clippings Stickers that were perfect for the theme.

The flowers were inked with both the yellow and the brown ink.

The layers of embossing powder make the old book paper slightly transparent, giving a cool effect where you can partly see the words on the opposite side of the paper.
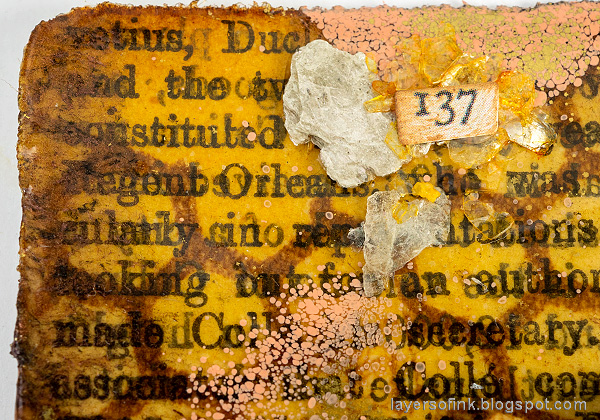
My youngest suggested adding the Tea Rose powder. I was a little reluctant, but the soft pink actually gave a nice look to the background.
It is hard to capture the glimmer and shine of this project on a photo, so I did a short video instead, where you can see how the light captures the embossed background, mica flakes and glitter.


Do you use Instagram? If so please add #sssmchallenge so we can see your entries there too.


Thank you so much for taking the time to visit my blog today!
Happy crafting!
Anna-Karin
Supplies:
* Please note: the links are affiliate links, for which I receive a small percentage of sales generated by the link, at no extra cost to you.
* Please note: the links are affiliate links, for which I receive a small percentage of sales generated by the link, at no extra cost to you.
I love this ATC Anna-Karin!
ReplyDeleteAnna-Karin, this is just so gorgeous! I love the mica flakes; brilliant creativity!
ReplyDelete