
Hello crafters! Today I am sharing a mixed media tutorial, with a crackle paste background, mica flakes and lots of texture. The techniques can be used for cardmaking, art journaling, 3-D projects and more.
We had a fun weekend with soccer, playgrounds and walks. Yesterday it was very windy and I struggled to photograph my project. It kept blowing away. All trees are still standing around us luckily.

This week we have a Crack It Up theme at the Simon Says Stamp Monday Challenge Blog. Don't miss the lovely project by our February guest designer Christina, with her blog Rosso Papavero.

I love crackle paste and have for a long time. Ranger's Opaque Crackle Paste is a one-step crackle paste and much easier to use than the two step pastes I used many years ago. It is very easy, you just apply the paste and crackles will appear as it dries. All you need is a little bit of patience. The sea on my tag also has a crackle appearance, since it is covered with mica flakes. These are two easy techniques, which will give great results.

Coat a tag with gesso and when dry, apply Distress Inks. Most of this will be covered up, and you can actually skip painting the sea.

Apply Ranger's Opaque Texture Paste across the sky, but don't cover the background completely. Apply Transparent Gloss Texture Paste over the sea.

At this point, my eye fell on a jar of Tim Holtz Mica Flakes and I decided to cover the sea with flakes. You can also leave it without the mica, which will create a cool effect too.
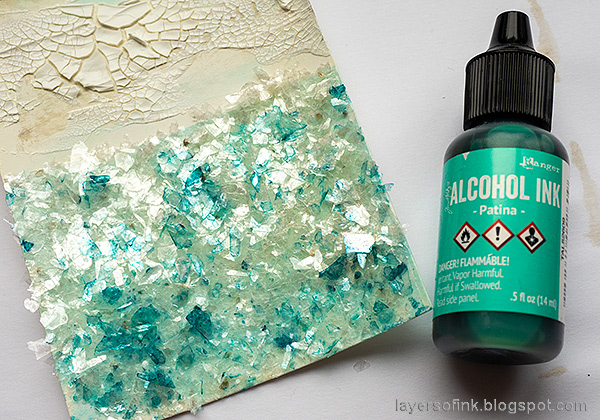
When the crackle paste dries, crackles will appear. Let the gloss paste dry too and then add some color to the mica flakes with Patina Alcohol Ink. Pounce up and down on the flakes with an ink blending tool and a felt applicator. This gives a cool varied look, instead of having colored all the flakes beforehand.
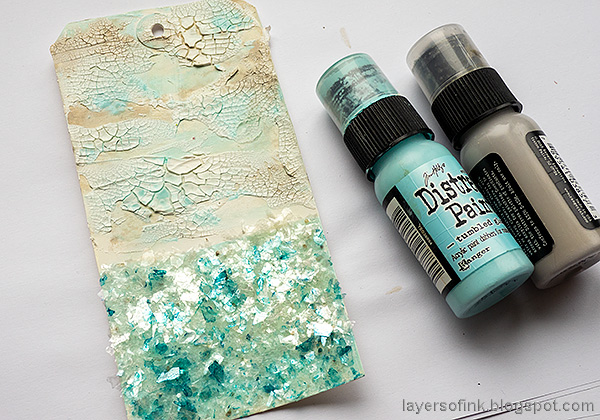
Add color to the crackled areas with watered down Tumbled Glass and Pumice Stone.

Die cut the SSS Lighthouse from watercolor paper and from grey cardstock. I actually ended up not using the grey matte piece shown on this photo, but instead die cut the lighthouse with the details once more from the grey cardstock.

Color the lighthouse with Scribble Sticks, by picking up the pigment with a paint brush from the tip of the crayons. I left the stones in the die cut paper, but removed the waves.

Stamp the Woodware Collection Make Art background stamp on Specialty Stamping Paper. Cut out the sentiments you want to use and have the rest ready for another project. It's such a great stamp.

Splatter some black dots on the lighthouse by dipping the black Scribble Stick in water and flicking a paint brush against the tip. Mount the watercolor lighthouse on the grey one, placing the latter a little to the side.

I added a small stamped zigzag piece behind the window at the top of the lighthouse.

Glue the sentiments to the background.

I also added an art pebble and stamped some birds on the background.

I love the look of crackle paste.

The reason for why I didn't use the solid lighthouse matte piece is that I wanted the mica flakes to show through the die cut in the wave areas.

I hope you will join us this week in our Crack It Up challenge. As always, you have a chance to win a $50 gift voucher to do some fun shopping at Simon Says Stamp. You have until next Monday 8am Ohio time. 1pm UK time, 2 pm CET to join in.


Do you use Instagram? If so please add #sssmchallenge so we can see your entries there too.


Thank you so much for taking the time to visit my blog today!
Happy crafting!
Anna-Karin
Supplies:
* Please note: the links are affiliate links, for which I receive a small percentage of sales generated by the link, at no extra cost to you.
* Please note: the links are affiliate links, for which I receive a small percentage of sales generated by the link, at no extra cost to you.
I'm glad this fabulous tag didn't blow away! All that crackled cloud texture is just amazing, as is the sparkle of the mica sea - just right for that fractured light reflected on choppy water. What a beauty!
ReplyDeleteAlison x
This is very cool. I love how you colored the mica flakes!
ReplyDelete