
Hi crafters! During October, the Eileen Hull Inspiration Team is sharing Fall and Halloween projects. I have another wrapped journal tutorial for you. These are so fun to make, and I had been wanting to make a felt journal for a while, so here it is.

Last month, I made a wrapped journal for myself from a piece of scrap leather, and my son badly wanted his own journal, but it had to be made from a piece of thick wool felt that he got in a surprise pack at a craft store recently. He had been waiting patiently for his journal and was happy when it was ready. The finished journal measures 4.7 x 5.1 in folded.

The wool felt I used is pretty thick and it was luckily just the right length. Die cut using the Wrapped Journal die, with this sandwich: Extended Cutting Pad, die facing up, felt, second Extended Cutting Pad. The XL dies fit perfectly through the ordinary Big Shot or Vagabond, all you need is a pair of Extended Cutting Pads.
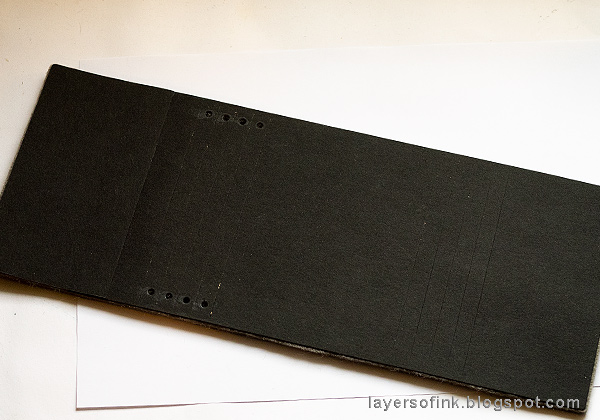
The felt wasn't sturdy enough as a cover, so I die cut another wrapped journal from black Sizzix Paper Leather. Paper Leather works great for this, since it is very strong, but also very flexible. I used it in my leather journal too. The sheets aren't quite big enough, so you will have to die cut the journal in two pieces, but since this is the inside cover, it doesn't really matter. Glue to the felt with matte medium.

When the glue was dry, I stitched around the journal with my sewing machine, both as a design element and to make sure the two parts of the cover were stuck together.

I tied this journal differently from the previous wrapped journals that I made. This one is tied more like how I normally tie journals made with the Journal die (here's an example). I punched a hole in the center of the spine, as you can see here.

The reason for punching that hole was that I wanted to thread the elastic string through that hole, so that it could become a closure mechanism at the same time. I wanted a closure mechanism that was stuck to the journal, otherwise it would quickly be lost.

I tied the strings through a button and then tied them at the end, so that they can be wrapped around the journal and keep it closed.

For the inside pages, I used mainly white and cream paper, but mixed it with some patterned papers, a couple of colored papers and some metallic papers. I found some of the papers in a folder from when I started making cards, so they have been in my stash for about seventeen years. Here's a fun fact, I can remember where I bought almost every paper (stamp and ink pad) that I own, and had fun thinking of the paper shop where I got these papers. It was also the shop where I got my very first rubber stamp. They only had a few stamps, but those stamps were the start of something big.
The papers were cut to about 7.7 x 4.7 in (19.5 x 12 cm) and folded in half. They were arranged into four signatures of about 6 papers each, and stitched down the center.

Tuck the signatures under the elastic strings.

I like that you can make new signatures and continue to use the journal for a long time.

Just a couple of photos of the various papers.

You don't have to stitch the signatures together, but I like to do it since it gives them a nice finished look and makes them stay together. You can also use staples or even leave them lose.

The finished journal has a very nice feel to it with the combination of the thick felt and the chunkiness of the journal as such. I die cut his name from wool felt using Tim Holtz's Letterboard die.

My son had been admiring the mushrooms that I used on last week's Autumn Gift Bag tutorial and on my Embossed Acetate Tag. They have also talked about mushrooms in school lately, so I die cut the mushrooms from felt for his journal, using the Tim Holtz Funky Foliage set. You could instead die cut flowers and leaves as I did for my leather journal, using one of Eileen's lovely flower dies and her Spring Leaves die.
Don't miss checking out all the fall inspiration from the Eileen Hull Inspiration Team this month.
Thank you so much for stopping by here today!
Happy crafting!
Anna-Karin
Supplies:
* Please note: the links are affiliate links, for which I receive a small percentage of sales generated by the link, at no extra cost to you.
I bought the Eileen Hull wrapped journal die after seeing all the lovely journals you make. Another masterpiece this one, wow!
ReplyDelete