
Hi crafters! Flowers are such fun to make and they work for so many themes and seasons. Today I have a Sizzix tutorial to share with you, for a pretty and easy dimensional rose, which I made as a gift to my Mom.

The rose was made with David Tutera's Rose Framelits set, and is much easier to make than what it might look like. I also made the pot/vase from paper, using Lynda Kanase's 3-D Geometric Holder set. I didn't glue the rose to the vase, so I can give my Mom more flowers so that she can change the flower in the vase now and then. Let's start.

The only surface I used for this entire project, was watercolor paper. I used the Canson Montval 200 g/m2 (100lbs) paper. You can also use other papers, as long as they can handle a bit of water. There are two sizes petals in the Rose set. Fold a piece of watercolor paper and place the dies along the folded edge as shown. Die cut using this sandwich: Multi Purpose Platform Tab 2, Cutting Pad, folded paper, die facing down, second Cutting Pad.

You need five of each, or more if you want a fuller flower.

I used Dina Wakley's Scribble Sticks to color my petals, since they are so easy and quick to use. You can also use watercolors or, for example, Distress Ink. The petals look horrible here, but it will all change with a bit of water. Color both sides, Lemon in the center, then Tangerine and last Sedona. The come from the Scribble Stick set 1 and set 2.

Die cut the center piece to and color on both sides as shown.
I totally forgot to take a photo of the step where you add water, but it is a simple process of loading a paint brush with water and working from the center out dissolving the pigment. I like to dab off excess color from the paint brush on a piece of paper towel.
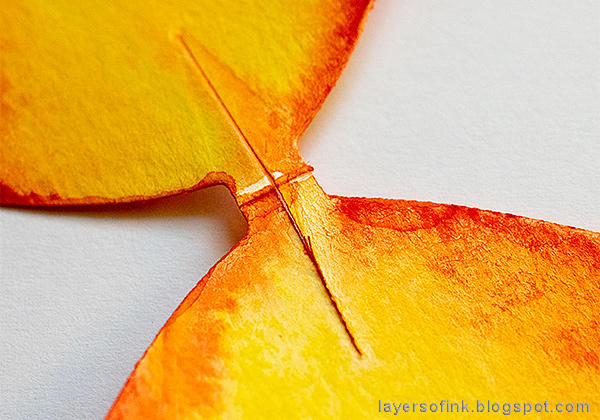
As you can see, the large petals have a slit in the center, this will help to give them dimension.

Fold one side of the slit over the other and glue and repeat on the other side of each petal pair. If you use hot glue, you have to take great care not to burn yourself. A small piece of Wonder Tape works well, or ordinary clear-drying white glue, or Ranger's Matte Medium. This step gives the petals more of a cup shape.
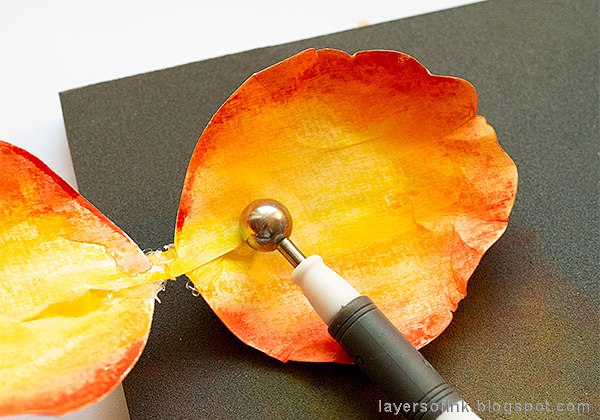
To shape them even more, I used the Paper Sculpting kit. Press with one of the ball tools, from the center towards the edges, working on the foam pad included in the kit. This gives great dimension and also breaks the fibers in the paper, making it easier to shape.

Use the Crease & Curl tool to shape the edges. It is very easy to use.

To shape some of the edges even more, I used the pair of tweezers included in the kit. You can also pinch the edges with the tweezers creating folds and slightly torn areas.

For the center of the rose, I curled up two of the smaller pairs of petals as shown in the lower part of this photo. I also rolled and glued the stamen piece.

Here is a better look at the center piece, fold one of the two curled petal pairs around the first one.

Assemble the rose, starting by gluing the larger pairs of petals together, altering their direction as you go. Continue with the three smaller pairs of petals. I cut off the lower part of the center petals that you see to the right, so that it wouldn't stick out. Again, be very careful if you use hot glue.

Glue the center petals into the rose and then add the stamen piece (or leave it out).

The pot is easy to make, using the same watercolor paper. Using the Geometric Holder set, die cut one base piece and five of the side pieces.

The pieces were colored on both sides, by applying Distress Ink to a non-stick craft sheet, misting with water and pressing the paper into the ink. I used Antique Linen and a tiny bit of Frayed Burlap. Fold along the score lines and adhere to the base piece as shown.

Assemble the pot by simply gluing all the flaps in place, one side at a time.
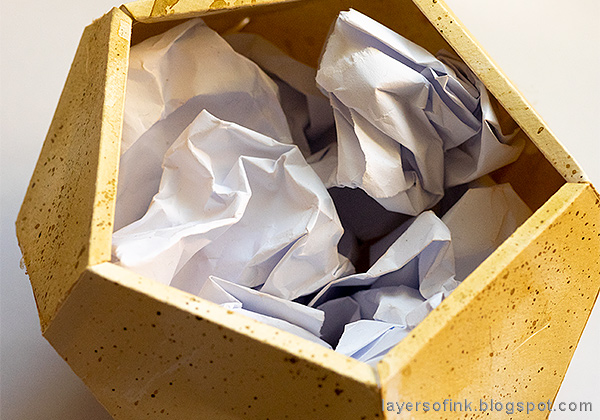
A very easy way of filling up the pot, is simply to scrunch up some paper and place in the vase.

Then I cut a piece of green felt and tucked it down over the pieces of paper. I splattered the pot with Ground Espresso ink for that textured look. Smear ink on a non-stick craft sheet, mist with water and pick up with a small paint brush. Tap the brush to create splatters.

Place the rose into the pot and you are done. If you want to, you can also add leaves, but I decided that I wanted just the rose and the pot for this project.

Here's a look at the project from the side. The project might be larger than you think, it is about 6 in tall and 4 in wide.
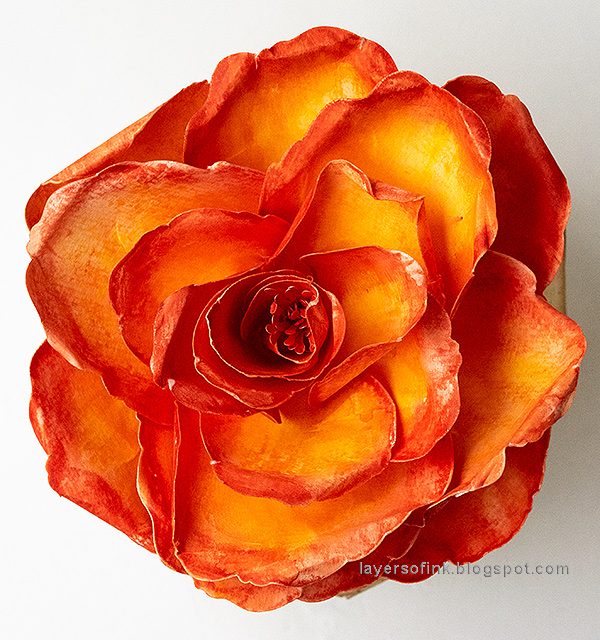
You can make the rose in any color you could think of, and this doesn't even need to be a rose, it can also be turned into other flowers. The finished size of the rose is 4 x 4 in.

Using Scribble Sticks is a very quick coloring method and it is fun too.

I hope you enjoyed this project and that it inspired you to make some paper flowers. For more paper flower inspiration, check out my recent Dahlia tutorial.
Happy Crafting!
Anna-Karin
Supplies:
* Please note: the links are affiliate links, for which I receive a small percentage of sales generated by the link, at no extra cost to you.
* Please note: the links are affiliate links, for which I receive a small percentage of sales generated by the link, at no extra cost to you.
No comments:
Post a Comment
Thank you so much for leaving a comment! Happy Crafting!