
Hello and welcome to my blog! I am happy to join the blog hop to celebrate the release of the Simon Says Stamp Fun and Festive collection. This is the last stop on the hop, and you should have arrived here from Mindy Baxter, and I am sure you got beautiful inspiration there. Don't miss all the inspiration in the hop, and of course, there is a giveaway too.

Fun and Festive is a versatile collection with both Christmas and more generally themed products. You can see the full Fun & Festive release here. I also have a special code to share with you, if you use the code FEST587, you get a free Festive Stickles with your order. The offer is valid until Sunday, 10/14 at 11:59 pm ET.
I have two projects to share with you today, and both are tutorials. The techniques can be used on almost any type of project.

The cute Winter Scene stamp set made me want to make a little dimensional winter scene and I thought it was the perfect size for an altered tin. I hadn't done an altered tin in quite a while, and it is such a fun little format. It's an Altoids tin - I have a good friend in the US who sends me Altoids and I am saving the tins for projects. This tin can hang in a Christmas tree, or from a hook, or be tied to a gift.

Here'a look at the front of the tin, which is also decorated.

These are the Fun & Festive products that I used for the altered tin: Snowflake Tags, Lined Circles stencil, and Winter Scene.

Start by stamping the background from the Winter Scene set on watercolor paper and use a torn paper as a mask to cover the hills when you stamp the mountains. The rest of the images were stamped elsewhere and later cut out. The background to the right ended up not perfectly stamped, so I just stamped images in the sky instead.

Use a masking pen to mask the stars, top of the mountain and areas on the snowy hills.
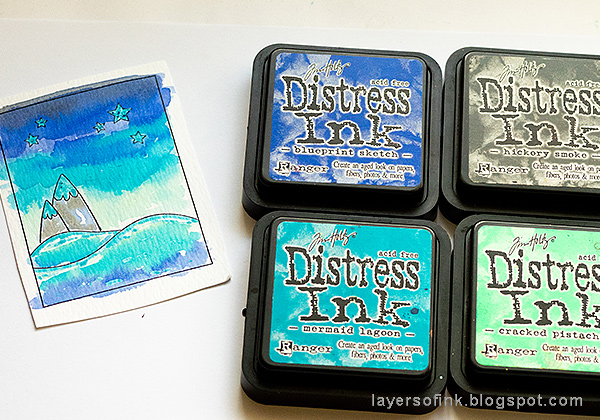
Smear Distress Inks on a craft sheet, mist with water and pick up with a paint brush. Watercolor the background.
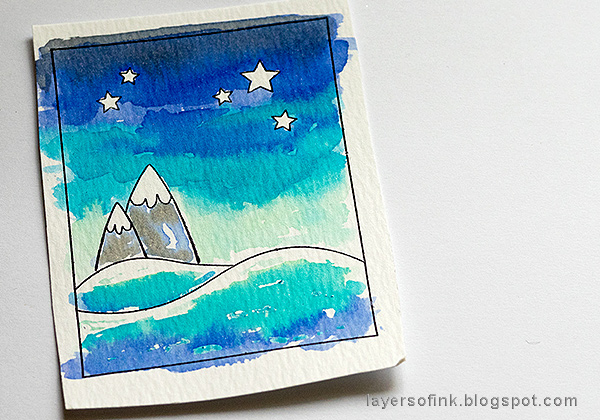
When dry, rub off the masking fluid.

Paint the stars yellow and watercolor the rest of the images. I like to use stamping mistakes to test out colors, as you can see in the middle.

Add snow to the sky with a white gel pen and a little bit of White Opal Liquid Pearls on the mountains and the top of the hills.

Cut two pieces of Heavystock paper and round the corners. Apply embossing paste with a palette knife, through the Lined Circles stencil and leave to dry.
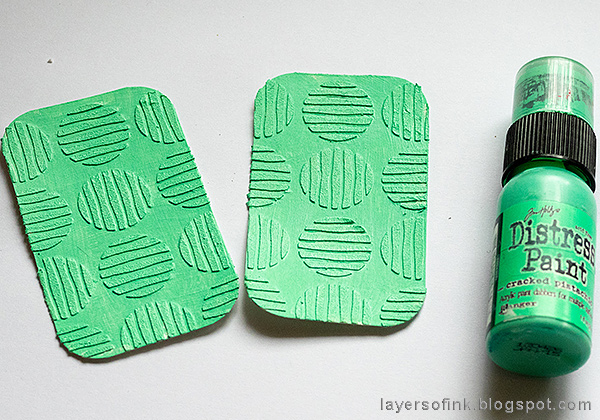
Paint with Distress Paint. Let dry.

Dry brush Blueprint Sketch and Picket Fence on the pieces to add texture and make the lines more visible.

Die cut the snowflake tags from watercolor paper. These are such fun designs. I especially like the one with the circle cut out.

Apply Distress Micro Glaze to the snowflakes to keep them white. Press Distress Inks on a craft sheet, mist with water and place the tags into the ink.

I painted the tin with gesso and then Gathered Twigs Distress Paint. Cut the background to size and round the corners, glue into the tin. I cut out the shapes with scissors, but it will be better to use the coordinated die set, especially since these shapes are small and detailed. The house, deer and one of the trees were adhered with foam tape.

To make the snow, I used embossing paste and covered it completely with Rock Candy Distress Glitter, which makes perfect snow.

Here's a closer look at the gel pen snow. You can also splatter acrylic paint.

Glue the two stenciled panels to the outside and inside of the lid. Inside the lid, I adhered one of the tags with foam tape, first stamping a sentiment on it.

The gumdrop heart was colored with alcohol ink.

One of the other tags were stamped with a sentiment and adhered on the front of the lid, using foam tape. I also added two leftover trees.

There is a Fluted Star in the center of the snowflake.

The edges of the tin were decorated with Design Tape. Add glue under the tape to make sure it sticks down well.

I glued a piece of cream paper and the third tag to the back of the tin. The tag then also functions as a hanger for the tin. All the sentiments are from the Winter Scene set.

My next project is a tag featuring the cute Big Picture Book Jack Russell die. It's a cute die and you can also turn it into other kinds of dogs. Our neighbors have a Jack Russell so she was my inspiration for this tag. It can also easily be turned into a card or perhaps an art journal page, and you can use the same techniques with all the Picture Book dies.

Start by die cutting the Jack Russell from watercolor paper.

Smear Distress Inks on a craft sheet, mist with water and pick up with a paint brush to watercolor the pieces. Leave some whites for highlights and texture.
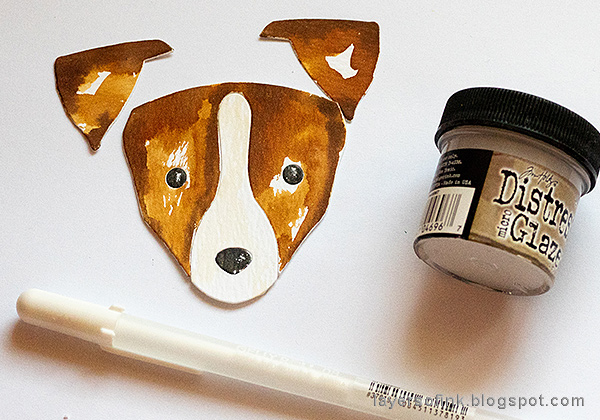
I wanted a little more white in the eyes and on her nose and used a white gel pen for that. To prevent the black ink from covering the white areas, I applied Micro Glaze to the eyes and nose, before gluing them in place.

To make my Jack Russell come to life, I applied Glossy Accents to the eyes and nose.

For the background, I worked on a Heavystock tag which had already been inked with a mix of Antique Linen and Frayed Burlap. Apply Distress Oxide ink with a blending brush through the Lined Circles stencil. The combination of Distress Oxide and the brush makes for a very soft look.
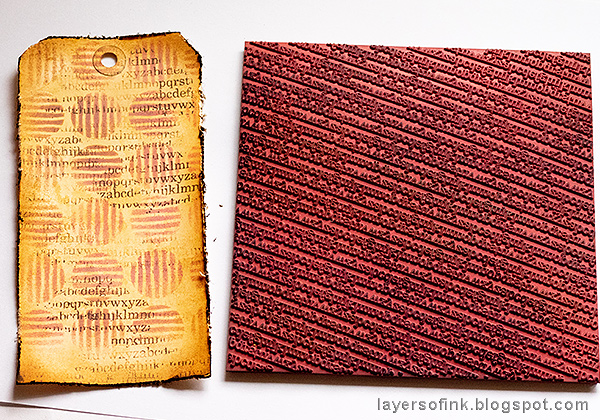
Distress and ink the edges. Stamp randomly with the SSS Tiny Alphabet background stamp.

Give some shape to the ears and add a piece of foam tape under the lower part of the ear, so that it looks like the top part goes behind her head, and the lower part stands out a little. The hearts in the background was die cut with the Clippings Hearts die.

Here's a look at the eye coated with Glossy Accents. I love Glossy Accents.

I also added some Design Tape to the background, for a quick extra detail.
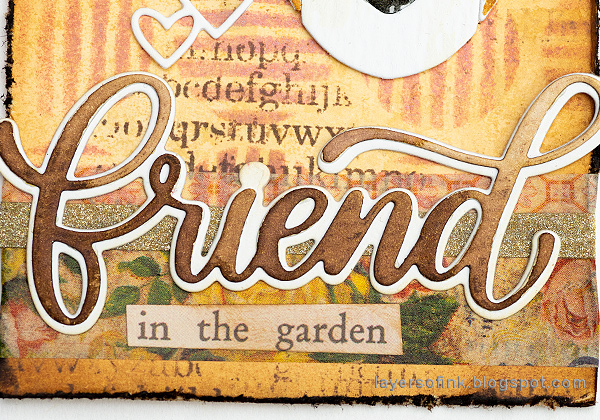
The sentiment was die cut with the Big Friend die from the Good Vibes collection, and accompanied with a Clippings Sticker.
Don't miss all the inspiration along the hop and of course there are prizes to be one too. On each stop of the hop a $25 gift voucher will be given to a random person who leaves a comment. The winners will be announced on the Simon Says Stamp blog on Wednesday. These are all the stops on today's hop:
Anna-Karin Evaldsson (you are here)
Thank you so much for stopping by here today! I hope you will have a lovely weekend and that you will get some creative time.
Happy crafting!
Anna-Karin
Supplies:
* Please note: the links are affiliate links, for which I receive a small percentage of sales generated by the link, at no extra cost to you.
Fabulous Anna! I love what you made with the release! So inspiring!
ReplyDeleteWow you made so many fabulous projects today! I love your idea of using tins. Makes me want to go buy some Altoids! LOL.
ReplyDeleteWow! Fabulous projects! The altered tin is just amazing!! <3
ReplyDeleteGreat step outs!! The altoid tin is amazing, and the Jack Russell is fabulous. Both have great dimension. The coloring is wonderful.
ReplyDeleteYou always have the most interesting projects! I have a "thing" for tins, but can never figure out what to do with them. This is inspiring. TFS.
ReplyDeletewhat a great idea. The box is adorable. Thanks for sharing.
ReplyDeleteThat's such a cool idea, it looks fabulous!
ReplyDeleteAnna-Karin, your projects are amazing! How beautifully your panels transform these tins into lovely gifts and the Jack Russell...oh my! Works of art, all!
ReplyDeleteChristmas spirit soaring in seeing your showcases...
~carol
These are really cool! Love all the layering and dimension you added to them.
ReplyDeleteWow, love all the details that went into these.
ReplyDeleteLove all of the new ideas!
ReplyDeleteAll are your cards are absolutely outstanding. Thanks for sharing.
ReplyDeleteLinda D.
Amazing! and thank you for the how to as well for this still beginning card and scrapbook making crafter! I appreciate it!
ReplyDeleteWhat beautiful projects! So full of details. Thanks for all the instructions.
ReplyDeleteI love all your creations! Thank you for the inspiration!
ReplyDeleteWow I love all your creations especially the tins, just stunning.
ReplyDeleteAwww!!! I'm totally in love for your amazing projects!!! Really cute!!!
ReplyDeleteDing Ding Ding, you win!! I can't believe your projects. I am going to have to go look at them again. AMAZING
ReplyDeleteBeautiful projects! Love the tin! Thanks for sharing how you made them!
ReplyDeleteWOW, love your creations, they are amazing!
ReplyDeleteFabulous and creative projects!! Thanks for the tips and ideas!
ReplyDeleteHow cute! I'm saving those tins from now on! You are very clever and creative and ended this blog on a "fun and festive note".
ReplyDeleteSuch gorgeous creations! Love them.
ReplyDeleteI love what you created!
ReplyDeleteThese are Really Awesome!! I love your tin!!!
ReplyDeleteoooh I can tell that you had a blast using these products - thanks so much for sharing your creativity with us:)
ReplyDeleteSuch beautiful projects! I especially love that altered tin!
ReplyDeleteLove how you put an entire scene on a tag!
ReplyDeleteWonderful creations - I love your mixed media tin, and that dog tag is so adorable!
ReplyDeleteYour makes are so gorgeous, all of them! The altered tin is my favourite, for sure - such a different project, and so beautifully done!
ReplyDeleteI'm blown away! This blog hop really saved the best for last as far as I'm concerned! And the Jack Russell...oh my heart! Looks like my Billy!
ReplyDeleteThere's so much detail here it's incredible!
ReplyDeleteGreat projects you created for this hop today. Thanks for sharing all the tips and techniques you used.
ReplyDeleteOh my goodness, I adore these! Perfect! TFS!
ReplyDeleteGorgeous projects! Thank you for the tutorial.
ReplyDeleteYour altered tin is amazing! Love the winter scene and those tags really look perfect together! Your tag with the dog on it as well....brilliant! Love his sweet face!
ReplyDeletefabulous projects. Love your altered tin. What a cleaver idea. TFS
ReplyDeleteHow fun is this project!
ReplyDeleteStunning designs and super happy creation!
ReplyDeleteWhat a cute tin and darling tag!
ReplyDeleteI love that you took this hop in a different direction! Thanks for sharing your talent!
ReplyDeleteSo many lovely holiday projects!
ReplyDeleteI have never heard of a masking pen. What a great tool!
ReplyDeleteOMG, your puppy is soooo cute!! I love how you colored him!
ReplyDeleteAnd your altered tin is beautiful! They are fun, aren't they?
I made my Mom a 2 tin set/advent calendar a couple years ago.
Your colors are just striking! I love the altered tin idea.
ReplyDeleteAbsolutely stunning!! You sure put a lot into this blog and it is AWESOME!! Thanks so much for the ideas!♥️
ReplyDeleteWow...your work is so creative!! Love your use of colors and how you used the tin.
ReplyDeleteLovely projects!
ReplyDeletelove your ideas. thank u for sharing.
ReplyDeleteYour little altoid tin is sooo cute. And I love the watercoloring of the jack russell terrier. Wonderful, wonderful projects.
ReplyDeleteWonderful tin, love all your creative tags too.
ReplyDeleteBeautiful projects! Wow, that tin was a lot of work but the results are amazing! This would be lovely hanging on a Christmas tree. Your tag is adorable. One of my daughters has a Jack Russell mix and would absolutely love this tag!
ReplyDeleteFun and creative ideas, thanks for sharing!
ReplyDeleteVery cool creations. LOVE the dog!
ReplyDeleteYour coloring is amazing! So many cool techniques with the distress inks!
ReplyDeleteWow, absolutely amazing creations! Gorgeous layers of elements and fantastic designs. Stunning execution.
ReplyDeleteBeautiful work! I think I love the jack Russell the best since I have had 11 of them over the years! They are my all time favorite dog. Now, after seeing what you did with this, I am going to have to get the die!!! Love it!!!
ReplyDeleteFabulous cards -- each and every one a gem. Love the coloring on the dog!
ReplyDeleteBeautiful work, love the new collection.
ReplyDeleteLove it all 😍
ReplyDeleteVery neat idea
ReplyDeleteWonderful creativity. The tin scene is wonderful. Like all the coloring.
ReplyDeleteMelissa
"Sunshine HoneyBee"
Wow your scene is just darling!! And all your techniques, I definitely want to try!!
ReplyDeleteI LOVE your projects! Oh my! That tin! That Jack Russell! Eek! I think I'm even going to print these for inspiration!
ReplyDeleteLove what you made with this release. So clever!
ReplyDeleteI love mixed media and altered art projects and these altered tins are amazing! I love your painting on the Winter Scene, it is gorgeous. Thank you for sharing my mind is swirling with ideas now, I can't wait to get started! (mardy14@bellsouth.net)
ReplyDeleteI learned some new techniques, thank you! Beautiful cards!
ReplyDeleteKaren Romero
Love this Fun & Festive release! Love your charming altered tin project! Such a pretty scene, and beautifully colored! Adorable tag with that cute pup too!
ReplyDeleteA “fun and festive” project!! Love your altered tin and sketchy watercolor scene! The Jack Russell tag is great too!
ReplyDeleteWhat a great variety of projects. Thanks for the tips about the ears on the dog, really makes a difference. :)
ReplyDeleteWow! I'm so glad I found you! Your projects are just amazing! Your altered tin is brilliant! And the doggy just came to life with your expert painting! So impressive. You did Simon Says Stamp proud with this creative blog post! ❄️🐶🎄
ReplyDeleteGorgeous creations, Anna-Karin! I love your wonderfully creative ways to use this great new release! Thanks so much for the inspiration!
ReplyDeleteLove the altered tin
ReplyDeleteSuch beautiful projects! The new release is really great!
ReplyDeleteWow, your work is so amazing. And this is the first time I'm hearing about a masking pen! I've seen people use masking paper but never a pen. It looks so much easier than using paper. I love your altoid tin. So cool!
ReplyDeleteWhat a fun piece! I love how you created the pieces for the inside especially!
ReplyDeleteYour creativity is always so inspiring Anna-Karin. Anything tag related ALWAYS gets my attention. Thanks for the great tutorials on both projects, very inspiring, indeed!
ReplyDeleteWow!!! Both of your projects are amazing!!! Thank you for taking the time to post step out photos and instructions for each one of them. I really appreciate it. I just love both of these! :)
ReplyDeleteWonderful art projects. Love the altered tin.
ReplyDeleteThanks for sharing...
Fabulous tags!
ReplyDeleteYour altered tin is so precious! I love small creations like that. Thanks for sharing!
ReplyDeleteYour projects are awesome!! The addition of snow in the altered tin is fabulous and the Jack Russell is so sweet. Love them both!
ReplyDeleteThese are awesome!
ReplyDeleteAwesome!
ReplyDeleteBoth projects are just darling!
ReplyDeleteWow, love to see that you made something totally different than all the others on the hop. I love the gorgeous tags you made and are now thinking that I just thrown away a little tin where I could have made such an awesome piece of art as you. It's a pitty, but I will keep it in mind for the next tin. Thank you so much for showing.
ReplyDeleteFantastic idea. Great way to
ReplyDeletepresent a small gift and leave
the recipient with a reminder
of that gift. thanks for
sharing. txmlhl(at)yahoo(dot)com
Not my style, but very cute. Love the little tin.
ReplyDeleteYou are super talented! The altered tin is great. The Jack Russel tag amazing.
ReplyDeletesuch fun projects!!!
ReplyDeleteWow, your projects have so much texture and detail! :)
ReplyDeleteI love seeing designers make projects like this. It's totally outside my wheelhouse, but I still learn so much. Thank you for sharing your creative vision with us!
ReplyDeleteAnna-Karin always love your projects... so much inspiration ! I learn something all the time... I did not know there was a masking pen!
ReplyDeleteBeautiful work! Love the artsy look! Great tin!
ReplyDeleteGreat projects!! Thanks for the detailed instructions, so helpful.
ReplyDeleteyour projects are fabulous! the little tin of tags, etc. is just gorgeous!
ReplyDeleteThank you for sharing all the fabulous projects! The little tin of tags is wonderful! Loved all the details and instructions!
ReplyDeleteInspirational projects!! I love the tin with the winter scene!! So beautiful!! The dog looked so real!!
ReplyDeleteYou are so very talented... your projects rock!!! I loved seeing all the steps to see how you incorporated all the new products!
ReplyDeleteWOW! These projects are amazing! And I am sure they are even more beautiful in person. Thanks for sharing them with us!
ReplyDeleteUsing Altoid tins for Christmas tree decorations or gift tags is perfect! What a clever idea. Beautiful use of colors and mixed media!
ReplyDeleteLove these tins!! Something different is always nice to see and inspires me to be adventurous and think outside the box. Your striped circles backgrounds are gorgeous! Love them!!
ReplyDeletewow--love all your projects. Thanks for sharing how you used the altoid tin.
ReplyDeleteAdorable cards & tags! What blew me away was that awesome tin you created...would never have thought to do that...beautiful!
ReplyDeleteVery nice projects
ReplyDeleteSimply delightful!! Love that little pup!
ReplyDelete