Thursday, July 25, 2024

Vellum and Acetate card

Hi friends! Today Simon Says Stamp has a brand new release called Cheering For You. I have a card to share made with some of the products from the release.

Please note: this post has affiliate links, for which I receive a small percentage of sales generated by the link, at no extra cost to you.

Simon Says Stamp Cheering for You
The Cheering for You release is filled with stunning new stamps, dies, embossing folders, stencils and other products. You can find the whole release here.

Layers of ink - Vellum and Acetate card tutorial by Anna-Karin Evaldsson.

I made a card with a combination of dry embossed acetate and vellum. The Cheering for You release includes Clear Acetate Cards, which inspired my card. I used the Tumbling Flowers Embossing Folder and Cutting Die. The colored flowers were die cut and embossed with the same set.

Layers of ink - Vellum and Acetate card tutorial by Anna-Karin Evaldsson. Emboss the acetate.

Start by dry embossing the front of the Simon Says Stamp Clear Acetate Card in the Tumbling Flowers folder.

Layers of ink - Vellum and Acetate card tutorial by Anna-Karin Evaldsson. Dry emboss vellum.

Next I folded Simon Says Stamp vellum and embossed the front.

Layers of ink - Vellum and Acetate card tutorial by Anna-Karin Evaldsson. Die cut and emboss the flower.

Die cut three flowers with the die included in the Tumbling Flowers set, from watercolor paper and emboss in the embossing folder. The coordinating flowers is a little bit below the middle of the folder, to the left.

Layers of ink - Vellum and Acetate card tutorial by Anna-Karin Evaldsson. Ink with Distress Ink.

Smear Distress Inks on a non-stick craft sheet and mist with water. Pick up with a paintbrush and watercolor the flowers.

Layers of ink - Vellum and Acetate card tutorial by Anna-Karin Evaldsson.

When the ink is dry, add some lines with a white gel pen.

Layers of ink - Vellum and Acetate card tutorial by Anna-Karin Evaldsson. Stamp and die cut you.

Ink YOU from the Simon Says Stamp You set with Pumice Stone Distress Ink and mist with water. Stamp on watercolor paper. Repeat with Lost Shadow. Die cut with the coordinating You die. Also die cut from Simon Says Stamp White Glitter cardstock.

Layers of ink - Vellum and Acetate card tutorial by Anna-Karin Evaldsson.

Layer the two grey words as shown and then glue to the glitter die cut. Adhere with Simon Says Stamp Pawsitively Perfect Foam tape. The smaller sentiment also comes from the You set and was stamped with grey ink on white paper.

Layers of ink - Vellum and Acetate card tutorial by Anna-Karin Evaldsson.

The layered acetate and vellum gives a shiny, yet translucent look to the card. The embossed vellum gives a more defined look to the embossed images. I also added some sequins.

Layers of ink - Vellum and Acetate card tutorial by Anna-Karin Evaldsson.

Adhere the flowers with foam tape too.

Layers of ink - Vellum and Acetate card tutorial by Anna-Karin Evaldsson.

I pierced holes along the spine and tied with gold DMC floss.

Layers of ink - Vellum and Acetate card tutorial by Anna-Karin Evaldsson.

This was a hard card to photograph, as is often the case with very shiny cards. 

Layers of ink - Vellum and Acetate card tutorial by Anna-Karin Evaldsson.

I will see you again tomorrow for more Simon Says Stamp Cheering For You inspiration.


Thank you so much for stopping by here today! 


Anna-Karin

Supplies:

* Please note: the links are affiliate links, for which I receive a small percentage of sales generated by the link, at no extra cost to you.


Monday, July 22, 2024

Matchbox filled with words

Hello crafters! It is Monday and I hope you had a good weekend with some crafty time!

Please note: this post has affiliate links, for which I receive a small percentage of sales generated by the link, at no extra cost to you.


This week our challenge theme at the Simon Says Stamp Monday Challenge Blog is Add a Sentiment. I hope you will join us and don't miss the project by our July guest designer Laura Cassina

Layers of ink - Matchbox filled with words tutorial by Anna-Karin Evaldsson.

I made a matchbox and couldn't use just one sentiment, but instead filled the box with sentiments. Almost as if it is a little box holding a lot of secrets. The box was made with Tim Holtz Vault Matchbox set and I used a bunch of different butterfly stamps to embellish it and the cards.

Layers of ink - Matchbox filled with words tutorial by Anna-Karin Evaldsson.

There are seven sentiment cards in the box.

Layers of ink - Matchbox filled with words tutorial by Anna-Karin Evaldsson. Die cut with Tim Holtz Matchbox.

Start by die cutting the box with the Vault Matchbox die from heavystock paper. Fold along the scorelines.

Layers of ink - Matchbox filled with words tutorial by Anna-Karin Evaldsson. Ink with Distress Ink.

Ink the box with Distress Ink. I also die cut a card for the top of the box.

Layers of ink - Matchbox filled with words tutorial by Anna-Karin Evaldsson.

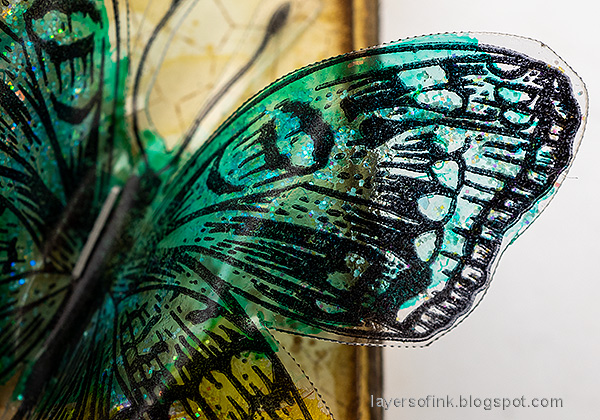
Stamp one of the butterflies from Tim Holtz Flutter on acetate. 

Layers of ink - Matchbox filled with words tutorial by Anna-Karin Evaldsson. Color with alcohol ink.

Cut out and color on the back with alcohol ink.

Layers of ink - Matchbox filled with words tutorial by Anna-Karin Evaldsson.

Gently heat with a heat tool and shape the acetate. Be careful as this might not work with all types of acetate. I used Wendy Vecchi Clearly for Art Modeling Film.

Layers of ink - Matchbox filled with words tutorial by Anna-Karin Evaldsson.

Die cut seven cards from inky paper. Stamp sentiments and small images on the cards. Mist the images with water after inking. Also stamp a sentiment inside the box.

Layers of ink - Matchbox filled with words tutorial by Anna-Karin Evaldsson. Stamp with Simon Says Stamp Stained Glass.

Stamp here and there with Simon Says Stamp Stained Glass, for texture.

Layers of ink - Matchbox filled with words tutorial by Anna-Karin Evaldsson.

Ink the edges and assemble the box.

Layers of ink - Matchbox filled with words tutorial by Anna-Karin Evaldsson.

I added Moon Dust Stickles Glitter Gel to the back of the butterfly, but forgot to take a photo of that step.

Layers of ink - Matchbox filled with words tutorial by Anna-Karin Evaldsson.

A part of a Tim Holtz Tiny Text sentiment was stamped on the front.

Layers of ink - Matchbox filled with words tutorial by Anna-Karin Evaldsson.

I stamped words from Simon Says Stamp Forest Scenery on both sides of the box. I messed up the stamping of 'peaceful' and restamped and cut into a strip. 

Layers of ink - Matchbox filled with words tutorial by Anna-Karin Evaldsson.

When you open the box you will find a little treasure of words.

Layers of ink - Matchbox filled with words tutorial by Anna-Karin Evaldsson.

I used a mix of stamps by Simon Says Stamp and Tim Holtz for the sentiments and images.

Layers of ink - Matchbox filled with words tutorial by Anna-Karin Evaldsson.

Mist the stamp with water after inking for a watercolor effect.

Layers of ink - Matchbox filled with words tutorial by Anna-Karin Evaldsson.

The remaining four cards. The long sentiment comes from Tim's Urban Chic, the sentiment to the bottom left is from Simon Says Stamp Extra Proud and the remaining two sentiments are from Tim's Tiny Text.

Layers of ink - Matchbox filled with words tutorial by Anna-Karin Evaldsson.

The birds come from Tim Holtz Mini Ornates.

Layers of ink - Matchbox filled with words tutorial by Anna-Karin Evaldsson.

The stamp at the top is one of my youngest son's favorite sayings.

Layers of ink - Matchbox filled with words tutorial by Anna-Karin Evaldsson.

All the little cards and the box itself.

Layers of ink - Matchbox filled with words tutorial by Anna-Karin Evaldsson.

Die cut the side pieces from kraft cardstock and sand to reveal the texture.

Join us this week in our Add a Sentiment! You have a chance to win a $25 gift voucher to do some fun shopping at Simon Says Stamp. You have until Monday 8am Ohio time. 1pm UK time, 2 pm CET to join in.


Do you use Instagram? If so please add #sssmchallenge so we can see your entries there too.


Thank you so much for stopping by here today! 

Happy crafting!

Anna-Karin

Supplies:

* Please note: the links are affiliate links, for which I receive a small percentage of sales generated by the link, at no extra cost to you.


Sunday, July 21, 2024

Bold Botanicals Tutorial

Hi crafters! I hope you are well! Today I have found cards to share. They are small, but with a lot of punch.

 Please note: this post has affiliate links, for which I receive a small percentage of sales generated by the link, at no extra cost to you.

Layers of ink - Bold Botanicals Tutorial by Anna-Karin Evaldsson.

The cards were made with Tim Holtz Bold Botanicals and Simon Says Stamp Bold Botanicals die set. The coordinating die set makes it easy to do a whole bunch of techniques with these stamps. The dies are from the Sunny Vibes release. My cards are about 3.2 x 4 in. 

Layers of ink - Bold Botanicals Tutorial by Anna-Karin Evaldsson. Stamp Tim Holtz Bold Botanicals.

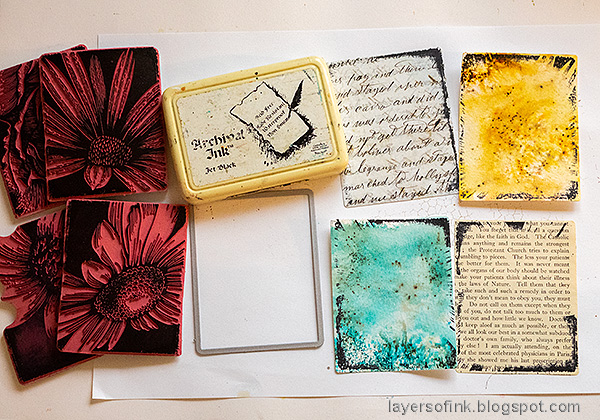
Start by stamping the four Bold Botanicals stamps on watercolor paper and old book paper. I used the MISTI when stamping, since you might stamp more than once, especially on the textured watercolor paper.

Layers of ink - Bold Botanicals Tutorial by Anna-Karin Evaldsson. Watercolor with Gansai Tambi.

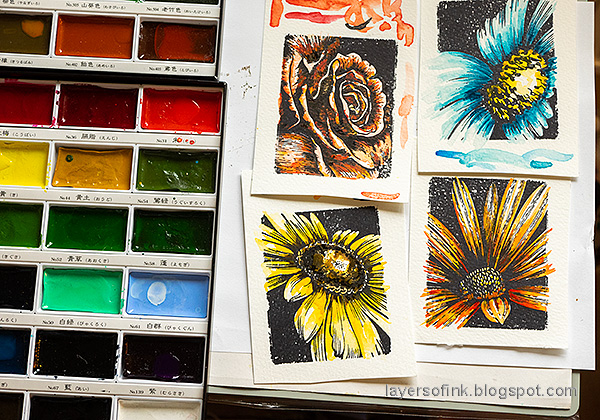
Watercolor the flowers with Tsukineko Gansai Tambi watercolors. As you can see, I often test the colors on the parts of the paper that I know will be cut off.

Layers of ink - Bold Botanicals Tutorial by Anna-Karin Evaldsson. Die cut with Simon Says Stamp Bold Botanicals.

Die cut the old book images with the coordinating Simon Says Stamp Bold Botanicals dies.

Layers of ink - Bold Botanicals Tutorial by Anna-Karin Evaldsson.

Die cut the colored flowers with the same dies. I used a strip of Simon Says Stamp Very Very Low Tack tape to keep the dies in place.

Layers of ink - Bold Botanicals Tutorial by Anna-Karin Evaldsson. Add details with a white and a black pen.

Add details with a white gel pen and a black pen.

Layers of ink - Bold Botanicals Tutorial by Anna-Karin Evaldsson.

I inked the stamps around the edges only and stamped on various papers: Tim Holtz Backdrops paper, inky papers and an old book paper. Die cut with the coordinating frame die. I didn't want the entire black area, but only a distressed frame.

Layers of ink - Bold Botanicals Tutorial by Anna-Karin Evaldsson.

Use Tim Holtz Shaping Kit to add shape to the colored flowers. I used an older shaping kit by Sizzix, Tim's tools are black in color.

Layers of ink - Bold Botanicals Tutorial by Anna-Karin Evaldsson. Stamp with Simon Says Stamp Old Letter.

Stamp the two inky backgrounds with Simon Says Stamp Old Letter.

Layers of ink - Bold Botanicals Tutorial by Anna-Karin Evaldsson. Adhere with foam tape.

Glue the old book paper flower to the background first and then adhere the colored flowers with two layers of Simon Says Stamp Pawsitively Perfect foam tape. Place the tape under the parts that you want to keep the most dimensional. As you might see, I by mistake adhered the yellow flower the wrong way around.

Layers of ink - Bold Botanicals Tutorial by Anna-Karin Evaldsson.

Since I had both stamped the frame and adhered this flower the wrong way around, I decided that it was okay with upside down script text instead. You don't really see it unless you know it. I used different color combinations of cardstock for all the cards.

Layers of ink - Bold Botanicals Tutorial by Anna-Karin Evaldsson.

Here you might be able to see the dimension better. 

Layers of ink - Bold Botanicals Tutorial by Anna-Karin Evaldsson.

The white pen adds highlights to the flowers and you can use the black pen to add back details or add new details.

Layers of ink - Bold Botanicals Tutorial by Anna-Karin Evaldsson.

The sentiment sticker was glued to cream cardstock and then adhered with foam tape.

Layers of ink - Bold Botanicals Tutorial by Anna-Karin Evaldsson.

The next card has a yellow/orange/brown color combo. 

Layers of ink - Bold Botanicals Tutorial by Anna-Karin Evaldsson.

Leave some of the paper without paint to preserve highlights.

Layers of ink - Bold Botanicals Tutorial by Anna-Karin Evaldsson.

This card also has a lot of dimension. Shaping the colored flowers adds a lot of interest to these cards.

Layers of ink - Bold Botanicals Tutorial by Anna-Karin Evaldsson.

The sentiment was adhered to kraft paper.

Layers of ink - Bold Botanicals Tutorial by Anna-Karin Evaldsson.

And finally, the rose, adhered to the Backdrops paper. 

Layers of ink - Bold Botanicals Tutorial by Anna-Karin Evaldsson.

It is difficult to see the dimension added by the shaping tools. But it is there.

Layers of ink - Bold Botanicals Tutorial by Anna-Karin Evaldsson.

The blue flower was also loosely colored, leaving quite a bit of the white of the paper showing. It was adhered to two blue papers and black folded cardstock.

Layers of ink - Bold Botanicals Tutorial by Anna-Karin Evaldsson.

Without the white pen work, the flowers would have looked darker.

Layers of ink - Bold Botanicals Tutorial by Anna-Karin Evaldsson.

The sentiment was again mounted on cream paper.


Don't miss the new Sunny Vibes release.

Thank you so much for stopping by here today! 


Anna-Karin

Supplies:

* Please note: the links are affiliate links, for which I receive a small percentage of sales generated by the link, at no extra cost to you.