Tuesday, October 24, 2023

Witch's Brew Halloween Scene

Hi friends! Every year I make new Halloween decorations and today I am sharing a little scene from a witch's backyard.

Please note: this post has affiliate links, for which I receive a small percentage of sales generated by the link, at no extra cost to you. 

Layers of ink - Witch's Brew Halloween Scene Tutorial by Anna-Karin Evaldsson.

I made a little Halloween scene from a witch's yard or kitchen, using various of different items and scary bubbling brews. There is also a magic crystal ball, a skull, spooky black goo, bones and a spider. The scene glows in the dark since Ranger's Glow Grit Paste was used. The project was made with a bunch of Tim Holtz products.

Layers of ink - Witch's Brew Halloween Scene Tutorial by Anna-Karin Evaldsson.

I like round scenes, which look different if you turn them around and display them from different angles.

Layers of ink - Witch's Brew Halloween Scene Tutorial by Anna-Karin Evaldsson.

The stick from the broom had broken in transit and I replaced it with a twig from the garden.

Layers of ink - Witch's Brew Halloween Scene Tutorial by Anna-Karin Evaldsson. Make the base.

For the base, I cut a circle from Sizzix Little Sizzles Mat board and covered it with Black Opaque Texture Paste. Wood Slices were placed into the paste. Let dry.

Layers of ink - Witch's Brew Halloween Scene Tutorial by Anna-Karin Evaldsson. Paint with Distress Paint.

The cork base of the Display Dome was painted with Ground Espresso. I also added some paint to the skull and the bones.

Layers of ink - Witch's Brew Halloween Scene Tutorial by Anna-Karin Evaldsson. Color with alcohol ink.

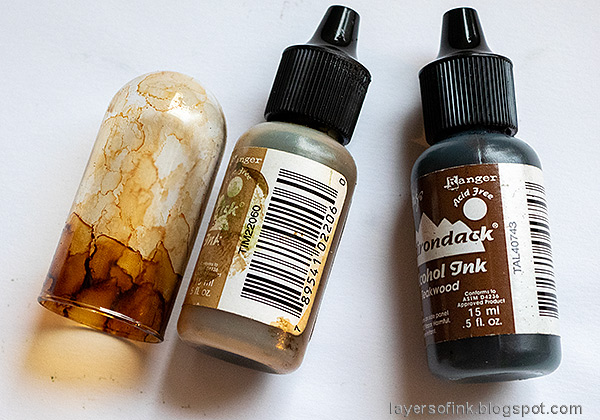
The dome was colored with alcohol ink, making it darker toward the bottom.

Layers of ink - Witch's Brew Halloween Scene Tutorial by Anna-Karin Evaldsson. Add Ranger Glow Grit Paste.

I filled the pot with Glow Grit Paste and placed Bubbles, pearls, jewels, two bones and a stick for stirring into the pot. The broom and the pot come from Tim's Graveyard set.

Layers of ink - Witch's Brew Halloween Scene Tutorial by Anna-Karin Evaldsson. Magic glass ball.

Turn a candle stick from The Manor around and you get a small table instead. To make the crystal ball, I added a little Glow Paste on top of the 'table' and placed an Idea-ology Bubble into the paste. This will keep the ball in place, while also giving a glow-in-the-dark effect through the ball. I added mica flakes to the base.

Layers of ink - Witch's Brew Halloween Scene Tutorial by Anna-Karin Evaldsson.

Place the Display Dome on top and you have a crystal ball on a small table inside the dome.

Layers of ink - Witch's Brew Halloween Scene Tutorial by Anna-Karin Evaldsson.

Add Black Opaque Paste to the base, but leave some of the wood showing. Place the items into the paste and it will function as an adhesive. I also sprinkled some mica flakes into the paste and added Bubbles and pearls.

Layers of ink - Witch's Brew Halloween Scene Tutorial by Anna-Karin Evaldsson.

The tree was made from twigs I found outdoors and pressed into one of the openings in the wood slice base. Plan the scene before placing the items down into the paste.

Layers of ink - Witch's Brew Halloween Scene Tutorial by Anna-Karin Evaldsson.

Let some of the Glow Paste flow and bubble outside of the pot for a fun effect. I used Tim Holtz Bubbles, Studio Katia Poseidon Crystals and Buttons Galore Peach pearls.

Layers of ink - Witch's Brew Halloween Scene Tutorial by Anna-Karin Evaldsson. Make a tree from twigs.

Glow Paste was added to the bones to. The metallic Word Tags hang from the branches of the tree.

Layers of ink - Witch's Brew Halloween Scene Tutorial by Anna-Karin Evaldsson. Black thirteen.

These Bubbles look black, but are clear. They pick up the dark shades from the paste and the base of the pots.

Layers of ink - Witch's Brew Halloween Scene Tutorial by Anna-Karin Evaldsson. Poison bubbling.

I added Glow Paste into the Jack-o-Lantern cat too and sprinkled Mica Flakes on top. A spider was glued to the cat.

Layers of ink - Witch's Brew Halloween Scene Tutorial by Anna-Karin Evaldsson. Spooky eyes.

I added some Distress Paint to the cat too and the eyes and mouth glow in the dark.

Layers of ink - Witch's Brew Halloween Scene Tutorial by Anna-Karin Evaldsson. Add mica flakes.

I just love Mica Flakes.

Layers of ink - Witch's Brew Halloween Scene Tutorial by Anna-Karin Evaldsson. Ideaology skull.

You can add lots of different little items to the scene.

Layers of ink - Witch's Brew Halloween Scene Tutorial by Anna-Karin Evaldsson.

I rubbed a little paint into the words.

Layers of ink - Witch's Brew Halloween Scene Tutorial by Anna-Karin Evaldsson.

It was hard to get good photos of the glow-in-the-dark effect here. As you can see, even the broom handle glows. 

Layers of ink - Witch's Brew Halloween Scene Tutorial by Anna-Karin Evaldsson. The glow effect.

The pots, brews and crystal ball are the coolest when they glow.

Layers of ink - Witch's Brew Halloween Scene Tutorial by Anna-Karin Evaldsson.

And there is a glow from the eyes of the cat too. For more glow-in-the-dark inspiration check out my Beware Pumpkins and Glow-in-the-dark Halloween Decor tutorials.


Thank you for stopping by here today!

Happy crafting!

Anna-Karin

Supplies:

* Please note: the links are affiliate links, for which I receive a small percentage of sales generated by the link, at no extra cost to you.


Monday, October 23, 2023

Beware Pumpkins

Hello crafters and welcome to my blog! It is a new week and I hope you had a good weekend. We spent a lot of time outdoors this weekend, luckily without much rain.

Please note: this post has affiliate links, for which I receive a small percentage of sales generated by the link, at no extra cost to you.


This week we have a Spooky theme at the Simon Says Stamp Monday Challenge Blog. I hope you will join us! Don't miss our two guest designers this week: Teresa York and Gitta Roolf.

Layers of ink - Pumpkins card glow in the dark tutorial by Anna-Karin Evaldsson.

My project isn't that spooky, but feature somewhat crazy pumpkins on a textured dry embossed background. The bats and the faces of the pumpkins glow in the dark and you can see the effect towards the end of the post. I used mainly Tim Holtz dies and an embossing folder to create the card.

Layers of ink - Pumpkins card glow in the dark tutorial by Anna-Karin Evaldsson. Die cut Tim Holtz Edison Colorize.

Start by die cutting Edison Colorize from heavystock paper.

Layers of ink - Pumpkins card glow in the dark tutorial by Anna-Karin Evaldsson. Ink with Distress ink.

Ink the two pieces which will go in the back with Mustard Seed and Antique Linen. By inking them with different colors, the glow paste will also get a different shade.

Layers of ink - Pumpkins card glow in the dark tutorial by Anna-Karin Evaldsson. Coat with Ranger Glow Paste.

Add a layer of Glow Grit Paste to the base pumpkins with a palette knife.

Layers of ink - Pumpkins card glow in the dark tutorial by Anna-Karin Evaldsson. Color the pumpkin green.

Apply Distress Ink to a non-stick craft sheet, mist with water and press the pumpkins into the ink. Let dry and repeat until you are happy with the look. Make the pumpkin that goes in the middle of the stack darker for a shadow effect.

Layers of ink - Pumpkins card glow in the dark tutorial by Anna-Karin Evaldsson. The orange pumpkin.

Repeat for the orange pumpkin. I changed my mind about the middle one and die cut it from Tim Holtz Deco sheets instead. Adhere the sheet to cardstock first.

Layers of ink - Pumpkins card glow in the dark tutorial by Anna-Karin Evaldsson. Stamp with Simon Says Stamp Crackle Background.

Stamp the orange pumpkin with Simon Says Stamp Crackle Background and Potting Soil ink.

Layers of ink - Pumpkins card glow in the dark tutorial by Anna-Karin Evaldsson.

Stamp the green pumpkin with green ink. I added more crackles to the green pumpkin.

Layers of ink - Pumpkins card glow in the dark tutorial by Anna-Karin Evaldsson. Color with Distress Ink.

For the background, smear Distress Ink on the craft sheet, mist with water and press watercolor paper into the ink.

Layers of ink - Pumpkins card glow in the dark tutorial by Anna-Karin Evaldsson. Emboss in Tim Holtz Tapestry folder.

Ink directly on the Tim Holtz Tapestry folder with two shades of brown. Mist with water and emboss the paper. Make two of these for the background.

Layers of ink - Pumpkins card glow in the dark tutorial by Anna-Karin Evaldsson. Die cut and emboss clouds.

The clouds from Edison Colorize were done in the same way and embossed in the Reptile folder.

Layers of ink - Pumpkins card glow in the dark tutorial by Anna-Karin Evaldsson.

The clouds and the green pumpkin are adhere with Simon Says Stamp Pawsitively Perfect Foam Tape.

Layers of ink - Pumpkins card glow in the dark tutorial by Anna-Karin Evaldsson. Glow in the dark bats.

Die cut the bats with Tim Holtz Moonlight set and coat with Glow Grit Paste. When dry, shape them a little. The clouds were also die cut from brown cardstock, to give them a small shadow. 

Layers of ink - Pumpkins card glow in the dark tutorial by Anna-Karin Evaldsson.

I colored the stems green, but didn't use the middle piece since I wanted the glow effect to show through the stems too.

Layers of ink - Pumpkins card glow in the dark tutorial by Anna-Karin Evaldsson.

A clippings sticker was added as a sentiment.

Layers of ink - Pumpkins card glow in the dark tutorial by Anna-Karin Evaldsson. Glow in the dark pumpkins.

Here you can see that the shade of the Glow paste is different depending on the ink used on the paper underneath it.

Layers of ink - Pumpkins card glow in the dark tutorial by Anna-Karin Evaldsson.

Here you can see the glow effect. 

I hope you will join us this week in our Spooky challenge. You have a chance to win a $25 gift voucher to do some fun shopping at Simon Says Stamp. You have until Monday 8am Ohio time. 1pm UK time, 2 pm CET to join in.


Do you use Instagram? If so please add #sssmchallenge so we can see your entries there too.


Thank you so much for stopping by here today! 

Happy crafting!

Anna-Karin

Supplies:

* Please note: the links are affiliate links, for which I receive a small percentage of sales generated by the link, at no extra cost to you.


Sunday, October 22, 2023

Glow-in-the-dark Halloween Decor

Hi crafters! Today I am happy to have a tutorial on the Simon Says Stamp Store blog. I made a Halloween decor piece with a glowing moon and other glow-in-the-dark details. Here is a sneak peek:


Layers of ink - Glow In the Dark Halloween Tutorial by Anna-Karin Evaldsson.

As a child I had two small glow-in-the-dark figurines next to my bed. I was very fascinated with them and still like glow-in-the-dark items, which is why I was happy to see Tim Holtz new Glow Grit Paste. 

To see the full project, the tutorial and lots of details, head over to the Simon Says Stamp Store Blog

Thank you for stopping by here today! See you again tomorrow.

Happy crafting!

Anna-Karin

Wednesday, October 18, 2023

Blue and gold card

Hi crafters! Today I am sharing a card using shades of blue combined with gold. The colors were inspired by one of my son's Lego builds.

Please note: this post has affiliate links, for which I receive a small percentage of sales generated by the link, at no extra cost to you.


Layers of ink - Blue and Gold Card Tutorial by Anna-Karin Evaldsson.

The Lego motorbike was cobalt blue combined with gold. I used more shades of blue and added some gold glitter paper. Even though the card was inspired by fall, it works for any season. It was made mainly with dies by Tim Holtz.

Layers of ink - Blue and Gold Card Tutorial by Anna-Karin Evaldsson. Color with Distress Ink.

Start by die cutting the die with the most holes from Tim Holtz Layered Dots set, from Ranger heavystock paper. Smear blue shades of Distress Ink on a non-stick craft sheet and press the paper into the ink. Let dry.

Layers of ink - Blue and Gold Card Tutorial by Anna-Karin Evaldsson.

Continue adding more layers of ink. Just touch the paper to the ink on the craft sheet for a splotchy appearance. 

Layers of ink - Blue and Gold Card Tutorial by Anna-Karin Evaldsson. Add color with Distress Oxide ink.

I finished with a layer of Distress Oxide ink.

Layers of ink - Blue and Gold Card Tutorial by Anna-Karin Evaldsson.

The Layered Dots set consists of three dies. Die cut the second dies (with fewer holes) from gold kraft stock paper. Die cut the solid rectangle from darker blue cardstock. Layers everything on a folded piece of blue cardstock.

Layers of ink - Blue and Gold Card Tutorial by Anna-Karin Evaldsson. Die cut Tim Holtz leaves

Die cut Tim's Artsy Leaves from two shades of gold kraft stock paper and from various gold glitter papers. Die cut the vins from a mix of Simon Says Stamp glue glitter papers and velvet paper. 

Layers of ink - Blue and Gold Card Tutorial by Anna-Karin Evaldsson. Add sequins.

Glue the veins to the leaves and give the leaves a little bit of shape. 

Layers of ink - Blue and Gold Card Tutorial by Anna-Karin Evaldsson. Assemble the leaves.

The sentiment from Simon Says Stamp Mixed Labels was stamped with embossing ink on vellum and gold embossed.

Layers of ink - Blue and Gold Card Tutorial by Anna-Karin Evaldsson.

The layers of Distress Ink and Distress Oxide ink creates a nice texture.

Layers of ink - Blue and Gold Card Tutorial by Anna-Karin Evaldsson. Combine glitter and velvet papers.

The Artsy Leaves dies are such fun. I really like both the shapes and the veins.

Layers of ink - Blue and Gold Card Tutorial by Anna-Karin Evaldsson.

I added some sequins, as berries.

Layers of ink - Blue and Gold Card Tutorial by Anna-Karin Evaldsson.

I hope you enjoyed this tutorial! Try making the card in various color combos. 


Thank you for stopping by here today!

Happy crafting!

Anna-Karin

Supplies:

* Please note: the links are affiliate links, for which I receive a small percentage of sales generated by the link, at no extra cost to you.