

Hi and welcome! It is Monday again and I hope you had a good weekend. We went to an historical museum and looked at an interesting exhibition about the history of Egypt. Even Leo enjoyed walking around there.
This week at the Simon Says Stamp Monday Challenge Blog we have a Powder Power challenge. You could use embossing powder or pigment powders (such as Perfect Pearls, Brusho Crystals and Infusions).

There is something almost magical about embossing powders, and I used lots of powder on this Halloween tag. It's been a while since I did the double embossing background technique, and it is such a fun technique with an interesting result. My tag is super glossy from all the embossing powders. That spooky tree was also fun to make, you'll see how I made it in the steps below.
Remember to always be very careful when working with embossing powders so that you don't burn yourself. It gets very hot.


I didn't stop, instead I continued adding more layers using Ranger's Emboss It Dabber. I think I added another two layers, maybe three.This gives the tag a wonderful glossy look, almost like it has been covered in liquid glass.

I die cut a Gothic Gate from mixed media cardstock, and cut it in the center with a craft knife and metallic ruler, so that it would be possible to open the gates. This die is amazingly intricate, and works best together with the Sizzix Precision Base Plate. You can also use a Die Brush, to get the pieces out.
The gate was inked with the Emboss It Dabber, which is great for such an intricate surface, and covered with a bit of gold powder, followed by Liquid Platinum. (I thought I took a photo of this step, but I seem to have forgotten).
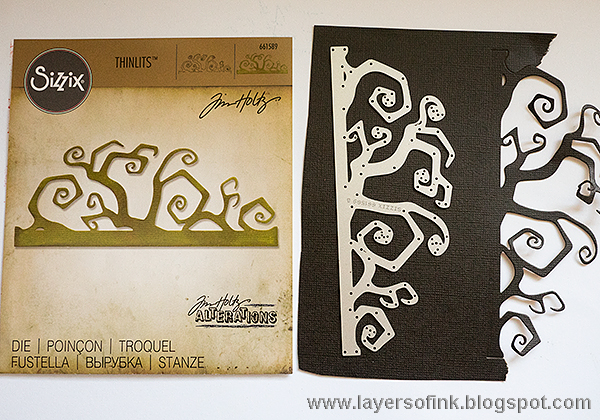
I wanted a spooky looking tree, and got the idea to use Tim's new Twisted Edge die, but in a different way. First, die cut it from black Kraft-Core cardstock, using a big enough piece of cardstock for an entire tree.

Next, line it up from the back of the paper instead, and die cut the other side, so that you get a spooky looking tree, like this. Since the long edge of the die doesn't cut, this worked perfectly.

Cut off the lower branches to make it look a little more like a tree. Do you see the branches looking like claw hands reaching out?

Mist with Brushed Pewter Mica Spray, for a metallic look.


I hope you will join us in our Powder Power challenge. As every week, you have a chance to win a $50 gift voucher from Simon Says Stamp. You have until Monday 8am Ohio time. 1pm UK time, 2 pm CET to join in.

If you want to, follow Simon Says Stamp on Instagram, they post great stuff daily.


Thank you so much for visiting my blog today!
Happy crafting!
Anna-Karin
Supplies:


