Saturday, November 23, 2013

Houses in a Row

Hello and welcome! I can't believe that we are on case file #99 at CSI:Color, Stories, Inspiration, number 100 next week! Here's this week's case file:


And my layout:

I used the Daydreaming on Paper prompt and got 'what was your first job'. I thought it was a great topic and it is something I've never done a layout on. My first job was to deliver advertisement leaflets and magazines into 325 different mail boxes, walking street up and street down with my sister's old pram. I didn't have a single photo relating to this job, instead I used some photos of me from the same time and built a street with my favourite Artful Dwellings die. From the evidence items I used: stripes, dots, butterflies, window accents, silver metal, and 6 of something (the houses).

I had a watercolour background which I made for something else and ended up not using, it was perfect for creating a backdrop for my scene.

I had so much fun making these houses, using left-over gelli prints and embossed papers I had used to make impressions into the paint on my gelli plate. I emboss white paper to use to make patterns when gel printing, since the random paint on these look really cool. If you look at these gelli print posts of mine, you'll be able to spot some of the papers I used: Jump Art JournalingDotty Gelli Print ATC-Book, and Gel Printing with Dies and Embossing Folders.
 
The papers were glued to mat board and houses were die cut using Artful Dwellings and the Mini Openings for windows. The one in the middle is a gelli print, the other two are embossed papers pressed into paint on the plate. I glued a brick die cut to the grey house.
  
The windows are backed with mica and some of them have lace curtains. I used Tim Holtz Industrious Borders stickers to add detail to the houses and label letters for the house numbers. The edges were inked with Black Soot.
 
The two houses to the right were covered with gelli prints and the large house with a Dot Matrix embossed paper, used to make patterns into the paint. The two print houses were stamped with a grid and a brick stamp, using Archival Ink. The butterflies were die cut from Bazzill text paper of old newspaper adds.
 
Love the look of these painty dots and that you can see some of the stamped numbers through the window.
 
I mixed Antique Linen Distress Paint into Light Molding Paste and applied it through three different stencils. When dry, the background was stamped with a number background stamp, birds and a clock.

I wrote a whole page of journaling, and tucked it behind the layout, as a reminder, I used an arrow and rub-on word. On Friday afternoons, huge piles of papers were delivered to the door and I then had to sort them into 325 different piles, it could take a really long time, since there sometimes were 7 or 8 different leaflets and magazines. Then they had to be delivered, and in a neighbourhood with a lot of steep hills and sometimes not very nice weather. Some people were rude (but could not go through the trouble of placing a sticker on their mail box saying that they didn't want ad materials), and they promptly got add leaflets every week. I started with this job when I was about 13 and continued for almost five years, every weekend, which was long considering the pretty bad pay.

A stripe stencil was used to make the road in front of the houses and I used a mix of Industrious stickers and label letters for the title.

Thank you so much for looking! Enjoy your weekend!

Anna-Karin

Supplies:
Surfaces: Daler & Rowney watercolour paper; Neenah Smooth Solar White cardstock; Sizzix Little Sizzles Mat Board 6 x 13; Bazzill Antique 6 x 6
Dies: Sizzix: Artful Dwellings, Mini Openings, Mini Butterflies, Brick Wall
Embossing folders: Sizzix: Bubble & Honeycomb, Dot Matrix & Gridlock, Rays & Retro Circles
Stamps: Stampers Anonymous Tim Holtz: School Desk, Ultimate Grunge, Curiosities, Mini Ornates
Ink: Ranger Archival Ink: Jet Black, Monarch Orange, Cornflower Blue; Distress Ink: Black Soot
Paint: Ranger Distress Paints: Tumbled Glass, Salty Ocean, Spiced Marmalade, Evergreen Bough, Iced Spruce, Wild Honey, Antique Linen; Daler & Rowney watercolours
Medium: Golden Artist Paint: Light Molding Paste
Stencils: Tim Holtz Stampers Anonymous: Cargo, Eye Chart, Stripes
Embellishments: Tim Holtz Idea-ology: Industrious Borders, Deco Type Industrious Stickers, Label Letters, Words Remnant Rubs, Black & Cream Trimmings; US ArtQuest Mica; lace trim
Tools: Sizzix Big Shot; Gelli Arts: Gel Printing Plate 6 x 6 in

Thursday, November 21, 2013

Christmas Crackers

Hello! Today I have a fun Christmas project to share. As children we used to make our own Christmas crackers from kitchen towel rolls and crepe paper, and I have very fond memories of that. Now there is a new Sizzix Treat Popper die by Brenda Walton, which makes it so easy to make Christmas crackers.
 
I made three crackers from Tim Holtz patterned paper. The finished size is almost 9 in long. They are so easy to make, since the die both cuts and scores the paper. This is also a great die for kiddies craft. While I made these, my soon-to-be 4-year old made three of these from cardstock. I only helped him with the die-cutting, the adhesive and to tie knots. He filled them with small toys. I would have photographed them for this post, if they had not been handled a bit too roughly in the process of getting those toys out again.
 
I die cut the crackers from three different patterned papers, assembled them and inked the edges. On the die there is also a decorative edge wrapper to go around the cracker, which I die cut from vellum. This is an XL die, so you need the extended cutting pads.
 
The flowers were die cut with the new Holiday Greenery die, also by Brenda. I love flower dies and this one is fabulous. It's got five differently sized and shaped flowers, and five different leaves. The leaves are very intricate and so pretty. I die cut the flowers from the same paper used for the crackers, but used the back of the paper instead. Some were also die cut from vellum.
 
Sentiments were stamped on Tattered Banners, also die cut from the same papers. If you use different papers and colours, these crackers can be made for lots of occasions.

I inked the edges of the flowers and shaped them with the Susan's Garden Tool Kit, which works great when it comes to giving life to any kind of flower. The flowers were smeared with just a little bit of Rock Candy Distress Stickles.

Here you can see the vellum wrapper around the crackers better. The crackers were tied with Tim Holtz Linen Ribbon and paper twine.

On the last one, I used tinsel to tie the ends, for a festive feel.

I also die cut stars from a Mirrored Sheet and tucked them in here and there. They look like real mirrors.

There wasn't space for the banner on the front, so I glued it on the side instead. If you tie a string to the crackers, you can hang them in your tree.
 
Thank you so much for looking!

Happy Christmas Crafting!

Anna-Karin

Supplies:
Surfaces: Tim Holtz Idea-ology: Holidays Pasts Paper Stash, Mirrored Sheets; vellum
Dies: Sizzix: Holiday GreeneryTreat Popper, Tattered Banners, Crescent Moon & Stars
Stamps: Stampers Anonymous Tim Holtz: Simple Sayings
Ink: Archival Ink Jet Black; Distress Ink: Gathered Twigs
Stickles: Ranger Distress Stickles Rock Candy
Embellishments: Tim Holtz Idea-ology: Silver Tinsel Twine, Linen Ribbon, Paper String Stripes
Tools: Sizzix: Big Shot, Susan's Garden Tool Kit

Wednesday, November 20, 2013

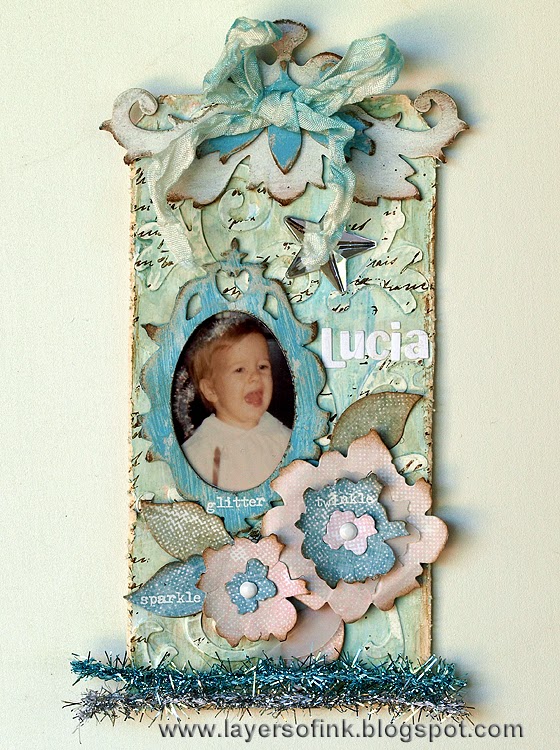
Shabby Chic Winter Tag

Hi everyone! Today I am sharing a winter tag on the Sizzix blog, made with the new Shabby Chic Originals dies. The smaller size of these dies make them perfect for tags and cards:

Shabby Chic Winter Tag
I used die cuts, gesso, paint and stamping for the background and really liked how the background turned out. For the frame, I used a childhood photo, of me during the Swedish holiday of Lucia.

For more photos and info about how I made this, you'll have to jump over to the Sizzix blog.

Thank you for the visit!

Happy Christmas crafting!

Anna-Karin

Tuesday, November 19, 2013

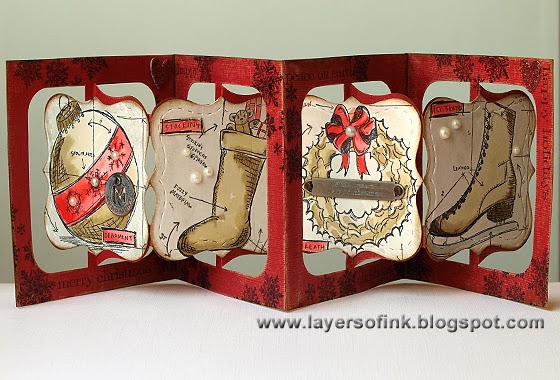
Christmas Blueprint Accordion and a card

Hello and welcome! Karen Burniston's November designer challenge is to do a project using red and the new Stitched Framelits. I made a Christmas Blueprint Accordion album, as well as a card.
 
Christmas Blueprint Accordion - Layers of ink
This is a quick and simple accordion card, using just a few inks, stamps and of course paper. I used red kraft-core cardstock for the frames and watercolour paper for the main panels. Tim Holtz Blueprint stamps fit perfectly together with the 3-D Accordion Flip die, and I have used this combination before (check out this Valentine's card), but not for Christmas.
 
I always photograph the different panels before assembling the accordion card, but I finished this late at night and totally forgot. It is so much easier to photograph them before the accordion is assembled. The panels were die cut from watercolour paper with the Labels & Stitched Frames die, which coordinates with the Accordion Flip die. The four blueprint stamps were stamped with Archival Ink Jet Black. Since I was planning to watercolour them, I had to use a waterproof ink. 

I smeared Distress Inks (Antique Linen, Frayed Burlap, Barn Door, Iced Spruce) on my craft sheet, misted once with water and picked up the ink with a paint brush. The images were watercoloured, making them darker where the crosshatching is.

After watercolouring the images, I felt that the surrounding area needed something extra. Biscotti Perfect Pearls was misted on my craft sheet and painted around the images, covering all the blank watercolour paper. The effect is so hard to photograph, but looks really shimmery in real life. Antique Linen Distress Paint was rubbed into the sentiment on the word band.

This ice skate is my favorite image. I used Iced Spruce for the blade. The edges were inked with Gathered Twigs.

I sanded the frames and stamped them with snowflakes and sentiments, using Jet Black ink. The snowflake stamp comes from the Tim Holtz special edition set which is included in the Simon Says Stamp Holiday Card Kit inspired by Tim Holtz.

Hearts were die cut from grungeboard with the Flower & Heart die and coated with Fired Brick Distress Glitter.

I rubbed a little bit of Antique Linen paint into the token and sanded the top.

After adhering the panels to the frames, I realised that I had forgotten to do the stitching. Luckily, I hadn't joined the panels together yet, so I could easily run the whole thing through my Big Shot with the stitching die. The new magnetic platform makes this so easy, no more shifting of the paper. Love it. I used the Bracket, Frame & Label die to cut a red frame for the front of the card, you could also leave it kraft.
 
I need more Christmas cards, so I made a quick card too:
 
Red kraft-core cardstock was used for the card base and embossed in the Swirls folder. I sanded and inked it. The banner was die cut from watercolour paper, and watercoloured with Antique Linen and Frayed Burlap. For an extra layer, I used the kraft back of the Bracket, Frame & Label leftover when I die cut the frame for the front of the accordion card. It was stamped with the snowflake stamp.
 
The focal panel was done exactly the same way as for the accordion card, adding the stitched border before adhering it to the card.

The stitched border adds such a nice touch and is super easy.

Thank you so much for stopping by!

Happy Christmas crafting!!

Anna-Karin

Supplies:
Surfaces: Tim Holtz Core'dinations Kraft-Core cardstock; Canson Montval watercolour paper; Tim Holtz Idea-ology Grungeboard
Dies: Sizzix: 3-D Accordion Flip Album, Labels & Stitched Frames, Bracket, Frame & Label, Banners & Borders, Flower & Heart,
Embossing folder: Sizzix: Trellis & Swirls set
Stamps: Tim Holtz Stampers Anonymous: Simple Sayings, Christmas Blueprint 2, Holiday stamps included in the Simon Says Stamp Holiday Card Kit inspired by Tim Holtz
Ink: Distress Ink: Antique Linen, Frayed Burlap, Gathered Twigs, Barn Door, Iced Spruce; Archival Ink: Jet Black
Mist: Ranger Perfect Pearls: Biscotti
Glitter: Distress Glitter: Fired Brick
Paint: Distress Paint Antique Linen
Embellishments: Tim Holtz Idea-ology: Christmas Muse Tokens, Christmas Word Bands; pearls

Monday, November 18, 2013

Jump Art Journaling page

Hi everyone! A new week is here and of course a new Simon Says Stamp Monday Challenge. This week we are solving mysteries in our It's a Mystery challenge.
 
There are many different possibilities with this fun theme, do a technique that is hard to figure out by just looking at the finished project, make a layout or an art journal page about something mysterious, solve something, etc. I made an art journal page as well as a Christmas card, without really having planned what I was going to do. 
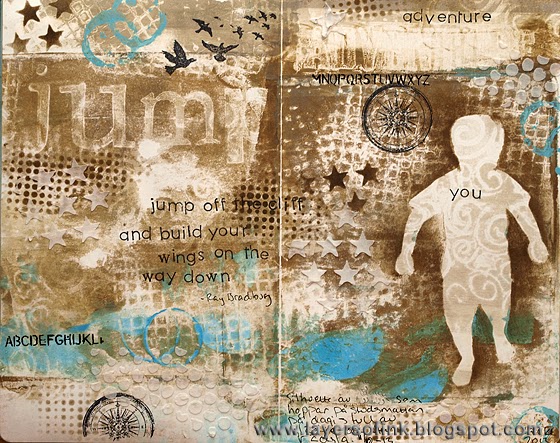
 
Jump Art Journaling - Layers of ink
You probably already know that I like to play around with different techniques and try to solve how to achieve various effects. When I first saw gelli prints, I thought it was a bit of a mystery how the pattters are achieved, but it is really so simple (and fun!). I love to use my own photos in projects and wanted to figure out a way of including my photos in gelli printing. The solution was simple and I'll share some step photos below. I used Tim Holtz stencils and embossing folders to make patterns into the paint. The print in my art journal was actually just to use up paint that was on the plate, after I had run out of paper, and ended up being the one I liked the best.
 
I started out looking through some photos and picked one of my son jumping on a trampoline. The photo wasn't sharp, but that didn't matter for what I had in mind. I printed it on paper, cut it out and painted it on both sides with about three layers of multi-medium, to make it stronger and more durable. You could also print on acetate, which I think I will do the next time I do this technique.
 
I used my 6 x 6 gelli plate, because I knew I wanted to make pretty small prints. Place the photo on the plate.
 
Add a few drops of Distress Paint (two blue colours) on the plate and roll out with a brayer. Distress Paint is thin and if you find that it beads up, wash the plate with soap and water and do a few test runs, then it should work fine. If there is still some beading, just see it as extra texture.
 
To create patterns, I pressed dry embossed papers and stencils into the paint. You can use the actual embossing folder too, but I like the effect you get by first embossing cardstock and then using that. To see more examples, check out this tutorial of mine for how to use your dies and embossing folders in gelli printing. I forgot to take a photo of this step, or I had too much paint on my hands to want to pick up my camera. Remove the mask and press your paper onto the plate. I used Neenah cardstock cut into 6 x 6 squares.
 
Pull off the paper and then print a second paper without adding more paint, this is called the ghost print (see the bottom right print above). You can also start with a layer of paint and then do a second layer with a darker colour, adding your silhouette mask. On the two prints to the right, I first printed a layer of Antique Linen and Pumice Stone on the paper, making impressions with dry embossed papers and stencils. Then I placed the mask on the plate and rolled on darker paints (Salty Ocean, Evergreen Bough), pressed additional embossed papers and stencils into the paint, removed the mask and made a second print. The two prints to the right are ghost prints, printed on white paper, making the silhouette white. The stars were made with Tim Holtz Star stencil.
 
Here you can see the patterns made into Antique Linen and Pumice Stone paint, using Dot Matrix and Swirls - first embossed on cardstock.
 
If you place the mask on the other side of the plate, the silhouette will of course be printed on the other side of the paper.  
 
I made a lot of prints, some with and some without the silhouette. The photo to the bottom left is the ghost print of the one above it, using the Rays embossing folder (again embossed on cardstock first), Gridlock and Swirls. For the top brown print, I made my own stamp using the Word Play die and fun foam - again check out my gelli print tutorial for this technique. For the two brown prints, I first did a layer of Antique Linen and Pumice Stone and then one with Walnut Stain and Salty Ocean.
 
For the top ones, I used Tim Holtz Rays and Cargo stencils, and the Dot Matrix embossing folder. For the bottom once, I used Dot Matrix, Swirls and more, in combination with Barn Door and Salty Ocean paint. These two didn't come out that nice, but I will use them for something else.
 
Another two prints. I used Evergreen Bough and Broken China on the one to the left, together with a snowflake and postcard embossing folder. On the one to the right, I forgot to remove the mask before printing, which also gave quite a cool effect on the silhouette. Rays, Gridlock, Dot Matrix and Swirls used for patterns.
 
When I cut Neenah cardstock into 6 x 6 squares, I am left with strips of paper. I use these to pick up leftover paint from the plate, usually being the third time I pull a print from the plate. Sometimes these strips are my favourites, I particularly like the edges created by the paint which remains on the very edge of the gel plate. I reach for these a lot when doing projects, you can see them in this layout for example.
 
I like to use white cardstock when I emboss papers to use to make patterns into the gelli plate. The reasons is that these end up looking pretty cool too and can be used as a background on another project. I just love the random paint on these.
 
I ran out of precut paper, just after I had applied new paint to the plate. Instead of cutting up new papers, I pressed my small Dylusions art journal into the paint. It just so happened that this ended up being one of my favourite prints. At first, I had planned to only make cards, but now I decided to turn this into an art journaling page. I made a second print on the right hand page, using the fun foam jump stamp. The bottom of the pages were coloured with ghost prints, and for the top I pressed 'adventure', from the Travel Signs embossing folder into the paint and made a print just at the top. The blue rings were made by tapping the lid of the paint dabber on the plate before printing.
 
I held the mask over the silhouette and sponged Potting Soil ink around it to make the silhouette stand out more. The stars were sponged with the same ink through Tim Holtz Star stencil. The blue rings were stamped with Broken China paint and I also added some stamping with Jet Black ink and rub-ons.
 
Potting Soil ink was sponged through the Dot Fade stencil and the birds were stamped with Jet Black ink (you know I love that stamp). Last of all, I applied Wendy Vecchi's White Embossing Paste through the Stars and the Bubble stencils with a palette knife.
 
I wanted to do something on the theme of jumping, even though you can't completely see on the silhouette that he is jumping. This quote is real nice and I stamped it with alphabet stamps. I also added some more personal journaling at the bottom of the right-hand page - and a date, I date everything I make.
 

Here you can see more of the stamping, and the embossing paste dots. I was real happy with how this turned out and it was not at all planned, which is one of the exciting mysteries of the creative process.
 
I was having fun and I wasn't done yet. I turned one of the blue prints into a Christmas card. On this print, I used Tim's Star and Bubble stencil for the print, as well as Swirls and Dot Matrix embossed papers. The paints were Evergreen Bough and Broken China. You can see this print on one of the examples above, it is a ghost print.
 
Again, I placed the mask on the paper and sponged around the edges with Viridian Archival Ink. I stamped the silhouette with a music note stamp and made the sentiment with the Schoolhouse stencil and French Ultramarine ink. I also sponged Viridian ink through the Dot Fade stencil here and there.
 
The blue stars were stamped with French Ultramarine Archival Ink. I love the look of the distressed printed stars in the background. Finally, I applied white embossing paste through the Bubbles and Stars stencils and sprinkled with Rock Candy glitter (check out this tutorial of mine for making snow with embossing paste and Rock Candy).
 
The sentiment was stamped with French Ultramarine. All the layers of dots: printed, sponged and paste, look really nice together. I finished the card with silver tinsel and ribbon roses.
 
I hope you will join us in the challenge this week! As every week, one lucky participant wins a $50 gift voucher from Simon Says Stamp and can do some shopping.

http://www.simonsaysstamp.com/servlet/StoreFront
 
Thank you for looking at this long post!
 
Happy Crafting!!
 
Anna-Karin

Supplies:
Dies: Sizzix: Word Play
Stamps: Stampers Anonymous Tim Holtz: Warehouse District,  Mini OrnatesMini Holidays 4, Mini Muse; Hero Arts Basic Lowercase Letters
Ink: Ranger Archival Ink: Jet Black, French Ultramarine, Viridian, Potting Soil
Stencils: Stampers Anonymous Tim Holtz: Bubble, Dot Fade, Schoolhouse, Stars, Rays, Cargo
Medium: Wendy Vecchi Stampers Anonymous: White Embossing Paste; Claudine Hellmuth Multi-Medium Matte
Glitter: Ranger: Rock Candy Distress Glitter
Embellishments: Tim Holtz Idea-ology: Silver Tinsel, Lavish Trimmings, Words Remnant Rubs
Tools: Gelli Arts: 6 x 6 Gel Printing Plate; Ranger Medium Inky Roller