Monday, June 26, 2023

At the sea mixed media tutorial

Hello crafters! On Friday we celebrated the traditional Midsummer in Sweden, with a maypole, dancing and strawberries. 

Please note: this post has affiliate links, for which I receive a small percentage of sales generated by the link, at no extra cost to you.


This week we have a Vacation theme at the Simon Says Stamp Monday Challenge Blog. I hope you will join us! Don't miss the last project by our June guest designer Kerry B.

Layers of ink - At the sea mixed media tutorial by Anna-Karin Evaldsson.

I created a tranquil seaside scene in my art journal this week using acrylic paint and a palette knife. Being at the sea is wonderful almost any time of the year, but mostly so during summer. I made the little boats out of design tape and an old dictionary page. The dictionary page was about the sea.

Layers of ink - At the sea mixed media tutorial by Anna-Karin Evaldsson. Apply gesso.

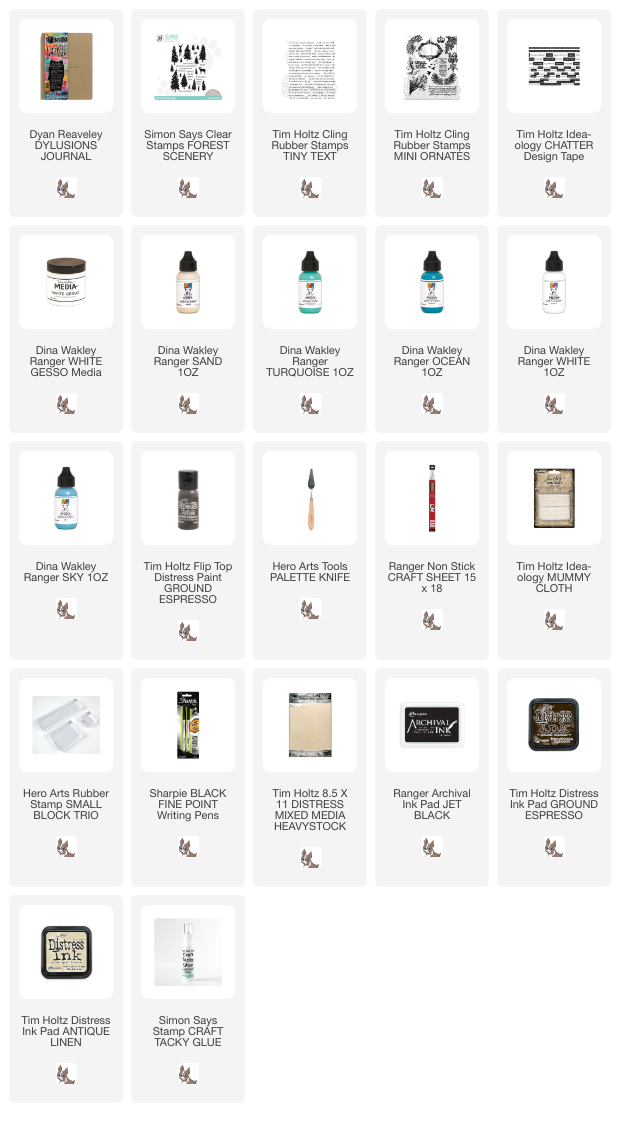
I worked in my large Dylusions Journal. Start by coating the page with gesso, adding a horizon line and som gentle waves. Place cheese cloth or mummy cloth into the gesso and add more gesso on top.

Layers of ink - At the sea mixed media tutorial by Anna-Karin Evaldsson. Paint the sunset.

When the gesso was dry, I painted the page using a palette knife and Dina Wakley's acrylic paints. Start with the beach and the sun.

Layers of ink - At the sea mixed media tutorial by Anna-Karin Evaldsson. Paint the sea with acrylic paint.

Continue with the sea using shades of blue and turquoise and mixing in some white here and there.

Layers of ink - At the sea mixed media tutorial by Anna-Karin Evaldsson. Paint the sky.

Continue in the same way with the sky, making it lighter towards the horizon line.

Layers of ink - At the sea mixed media tutorial by Anna-Karin Evaldsson.

Add a darker shade of turquoise at the top of the sky and towards the beach, this adds a sense of perspective. I used Dina's Ocean color. Add some Ground Espresso Distress Paint to the beach area. When the paint is dry, dabb on white to create clouds, foam and highlights.

Layers of ink - At the sea mixed media tutorial by Anna-Karin Evaldsson. Make little paper boats.

Adhere Tim Holtz Chatter Design Tape words to heavystock paper and cut into boat shapes. Draw the sail on dictionary paper and cut out.

Layers of ink - At the sea mixed media tutorial by Anna-Karin Evaldsson.

Stamp birds with Tim Holtz Mini Ornates and words with Simon Says Stamp Forest Scenery. Add more white if needed.

Layers of ink - At the sea mixed media tutorial by Anna-Karin Evaldsson.

Dina Wakley's acrylic paint is thicker than Distress Paint, making it easier to get these types of textured effects. 

Layers of ink - At the sea mixed media tutorial by Anna-Karin Evaldsson.

I am very fond of repeat stamping words without reinking. 

Layers of ink - At the sea mixed media tutorial by Anna-Karin Evaldsson. Sail into the sunset.

I added shading under the boats with a black pen.

Layers of ink - At the sea mixed media tutorial by Anna-Karin Evaldsson.

The dictionary paper is from a page about the sea, which is a nice detail. But you can use any type of old book instead.

Layers of ink - At the sea mixed media tutorial by Anna-Karin Evaldsson. DIY paper boat.

Ink the edges of the sails and the boats slightly.

Layers of ink - At the sea mixed media tutorial by Anna-Karin Evaldsson.

The cheese cloth gives an interesting texture to the beach.

Layers of ink - At the sea mixed media tutorial by Anna-Karin Evaldsson. Tim Holtz Tiny Text.

I stamped sentiments from Tim Holtz Tiny Text on inky papers and cut into strips.

Layers of ink - At the sea mixed media tutorial by Anna-Karin Evaldsson.

A border was drawn around the sentiments with a black pen.

Layers of ink - At the sea mixed media tutorial by Anna-Karin Evaldsson.

It is a lot of fun to paint with a palette knife.

Layers of ink - At the sea mixed media tutorial by Anna-Karin Evaldsson.

Using a paint brush would have given a different look to the scene.

Layers of ink - At the sea mixed media tutorial by Anna-Karin Evaldsson.

If I wasn't working in my art journal, I might have added some real shells to the beach area, but I try to keep the pages in my journals fairly flat. 

I hope you will join us this week in our Vacation challenge. You have a chance to win a $25 gift voucher to do some fun shopping at Simon Says Stamp. You have until Monday 8am Ohio time. 1pm UK time, 2 pm CET to join in.


Do you use Instagram? If so please add #sssmchallenge so we can see your entries there too.


Thank you so much for stopping by here today! 

Happy crafting!

Anna-Karin

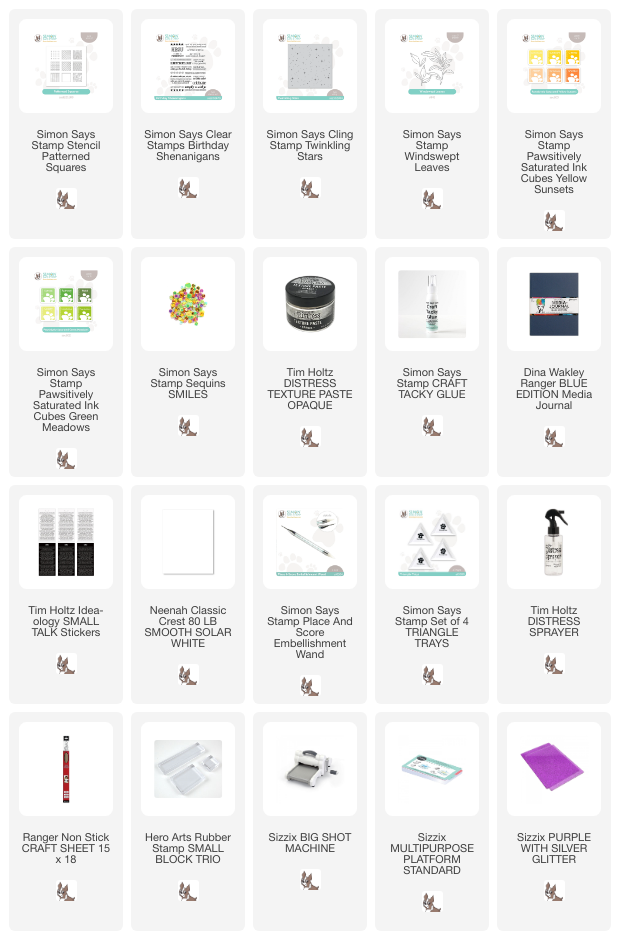
Supplies:

* Please note: the links are affiliate links, for which I receive a small percentage of sales generated by the link, at no extra cost to you.

Saturday, June 24, 2023

Patterend Paste Squares Tutorial

Hi crafters! Today I have an art journal page to share with patterned paste squares. The techniques work just as well for cardmaking.


Please note: this post has affiliate links, for which I receive a small percentage of sales generated by the link, at no extra cost to you.


Layers of ink - Patterend Paste Squares Tutorial by Anna-Karin Evaldsson.

This page is bright and happy, with nine paste squares as the focal point. I used products from Simon Says Stamp's new Out Of This World Release and worked in my Dina Wakley Blue Edition Journal. The squares were all done with a single stencil, Simon Says Stamp Patterned Squares.


Layers of ink - Patterend Paste Squares Tutorial by Anna-Karin Evaldsson.

Start by applying texture paste with a palette knife through Simon Says Stamp Patterned Squares stencil. I worked on a cotton rag watercolor page.

Layers of ink - Patterend Paste Squares Tutorial by Anna-Karin Evaldsson. Color with Simon Says Stamp Pawsitively Saturated Inks.

When the paste was dry, I colored the squares with Simon Says Stamp Pawsitively Saturated inks, using inks from both sets included in Out Of This World: Yellow Sunsets and Green Meadows. Smear the ink pads on a non-stick craft sheet, mist with water and pick up with a paint brush.

Layers of ink - Patterend Paste Squares Tutorial by Anna-Karin Evaldsson. Stamp with Simon Says Stamp Twinkling Stars.

Stamp the background with Simon Says Stamp Twinkling Stars and Citrine ink.

Layers of ink - Patterend Paste Squares Tutorial by Anna-Karin Evaldsson.

Stamp 'celebrate' from Simon Says Stamp Birthday Shenanigans with three shades of orange ink. Stamp the flower and swirl border with green and orange ink.

Layers of ink - Patterend Paste Squares Tutorial by Anna-Karin Evaldsson. Die cut Simon Says Stamp Windswept Leaves.

Die cut Simon Says Stamp Windswept Leaves from watercolor paper and color with Celery, Sprout and Field. Smear on a non-stick craft sheet, mist with water and press the leaves into the ink.

Layers of ink - Patterend Paste Squares Tutorial by Anna-Karin Evaldsson.

'Today' also comes from Birthday Shenanigans and was stamped with one of the green inks. I also used some Tim Holtz Small Talk stickers.

Layers of ink - Patterend Paste Squares Tutorial by Anna-Karin Evaldsson.

Layer the leaves together in two clusters.

Layers of ink - Patterend Paste Squares Tutorial by Anna-Karin Evaldsson.

This Patterned Squares stencil is such fun with all the squares with different patterns. You can also use just one or a few of the patterns.

Layers of ink - Patterend Paste Squares Tutorial by Anna-Karin Evaldsson.

Don't worry about getting the coloring perfect. Some ink might seep through to the background.

Layers of ink - Patterend Paste Squares Tutorial by Anna-Karin Evaldsson.

I also sprinkled some sequins across the page.

Layers of ink - Patterend Paste Squares Tutorial by Anna-Karin Evaldsson.

If you need a larger sentiment, but don't have a large enough stamp, stamp a sentiment more than once, using the same or different inks. Since this watercolor paper is rough, the stamping isn't perfect, but I liked the textured and worn look.

Layers of ink - Patterend Paste Squares Tutorial by Anna-Karin Evaldsson.

I hope you enjoyed this tutorial! For another project made with the Simon Says Stamp Out Of This World release, check out my Sunny Sunflower Mosaic Tag


Thank you so much for stopping by here today! 

Happy crafting!

Anna-Karin

Supplies:

* Please note: the links are affiliate links, for which I receive a small percentage of sales generated by the link, at no extra cost to you.


Friday, June 23, 2023

Simon Says Stamp Out Of This World Blog Hop

Hi and welcome to my blog! I am so happy to take part in the Simon Says Stamp Blog Hop to celebrate the new Out of this World release. If you are following along in the hop, you should have come here from the creative Keisha Charles.

Please note: this post has affiliate links, for which I receive a small percentage of sales generated by the link, at no extra cost to you.


Simon Says Stamp Out of This World


The Out of this World release is full of wonderful new and versatile stamps, stencils, dies, ink and sequins. You can find the entire Out of this World release here. If you use the code GALAXY you can get Free Tim Holtz Distress Crayons with purchase, until 25 June or while supplies last.

Simon Says Stamp Out of This World

I made a tag, but you can also use the techniques on other types of projects.

Layers of ink - Mosaic Sunflower Tag Tutorial by Anna-Karin Evaldsson.

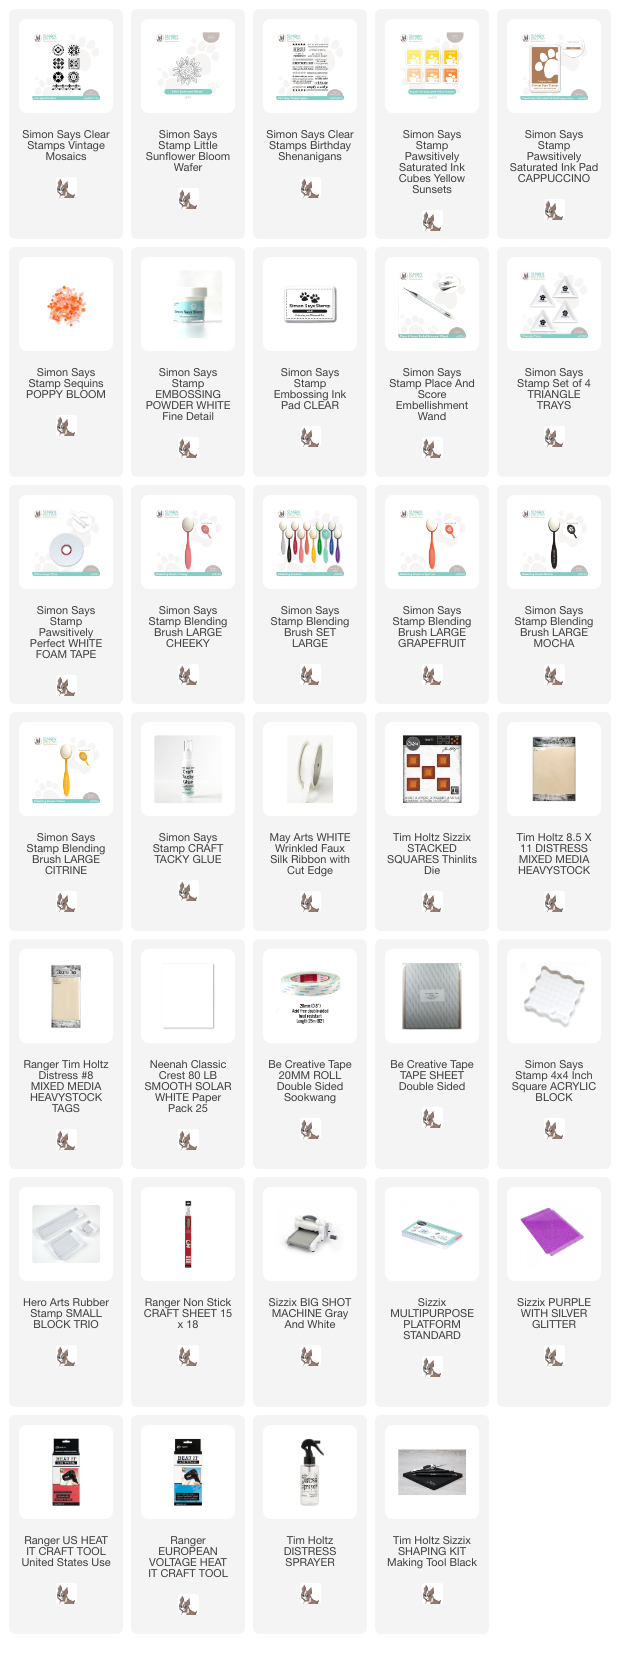
We have had warm and sunny weather for several weeks now, and rain would be welcome. But the sunny weather also inspired this tag, using a mix of yellow, orange and apricot, with just a tad of brown. I used the Simon Says Stamp Little Sunflower Bloom for the flowers and the Vintage Mosaic stamp set for the background.

Layers of ink - Mosaic Sunflower Tag Tutorial by Anna-Karin Evaldsson. White emboss Simon Says Stamp Vintage Mosaic.

Start by white embossing the pretty Vintage Mosaic squares on heavystock paper. I die cut my squares with Tim Holtz Stacked Squares, but you can also cut them by hand. Always be careful when using a heat gun and never touch the melted powder until it has cooled down completely.

Layers of ink - Mosaic Sunflower Tag Tutorial by Anna-Karin Evaldsson. Ink with Simon Says Stamp Pawsitively Saturated Ink.

The Out Of This World release has two sets of Pawsitively Saturated inks and I used the Yellow Sunset set for this card. Ink the squares with all the shades in the set, using ink-blending brushes.

Layers of ink - Mosaic Sunflower Tag Tutorial by Anna-Karin Evaldsson.

Cover a heavystock tag with Be Creative adhesive. If you have a thicker tape or a sheet, use that instead. 

Layers of ink - Mosaic Sunflower Tag Tutorial by Anna-Karin Evaldsson.

Place the squares onto the tape and then sprinkle with white embossing powder. The embossing powder will act as grout. Carefully emboss.

Layers of ink - Mosaic Sunflower Tag Tutorial by Anna-Karin Evaldsson.

Die cut the Little Sunflower Bloom six times from heavystock paper and ink with Cantaloupe, Sunbeam and Cappuccino.

Layers of ink - Mosaic Sunflower Tag Tutorial by Anna-Karin Evaldsson.

Shape using Tim Holtz Shaping Kit

Layers of ink - Mosaic Sunflower Tag Tutorial by Anna-Karin Evaldsson. Simon Says Stamp Little Sunflower Bloom assembly.

Layer the flowers together using Simon Says Stamp Pawsitively Perfect Foam tape in between the yellow flower and the disk floret. I layered two disk florets together, with a darker shade of brown at the bottom. Off-set slightly to create a shadow.

Layers of ink - Mosaic Sunflower Tag Tutorial by Anna-Karin Evaldsson. Dye the ribbon with Pawsitively Saturated Inks.

It is easy to dye ribbon with Simon Says Stamp Pawsitively Saturated ink and a great way to match your ribbon to the project. I used May Arts Wrinkled Faux Silk Ribbon.

Layers of ink - Mosaic Sunflower Tag Tutorial by Anna-Karin Evaldsson.

The Simon Says Stamp Pawsitively Place and Score Embellishment Wand works so well when placing out sequins.

Layers of ink - Mosaic Sunflower Tag Tutorial by Anna-Karin Evaldsson.

The Vintage Mosaic squares have such nice patterns. 

Layers of ink - Mosaic Sunflower Tag Tutorial by Anna-Karin Evaldsson.

There might be specks of white embossing powder here and there, but don't worry about it since it just adds to the look. I didn't wait long enough after inking before doing the grout/embossing powder step and my squares were covered with embossing powder. I removed it with a soft paint brush, but some specks till remained. Use a Simon Says Stamp Antistatic brush if you want to avoid this.

Layers of ink - Mosaic Sunflower Tag Tutorial by Anna-Karin Evaldsson.

Sunflowers are such happy flowers. We have a bunch growing in the garden, but no flowers yet.

Layers of ink - Mosaic Sunflower Tag Tutorial by Anna-Karin Evaldsson.

The sentiment comes from Simon Says Stamp Birthday Shenanigans and was stamped with Melon ink.

Layers of ink - Mosaic Sunflower Tag Tutorial by Anna-Karin Evaldsson.

Adhere the sunflowers with two layers of Simon Says Stamp Pawsitively Perfect Foam Tape, for even more dimension.

Layers of ink - Mosaic Sunflower Tag Tutorial by Anna-Karin Evaldsson.


Don't miss all the inspiration along the hop. There are of course prizes to be won too, and at each stop on the hop SSS is giving away a $25 coupon, randomly drawn from those who leave a comment. The winners will be posted post on the Simon Says Stamp store blog on Wednesday the 28th of June.

Your next stop on the hop is Heather Ruwe. Don't miss to see the wonderful project she has created. If you get lost along the way, here are all the stops:


Anna-Karin Evaldsson (you are here)

For more inspiration, remember to check out the Out Of This World gallery at Simon Says Stamp, and if you make something with products from the range, it is fun if you post it in the galleries too. There are galleries for all releases, and for the card kits, full of inspiration.

This is the second Out Of This World blog hop, don't miss blog hop number day number 2, which is tomorrow.


Thank you so much for stopping by here today! 

Happy crafting!

Anna-Karin

Supplies:

* Please note: the links are affiliate links, for which I receive a small percentage of sales generated by the link, at no extra cost to you.


Tuesday, June 20, 2023

Summertime Mixed Media Tag

Hi friends! Today I have a mixed media tag with a summer theme to share.

Please note: this post has affiliate links, for which I receive a small percentage of sales generated by the link, at no extra cost to you.

Layers of ink - Summertime Mixed Media Tag Tutorial by Anna-Karin Evaldsson.

The background is a beach scene, with foliage in the foreground. I liked the idea of making the foliage and flowers the main focus instead of the beach itself. You can easily turn the design into a card instead.

Layers of ink - Summertime Mixed Media Tag Tutorial by Anna-Karin Evaldsson. Paint with Distress Paint.

I started with a tag which had been coated with gesso. I had also added some crackle paste at the base, for the beach part. When dry, paint with Distress Paint and mist with water.

Layers of ink - Summertime Mixed Media Tag Tutorial by Anna-Karin Evaldsson.

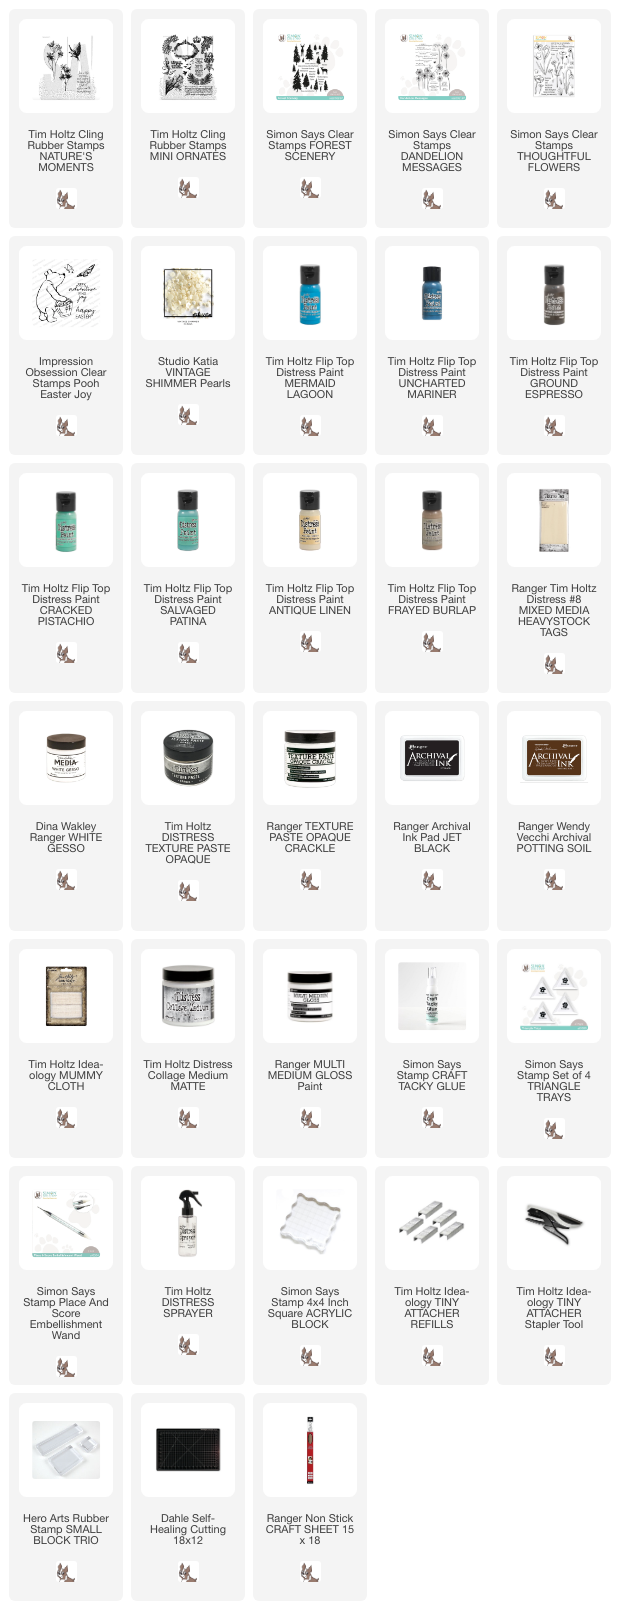
Stamp flowers from Tim Holtz Nature's Moments on tissue paper with Potting Soil ink. Since the background is textured it is hard to stamp on.

Layers of ink - Summertime Mixed Media Tag Tutorial by Anna-Karin Evaldsson. Paint with Distress Paint.

Apply gloss medium to the tag and place the tissue paper onto the tag. Add another layer of gloss medium on top.

Layers of ink - Summertime Mixed Media Tag Tutorial by Anna-Karin Evaldsson. Paint with Distress Paint.

Add more stamping directly to the tag and darker shades with Uncharted Mariner and Ground Espresso.

Layers of ink - Summertime Mixed Media Tag Tutorial by Anna-Karin Evaldsson. Paint with Distress Paint.

The bird stamp is a favorite of mine, it comes from Tim Holtz Mini Ornates. The sentiment is from Simon Says Stamp Dandelion Messages.

Layers of ink - Summertime Mixed Media Tag Tutorial by Anna-Karin Evaldsson. Paint with Distress Paint.

This sentiment comes from Impression Obsession Pooh Easter Joy.

Layers of ink - Summertime Mixed Media Tag Tutorial by Anna-Karin Evaldsson. Paint with Distress Paint.

Dye cheese cloth or mummy cloth and staple to the background. I also added some twine.

Layers of ink - Summertime Mixed Media Tag Tutorial by Anna-Karin Evaldsson. Paint with Distress Paint.

I added some lines as shadows with a black pen.

Layers of ink - Summertime Mixed Media Tag Tutorial by Anna-Karin Evaldsson. Paint with Distress Paint.

Summer was stamped repeatedly without reinking.  


Thank you so much for stopping by here today! 

Happy crafting!

Anna-Karin

Supplies:

* Please note: the links are affiliate links, for which I receive a small percentage of sales generated by the link, at no extra cost to you.