Monday, August 1, 2016

Kids Summer Vacation Challenge


Hello again! This is my second post for the day, you'll find the Simon Says Stamp Monday Challenge post below. During August, Simon Says Stamp has a Kids Summer Vacation Challenge, with a junior design team making really wonderful projects. The challenge is Anything Goes With Glitter and it will last the whole month. There are three prize hampers to be won, so I hope any crafty child (2-16 years) will join in.

Anton (age 6) of course wanted to join in, since he loves to craft. He ended up making a pretty spooky project...

Layers of ink - Spooky Glittery House with Tim Holtz Sizzix Brownstone die
Since I made my Old Town project, using Tim Holtz Brownstone die, Anton has been wanting to make his own house. He looked through some of my embellishments and decided that he wanted to make a spooky Halloween house. I die cut the house pieces for him and he sat down to paint them, but by mistake poured out way too much Candied Apple Distress Paint (luckily on a plastic sheet). So with all that extra paint, he decided to start dipping embellishments into the paint and then into glitter, which is the reason why the doll, skulls and skeleton ended up being very scary,

Layers of ink - Spooky Glittery House with Tim Holtz Sizzix Brownstone die
The house was die cut from a cover from one of Tim Holtz patterned paper pads. Anton painted it purple and the roof black. The base is a piece of mat board, also painted black. I helped him assemble the house and glued everything in place, since I used a heat gun for that, which he is not allowed to touch. 

Layers of ink - Spooky Glittery House with Tim Holtz Sizzix Brownstone die
Before assembling the house, we coloured some clear Modeling Film with Denim and Gold Mixative alcohol ink. Anton was very impressed with how fast it dried. Don't let small children work with alcohol ink on their own, and make sure you are in a well-ventilated space. 

Layers of ink - Spooky Glittery House with Tim Holtz Sizzix Brownstone die
Here's another shot of the windows. 

Layers of ink - Spooky Glittery House with Tim Holtz Sizzix Brownstone die
Anton shares my love of details, and came up with the idea that the Resin Skulls should be sitting on wooden sticks, sort of as guards to the house. As you can see, it was dipped in paint and then in red Distress Glitter.

Layers of ink - Spooky Glittery House with Tim Holtz Sizzix Brownstone die
Wicked Alpha Parts were added to the house. 

Layers of ink - Spooky Glittery House with Tim Holtz Sizzix Brownstone die
The roof was covered with Pumice Stone Distress Glitter. Anton thought it was too even looking and scratched into the glitter to make marks. 

Layers of ink - Spooky Glittery House with Tim Holtz Sizzix Brownstone die
There is cotton wool smoke coming from the chimney.

Layers of ink - Spooky Glittery House with Tim Holtz Sizzix Brownstone die
The fence is die cut with the Village Bungalow die and Anton cut some of the boards, so that it would look old and broken. Clever idea!
Layers of ink - Spooky Glittery House with Tim Holtz Sizzix Brownstone die
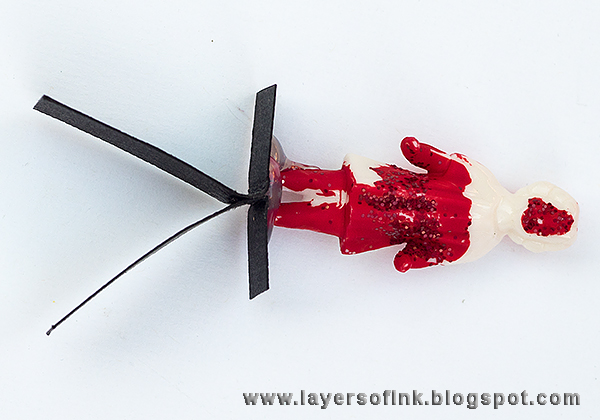
The spookiest part of the project is the zombie girl inhabitant of the house, who got a little bit too much red paint on her. Has a Salvaged Doll ever looked so scary? It was very important for Anton that she could move. I did a simple solution of two cardstock strips glued together as shown. 

Layers of ink - Spooky Glittery House with Tim Holtz Sizzix Brownstone die
Then I cut a little path into the base.

Layers of ink - Spooky Glittery House with Tim Holtz Sizzix Brownstone die
Tuck in the strips. 

Layers of ink - Spooky Glittery House with Tim Holtz Sizzix Brownstone die
And she can walk up to her door. Very scary!

Layers of ink - Spooky Glittery House with Tim Holtz Sizzix Brownstone die
She can also be turned around and walk the other way. This would be a fun interactive idea for other, less spooky, children's projects too, to get moving parts.

Layers of ink - Spooky Glittery House with Tim Holtz Sizzix Brownstone die
You could also place an electric tea candle inside the house, but we had already glued it to the base when I thought of that. The skeleton is propped up by another wooden stick.

Layers of ink - Spooky Glittery House
Anton is very proud of his project and he says to tell you that he hopes you will like it and want to make the same thing, although maybe a little less spooky. The house is displayed in the living room now, because he thinks his house is too scary for his own room.

I hope there will be lots of kids joining us in the Simon Says Stamp Glitter Kids Summer Vacation Challenge, and there are three fun grab bags from Simon Says Stamp to be won. The last day to participate is 31 August, so there is plenty of time. This challenge will end on August 31st at 8am EST, 1pm UK time 2pm CET.


Don't forget to follow Simon Says Stamp on Instagram, they post great stuff daily. 


new-instagram-icon22


Thank you so much for stopping by today!

Happy crafting!

Anna-Karin

Supplies:


Celebrate Watercolour Poppies


Hi and welcome! The Simon Says Stamp Monday Challenge Blog is turning 6 years old, and this week we are celebrating the anniversary. Our theme for the challenge is Celebrate. Since it is the first day of a new month we are also showcasing products from a specific company, and this week it is the wonderful exclusive products by Simon Says Stamp itself. 

Because this is such a special challenge, there are two $50 gift vouchers to be won. I hope you can join us!

Layers of ink - Watercolour Poppies Tutorial by Anna-Karin
Six years, that means approximately a total of 312 challenges. If you take the design team projects, and participant projects into account, that adds up to a massive amount of creative inspiration, and joy. With some quick very rough estimations, I think it will be above 40000 projects in total. Just imagine all of them collected in one room. That is certainly something to celebrate. 

I have been on this amazing design team for a little more than four years now, which would mean about 212 projects. But enough with the maths now and onto the card. :)

I made a card with the Tattered Poppy die as my focal point, and a whole bunch of other Simon Says Stamp dies and stamps. Here are some step photos. 

Layers of ink - Watercolour Poppies Tutorial by Anna-Karin
Start by die cutting the Tattered Poppy twice from watercolour paper. 

Layers of ink - Watercolour Poppies Tutorial by Anna-Karin
Paint the parts with Prima's watercolours. I painted the petals with clean water first, dropped in pretty concentrated red paint and then finished with a little bit of black at the base. You need four more of the stamen pieces than shown here.

Layers of ink - Watercolour Poppies Tutorial by Anna-Karin
Give the flowers some shape with a ball embossing tool and a pair of tweezers. This step really brings them to life.

Layers of ink - Watercolour Poppies Tutorial by Anna-Karin
Paint a background on watercolour paper with green, grey and black paints. Drop some extra grey paint into the sky for texture. Dry brush green paint in the foreground when the background has dried.

Layers of ink - Watercolour Poppies Tutorial by Anna-Karin
Die cut a number using the Number Blocks and the Create word from watercolour paper and paint them. I did an ombre effect on the word, using only black paint and water.

Layers of ink - Watercolour Poppies Tutorial by Anna-Karin
Stamp the sky with Falling Hearts and Smoke ink, and the grass with Tiny Alphabet Background and Green Leaf ink.

Layers of ink - Watercolour Poppies Tutorial by Anna-Karin
Die cut Stacked Hearts and a Sketch Frame from grey cardstock.

Layers of ink - Watercolour Poppies Tutorial by Anna-Karin
Assemble the flowers and add a pool of Glossy Accent in the center, sprinkle with Distress Glitter.

Layers of ink - Watercolour Poppies Tutorial by Anna-Karin
Here's the second flower. You can find another tutorial of mine using the Tattered Poppy die, here on this mixed media wall-hanger.

Layers of ink - Watercolour Poppies Tutorial by Anna-Karin
'Joy' was die cut with the Alphabet Blocks die and painted red.

I hope you will join us in our Celebrate challenge. Since this is a special challenge, two random participants will win a $50 gift voucher from Simon Says Stamp. You have until Monday 8am Ohio time. 1pm UK time, 2 pm CET to join in.


If you want to, follow Simon Says Stamp on Instagram, they post great stuff daily. 


new-instagram-icon22

Do you use Instagram ? If so please add #sssmchallenge so we can see your entries there too.


Thank you so much for stopping by today!

Happy crafting!

Anna-Karin

Supplies: