Monday, October 27, 2014

Halloween Treat Bag

Hello everyone! This month is almost over, time really flies. We have a 'this is a treat' challenge at Simon Says Stamp Monday Challenge this week.
 
I made a little Halloween treat bag using Tim Holtz In The Bag die, Distress Ink, stamps and a stencil. The In the Bag die is a Movers and Shapers die and I placed the owl die inside it when die cutting it, to get an owl shaped window. The bag was die cut from manila cardstock.
 
Behind the window there is a piece of Frosted Film, coloured with alcohol ink and stamped with a spider web stamp. It is translucent, so you'll be able to peak what is inside the bag. I thought the owl would look fun with googly eyes.

The background was inked with Distress Ink and stamped with a spider web stamp. I used a stencil and Ranger's Texture Paste to add the words. They were inked after the paste was dry. I also added some die cut bats and tissue tape.

At the back, the bag looks like this. I splattered the bag with Black Soot distress ink, smeared on my craft sheet, misted with water and picked up with a paint brush.

You might be able to see the frosty surface of the owl better here. I love Frosted Film.

The handle is a piece of wire which was wrapped with tinsel.
 
I hope you will join us in the challenge. As every week, one random participant wins a $50 gift voucher from Simon Says Stamp.

http://www.simonsaysstamp.com/

 
Thank you so much for looking!
 
Happy crafting!
 
Anna-Karin

Supplies:
Surfaces: Ranger: Manila Cardstock; Tim Holtz idea-ology: Frosted Film; Tim Holtz Core'dinations Kraft-Core Cardstock
Dies: Sizzix: In the Bag, Mini Owl and Crescent Moon, Halloween Shadows
Stamps: Stamper's Anonymous Tim Holtz: Mini Halloween 3
Ink: Ranger Archival Ink: Jet Black; Distress Ink: Spiced Marmalade, Black Soot, Pumice Stone, Dusty Concord, Seedless Preserves
Alcohol Inks: Adirondack: Plum, Raisin
Medium: Ranger Texture Paste
Stencil: Stamper's Anonymous Tim Holtz: Halloween
Embellishments: Tim Holtz idea-ology: Seasonal Chit Chat stickers, Autumn Tinsel Twine, Laboratorie Tissue Tape

Sunday, October 26, 2014

Sunshine and Rainbows

Hello everyone! It is time for another CSI:Color, Stories, Inspiration layout and I have a sad goodbye to make. This will be my last layout as a member for the CSI Design Team. It was a really hard decision to take and I am going to share the reasons why in a post in a few weeks. I've been on the CSI team since the very start in January 2012 and I have loved working with each and every case file. Debbi Tehrani is a wonderful person and DT leader. I will miss it and I will still play along now and then.  
 
My layout:
 
I loved the mixed media background with all the different dots and did something a little similar on my layout. From the evidence items I used: polka dots, clear shapes, mixed media, hearts, rainbows and. The testimony was inspired by the fairy tale theme, with a pretty broad interpretation. The layout is about a Lollos concert we went to and my son getting to meet the stars of the show. He was so happy.

I coated watercolour paper with gesso, dragging a sponge through it to create a fine lined texture. The dots were stencilled with various Simon Says Stamp exclusive stencils and Dina Wakley Paint. I started with large white circles, then green and red ones and finally the smallest ones with texture paste. The hearts were die cut from mat board, inked red and stamped with a dot stamp. The 'happy' die cut is also by Simon Says Stamp.

The stamped acetate was in my scrap box, stamped with Stazon Cotton White using stamps by Dina Wakley.

I also used frame, heart and flower dies by Simon Says stamp, die cut from white paper.

I love the Heart Parade die as well as this sweet sentiment. The title letters were die cut with the Word Play die, inked with Shabby Shutters and stamped with the same ink.

The label is from the same die set as the frames layered under the photo. I stamped it with a rainbow and added a sentiment. The journaling is tucked behind the layout, because I wrote pretty much.
 
Thank you so much for looking! I was a little sad to write this post, but it helped that the layout was a happy one.
 
Anna-Karin
 
Supplies:
Surfaces: Daler & Rowney Watcolour Paper; Neenah Smooth Solar White cardstock
Dies: Sizzix: Word Play, Mini Hearts; Simon Says Stamp: Happy, Heart Parade, Frames, Tall Flowers
Stamps: Simon Says Stamp: Color and Sunshine, Drawn Heart Background; Ranger Dina Wakley: Textures 
Ink: Ranger Archival Ink: Jet Black, Sap Green, Vermillion, French Ultramarine; Distress Ink: Barn Door, Shabby Shutters; Tsukineko Cotton White
Paint: Ranger Dina Wakley: White, Ruby, Lime; Distress Paint: Tumbled Glass, Broken China, Black Soot
Medium: Ranger Texture Paste
Stencils: Simon Says Stamp: Irregular Dots, Polka Dots Party Set

Friday, October 24, 2014

Glittery Snowflake Card

Hi all! I hope you are all well! I have a quick Christmas card to share using new Sizzix dies by Basic Grey, from the 25th & Pine collection.
 
I was in the mood for glittery snowflakes and used Sizzix adhesive sheets for the snowflakes. Adhere one side of the sheet to patterned paper and die cut four snowflakes using the Snowflakes #3 die. Glue the snowflakes to the background patterned paper. Remove the top protective layer from the snowflakes and sprinkle with glitter.
 
Here's a close up of one of the snowflakes. Instant glitter and it all stays stuck. The stars were die cut from Specialty Stamping paper with the Labels & Snowflakes Thinlits set. Leave the paper in the die and dry emboss it using this sandwich: multipurpose platform tab 1, Impressions Pad, die facing up with the paper still inside, Silicon Rubber Pad. Leave the paper in the die and ink the star with Peeled Paint ink.

The tree was also die cut from Specialty stamping paper and dry embossed. While still in the die, I inked the ornaments with Barn Door Distress Ink. Remove from the die and ink the rest of the tree with Peeled Paint. The banner was done in the same way, only inking it with Antique Linen instead. I attached the tree and the banner with foam dots. The stand of the tree got a bit crooked when I took the photo, it is straight again now.
 
Thank you so much for looking!
 
Have a great weekend!
 
Anna-Karin
 
Supplies:
Surfaces: Ranger Specialty Stamping Paper; Basic Grey: Aspen
Ink: Distress Ink: Barn Door, Peeled Paint, Antique Linen
Glitter: Ranger: Star Dust
Embellishment: Tim Holtz idea-ology: Christmastime Remnant Rubs
Tools: Sizzix: Big Shot, Impressions Pad, Silicon Pad

Tuesday, October 21, 2014

Happy Heart Journal Page

Hello and welcome! I am sharing an art journal page on the Sizzix blog today, made with new dies by Stephanie Ackerman.
 
I really like these heart and word dies and had fun with the colours, using paint by Dina Wakley. This teenage photo of me was on my desk and I thought it fit the page well.
 
You can read more about the page on the Sizzix blog.
 
Thank you for visiting today!!
 
Happy crafting!
 
Anna-Karin

Halloween Magic Blocks

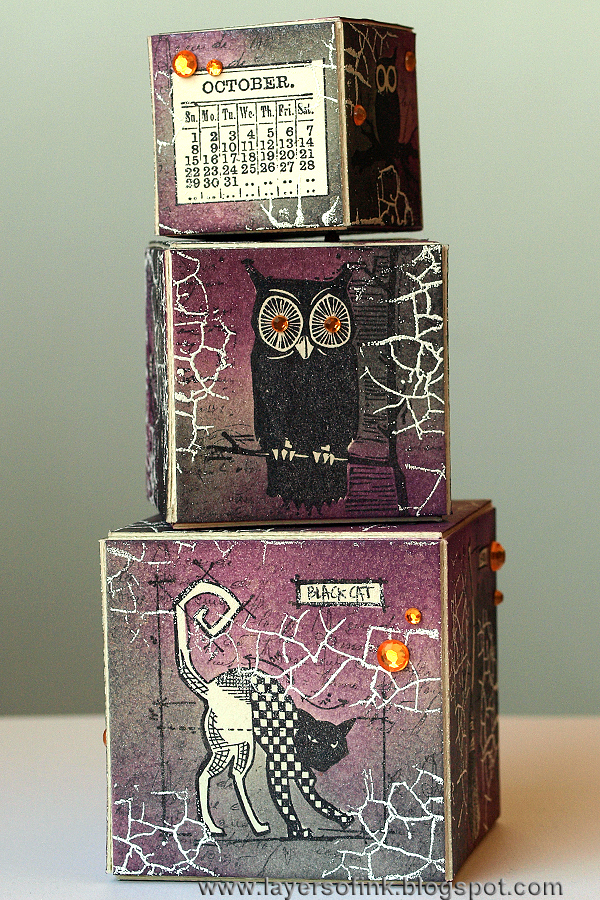
Hello all! This month the challenge at Eileen Hull's Art With heart challenge is 'Tricks and Treats', my project is a little bit of both. I hope you'll join us in the challenge and there is a great prize to be won.
 
I made three Halloween Artist Trading Blocks, but they also double as gift boxes, or rather a gift box where you have to open three boxes to get to your gift, which is inside the smallest box. These boxes are all done with the 3-D Blocks/Cubes die, and I used Tim Holtz stamps and Distress Ink to decorate them.
 
Start by die cutting two of each size of the three boxes (sorry about the poor photo).

Stamp the boxes with different Halloween stamps, and remember to stamp them in the right direction.

Ink with Antique Linen Distress Ink.

Stamp most of the images again on sticky-note paper or masking paper. Cut them out and mask the images. You don't need to mask the areas which are a solid black.

Ink the blocks with Seedless Preserves, Dusty Concord and Black Soot, using an ink blending tool. Mat board takes ink beautifully.

Leave the masks on and mist the blocks with Pewter Perfect Pearls. It is hard to capture the shine in photos.

When dry, stamp with two different script stamps, to add texture.

Remove the masks and you'll have all the images in the light Antique Linen ink. You can add more colour to them if you want to, I decided to leave them.

The blocks were a little too dark for my liking, so I white embossed the fabulous Cracks stamps here and there.
 
Assemble the blocks, but don't apply adhesive to the top flap, since we want to be able to open them. I used Ranger's Wonder Tape.

The three boxes fit perfectly inside one another. My son is going to enjoy opening one after the other.

Let's have a look at the other sides of the blocks. I used blueprint stamps on the larger blocks, carved stamps on the middle one and various small stamps on the smallest block.

There had to be a spider web and a scary witch.

The blocks were embellished very simply with a few orange rhinestones. Since I am giving these to my son, it was better not to add too many things to the boxes.

These are the three lids, would you dare opening those boxes?

Here you can better see the layers of stamping and inking. The Distress Inks hadn't dried fully with I did the white embossing so there is a quite a bit of stray white powder, which I thought added to the effect. If you don't want any stray powder, dry the inks with a heat gun first.

You might be able to see the metallic effect of the Perfect Pearls better on this photo.
 
Thank you for visiting today!
 
Happy crafting!
 
Anna-Karin
 
Supplies:
Dies: Sizzix: 3-D Blocks/Cubes
Stamps: Stamper's Anonymous Tim Holtz: Mini Halloween, Mini Halloween 3, Mini Halloween 4, Carved Halloween, Specks & Cracks, Mini Blueprints 7
Ink: Ranger Archival Ink: Jet Black; Distress Ink: Seedless Preserves, Dusty Concord, Black Soot
Mist: Ranger Perfect Pearls: Pewter
Embossing powder: Ranger Seafoam White

Monday, October 20, 2014

Happy Halloween Meeting

Hi and welcome! It is Monday and a new Simon Says Stamp Monday Challenge is up, and this week anything goes.

I wanted to scrap some photos from last year's Halloween, about a happy meeting with Spider-Man. When Anton looked at these photos recently he was thinking it was a little strange that Spider-Man, who is a good guy, seemed to get very well along with the bad guys at this occasion, reasoning that he was probably keeping a check on them. For the background I used Tim Holtz Laboratorie paper and dressed it up with stamps. It might even be a little hard to see which images are stamps and which are part of the original paper. I like using stamp to change patterned paper.
 
I had fun using the new Halftone Halloween stamps, which are great for stamp layering. The shadow parts were stamped with Archival Ink Monarch Orange and the black parts with Jet Black, on Specialty stamping paper.  
The background paper had a spiderweb pattern so I stamped some spiders here and there to populate the web.
 
The title stamp is also from the Halftone Halloween set. Since the stamps are cling stamps with the image printed at the back, they are easy to align. Stamp the outline first and then the filler part.
 
This is another of the Halftone Halloween stamps.
 
I made a border of tissue tape and jute string and stamped the row of children just above it. The journaling is tucked behind the layout, something I do often since I tend to write a lot.
 
I love this owl stamp, and it isn't only for Halloween projects, it will work any time of the year.
 
Join us in our anything goes challenge and it might be you who wins a $50 gift voucher from Simon Says Stamp, drawn randomly.

http://www.simonsaysstamp.com

 
Thank you so much for stopping by here today!
 
Happy crafting!!
 
Anna-Karin
 
Supplies:
Surfaces: Ranger: Specialty Stamping Paper; Tim Holtz idea-ology: Laboratorie paper stash
Ink: Ranger Archival Ink: Monarch Orange, Jet Black; Distress Ink: Black Soot

Sunday, October 19, 2014

Winter Moon Scene

Hello stampers! We are continuing our By the Silver Moon October challenge at Craft a Scene.

I made a blue-toned winter scene, which can also double as a Christmas card. All the stamping was done with Jet Black ink. I used a Colorbox Stylus Tool and various blue dye inks to colour the scene, making sure to leave some areas the white of the paper. The sky was stamped with a single stamp, masking out the moon on the subsequent impressions to fill the whole sky. Highlights were added with a white gel pen and mist and shine with white pigment ink.

Thank you for looking!

Happy stamping!

Anna-Karin

Supplies:
Stamps: Stampscapes: Eerie Moon 282F, Spiny Branches Sm. 331B, Snowy Covered Bridge 357F, Snowy Rocks 365A, Winter Bush 366C
Ink: Ranger Adirondack dye ink: Aqua, Stonewashed; Distress Ink: Faded Jeans, Chipped Sapphire; Archival Ink Jet Black; Colorbox Frost White
Surface: Kromecote glossy cardstock