Monday, March 17, 2014

Fly Art Journal Page

Hi and welcome! A new week, which also means a new Simon Says Stamp Monday Challenge and this week we are feeling lucky in our Just My Luck challenge. Don't miss checking out all the DT projects, every week I am amazed by the wide variety of projects.
 
I was in the mood for a bit of play in my art journal and decided to make a green page about flying and trusting your luck. I used stamps and stencils to give a botanical look to the page, in combination with different green inks.
 
First, Wendy Vecchi's translucent embossing paste was smeared through a leaf stencil and left to dry. Try to avoid getting paste at opposite places on a double spread because it might stick to itself. I forgot about that here, but if you do, you can place a piece of wax paper in between the pages to prevent them from sticking together. When the paste was dry, I inked the pages with Distress Inks using an ink-blending tool. The paste resists the ink.
 
After the first layer of ink, I placed a Kelly Purkey Potty People mask on the page and inked darker green around it. Love this as a focal point. The pages were splattered with water for some nice texture.
 
More Distress Inks were sponged through different stencils, such as this gorgeous one by Wendy Vecchi. I added further layers by stamping with the same inks, using Darkroom Door's pretty Wildflowers Vol. 1 set.

I repeatedly stamped some of the words from the Wildflowers set. I like using sentiment stamps in that way, to create a background element at the same time as you are saying something.

I hope you have time to join us this week in our fun challenge and as always one random participant wins a $50 gift voucher from Simon Says Stamp. The team also enjoys looking through all the entries picking out our favourites to spotlight.

http://www.simonsaysstamp.com/servlet/StoreFront

Thank you for the visit!

Happy crafting!

Anna-Karin

Supplies:
Surfaces: Ranger Dylusions Small Creative Journal
Stamps: Darkroom Door: Wildflowers Vol. 1
Ink: Distress Ink: Shabby Shutters, Crushed Olive, Peeled Paint, Mowed Lawn, Forest Moss
Stencils: Kelly Purkey: Potty People; Wendy Vecchi Stampers Anonymous: Fancy Flowers; Dyan Reaveley: Leaf Flourish 9 x 12, Leaf Flourish 8 x 5
Medium: Wendy Vecchi Stampers Anonymous: Translucent Embossing Paste

Saturday, March 15, 2014

CSI case file #114

Hello and welcome! I am sorry I missed last week's CSI:Color, Stories, Inspiration case file. Here is the case file for this week:
 
 
And my layout:
 
From the evidence I used: circles, rub-ons, and numbers. I was inspired by the name theme of the testimony and wrote about a new funny saying by my son, that he is a little bit shy of someone 'because I don't know his or her surname'. The green paper was in my stash of gelli printed paper and I cut it into the same shape as on the sketch. The journaling is on the tag behind the photo.

For the background, I used watercolour paper and applied gesso on top with a palette knife. I pressed a paint lid into the gesso to make circles. When the gesso was dry, I coloured it with a yellow Gelato, using water and a paint brush to give it a watercolour look. The dots were inked with Red Geranium Archival Ink through a Tim Holtz Bubble stencil.

I stamped the background with a coffee stain stamp and with this great number stamp, both by Tim Holtz.

I also used some rub-ons, tissue tape and new Idea-ology Alpha Parts plastic words and arrows.

The potty man was masked and to make him stand out more I drew around him with a pen.

Thank you for stopping by!!

Enjoy the rest of your weekend!

Anna-Karin

Supplies:
Surfaces: Daler & Rowney watercolour paper; Basic Grey patterned paper
Stamps: Stampers Anonymous Tim Holtz: Ultimate Grunge, Mini Muse
Ink: Ranger Archival Ink: Red Geranium; Tsukineko Stazon Jet Black
Stencil: Tim Holtz Stampers Anonymous: Bubbles Kelly Purkey: Potty People
Paint: Faber-Castell Gelato: Buttercream
Embellishments: Tim Holtz Idea-ology: Label Letters, Numbers Remnant Rubs, Alpha Parts Framed, Elements Tissue Tape, Life Quotes Remnant Rubs, Vial Labels

Friday, March 14, 2014

Eileen Hull Inspiration Team

Hello everyone! I have some fun news to share, I am going to part of the brand new Eileen Hull Inspiration Team. This fabulous team will bring you a lot of inspiration on using Eileen's fabulous Sizzix dies. I've loved Eileen's dies every since I used them the first time. They are so clever and versatile and make 3-D projects very easy to make.


I've picked out a some of my favourite projects made with Eileen's dies. I am not good at picking favourites, since I always have too many. Here's an attempt:

http://layersofink.blogspot.com/2012/10/shadow-box-tutorial.html
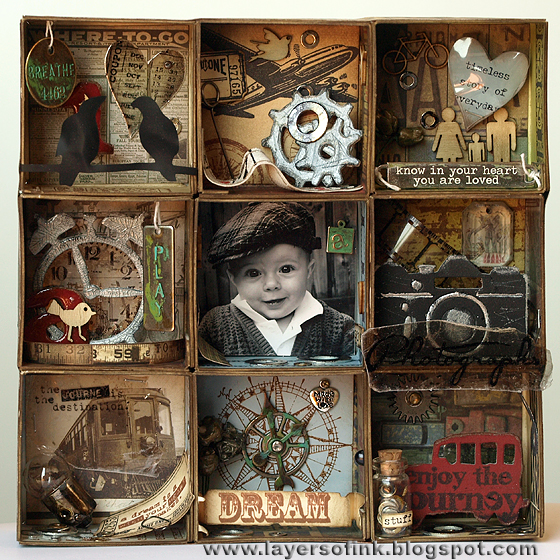
One of my top favourites of Eileen's dies is the Candy Drawer die. I used it to make the base for this shadow box, which contains a lot of my favourite elements: ink, stamps, small meaningful details, a special photo and fun techniques. You can find the full tutorial here. I've also used the Candy Drawer die to make a Memory Children's Game, a gift box and a Chest of Drawers. I like to use dies in ways they were not originally intended.

http://layersofink.blogspot.com/2012/08/chest-of-drawers-tutorial.html
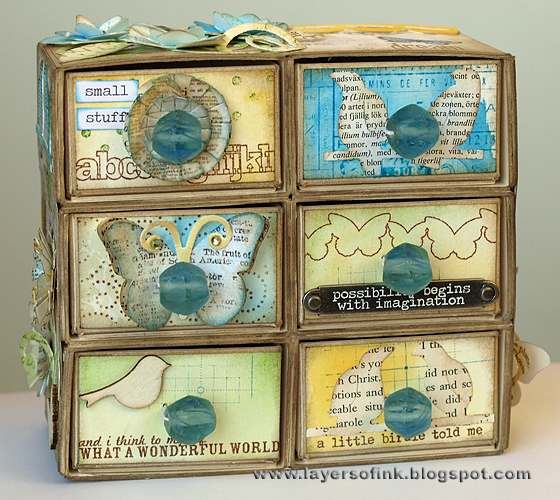
This is the Chest of Drawers, made with the same Candy Drawer die. I use it to store my Tim Holtz Idea-ology embellishments. You can find a full tutorial here. I also made a large version of this as an Advent calender.

Another of my favourite projects with Eileen's dies is the Heart Shadow Boxes (the original tutorial is here), where I used similar photos of my grandmother, mother and myself to create three shadow boxes.

http://layersofink.blogspot.com/2013/04/three-happy-birds.html
I love birds and I've made quite a few using the Bird die, these are some of them. It is also a tutorial.

http://layersofink.blogspot.com/2013/06/csi-case-file-77-bloom.html'
Eileen's dies aren't just for 3-D projects, I use them a lot on layouts and for cardmaking too. Here I used dies from the Picket Fence Collection.
 
http://layersofink.blogspot.com/2013/02/love-atc-box-tutorial.html
I had so much fun making this Love ATC box, filled with ATC cards. The box was made with the Artist Trading Card Box die and I also used some of Eileen's great flower dies. You can find the tutorial here. 
 
Finally, four Inky Artist Trading Blocks. This is such a fun new concept, which Amy Bowerman came up with. I used family photos from different generations, Tim Holtz Stampers Anonymous stamps and Distress Ink to make these. You can find the tutorial here. 

 
Art With Heart Challenge | Eileenhull.com
There is also a brand new challenge, the Art with Heart Challenge is a monthly celebration of creativity. Each month the Inspiration Team will be showcasing projects using Eileen Hull’s innovative Sizzix dies and following a broad theme left open to creative interpretation. We invite you to play along with us. We want this to be a place for everyone to create, inspire and share. We would love to see what you do with Eileen Hull’s products but this is not a requirement. There will also be prizes to be won. You can read more about the challenge here.

Our theme this month is 'New Beginnings'. I hope you will join us!

Happy crafting!

Anna-Karin

Monday, March 10, 2014

Distressed Travel ATCs

Hello everyone!! Sorry for having been a bit quiet, we were visiting family. It is Monday and time for a new Simon Says Stamp Monday Challenge. This week we are having a favourite theme of mine as a challenge - distress. Tim Holtz Distress range of products make their way onto almost every project of mine, and I of course also love to distress. Speaking of that, I had a great day yesterday at a full-day class taught by Tim Holtz and Paula Cheney. It was so much fun to meet them for the first time.
 
I felt like making some ATCs this week, and I challenged myself to use as many Distress products as possible on the small surface of an ATC. I ended up using: Distress Ink, Distress Markers, Distress Glitter and Distress Paint.

The ATCs were die cut from manila cardstock and I stamped three transportation images on them with Archival Jet Black Ink. They were stamped a second time on a post-it note and cut out for a mask. I masked the images and inked the cards with Distress Inks, using an ink-blending tool. The sea and the sky were inked blue, the rest in shades of brown. I also splattered some water on the backgrounds, for more texture.

Before removing the mask, I stamped the ATCs with various ticket stamps. The stamps were inked with Distress Markers for a great multi-colour effect. Huff on the stamp to before stamping and you'll get a great impression. I really like using the Distress Markers in this way. The transportation images were coloured with Distress Ink, using a craft nib.

The background was done in the same way here, with the top of the sky inked blue. The ticket stamp was stamped and reinked with the markers repeatedly to cover the background.

I die cut the letters from grungeboard with the Vintage Market XL die, inked them with Antique Linen, coated with Glossy Accents and covered with Antique Linen Distress Glitter. The remainder of the word was completed with Label Letter stickers.

I really like these transportation stamps, and the train is one of my favourites. It was coloured mainly with Pumice Stone and Black Soot, adding just a few red details.

I also used some metal Idea-ology pieces and coloured them with Distress Paint for a patina look.

I hope you will join us this week in our fun distress challenge, and as always, one random participant wins a $50 gift voucher from Simon Says Stamp.
 
http://www.simonsaysstamp.com/servlet/StoreFront

Thank you for stopping by!!

Happy distressing!

Anna-Karin

Supplies:
Surfaces: Ranger Manila Cardstock; Tim Holtz Idea-ology: Grungeboard
Dies: Sizzix: ATC and Corners, Vintage Market
Stamps: Stampers Anonymous Tim Holtz: Travel Ways, Paris to London
Ink: Ranger Archival Ink: Jet Black; Distress Ink: Barn Door, Tumbled Glass, Salty Ocean, Antique Linen, Gathered Twigs, Pumice Stone, Frayed Burlap, Black Soot
Markers: Distress Markers: Faded Jeans, Barn Door, Walnut Stain
Paint: Distress Paint: Peeled Paint, Salty Ocean
Glitter: Distress Glitter: Antique Linen
Embellishments: Tim Holtz Idea-ology: Sprocket Gears, Game Spinners, Long Fasteners, Label Letters

Monday, March 3, 2014

Shabby Chic Assemblage Clock

Hi and welcome! Monday and of course a new Simon Says Stamp Monday Challenge. This week our challenge is all about time.
 
I often use themes related to time and this week I thought it was the perfect time to alter my Tim Holtz Assemblage Clock. I had so much fun making this and made it in a shabby chic style since it was a gift for my sister. She has it on a shelf in her kitchen now and it is really at home there. Instead of using clock arms or a clock image in the background, I used the lady stamp from Stampers Anonymous Classics #5 together with one of my favourite sentiments, also from that set.
 
I first disassembled the clock (if you do this, remember to put the screws, washers and parts in a safe place so that you don't lose any of them). I started out painting it with Vintaj Patina Inks, but changed my mind and coated it with gesso instead. The gesso gives tooth for the Distress Paint to adhere too. Next, I painted it with Antique Linen Distress Paint and when dry, with Spun Sugar.

When the paint was dry, I burnished the clock slightly to reveal some of the metallic and some of the lighter colours underneath. I also aged it further with a wash of watered-down Frayed Burlap paint, most of which was wiped off. A few images from the Tiny Things set were stamped with Stazon ink and I used one of my favourite text stamps to add words to the background. Hold the cling stamp in your hand instead of mounting on an acrylic block since that makes it much easier to stamp on the uneven surface.

I planned where some of the stamped words would go, such as this one.

I traced the back of the clock on a piece of Specialty Stamping paper and cut out a slightly smaller circle. The face was stamped with Archival Jet Black ink and then I coloured it lightly with Distress Inks, making sure to leave the white of the eye white. The rest of the circle was inked and the flowers were stamped with Victorian Velvet. Later I also stamped a clock stamp in three places.

The roses were made with the Tattered Pine Cone die, and die cut from three colours Core'dinations cardstock as well as BasicGrey ledger paper. I die cut leaves with the Garden Greens die, also from ledger and text papers.

Before assembling the flowers, the Core'dinations cardstock was lightly sanded and the roses were inked with Frayed Burlap. I also gave them a vintage shimmery look with Rock Candy Distress Glitter.
 
I put the glass back again, since I wouldn't have been able to put it back after gluing down the flowers. I also assembled the rest of the clock since it would be hard to do so once the embellishments were in place. The flowers were glued to the sides of the clock and the leaves tucked in here and there.

I also added a couple of sprocket gears. The sentiment was stamped on a piece of ledger paper and the corners were rounded with my Crop 'n Dile Corner Chomper.

I added some rub-on stars to the glass.

I wanted the look of old enamel, but also with some texture.

Adhere the stamped and inked circle to the back piece of the clock and press the back piece back. You can get so many different looks with this clock, it is a really fun piece to alter.

Join us this week in our time challenge and you can be the one who wins a $50 gift voucher from Simon Says Stamp, drawn randomly among the participants.

http://www.simonsaysstamp.com/servlet/StoreFront
 
Thank you for visiting my blog!
 
Happy crafting! 
 
Anna-Karin

Supplies:
Surface: Tim Holtz Idea-ology: Assemblage Clock, Mini Collage Paper Stash 8 x 8; Ranger Specialty Stamping Paper; Tim Holtz Core'dinations Colour-Core Cardstock; BasicGrey Capture Cardstock Pack
Dies: Sizzix: Tattered Pinecone, Garden Greens
Stamps: Stampers Anonymous Tim Holtz: Classics #5, Tiny Things, Stuff to Say, Curiosities, Nature's Moment
Ink: Ranger Archival Ink: Jet Black; Distress Ink: Antique Linen, Tattered Rose, Barn Door, Frayed Burlap, Gathered Twigs, Victorian Velvet, Tumbled Glass; Tsukineko Stazon Jet Black
Paint: Distress Paint: Frayed Burlap, Antique Linen, Spun Sugar
Stickles: Distress Stickles: Rock Candy
Medium: Claudine Hellmuth Gesso
Embellishments: Tim Holtz Idea-ology: Christmas Time Remnant Rubs, Sprocket Gears

Sunday, March 2, 2014

Spring Birch Forest

Hello stampers! A new month and a new theme at Craft a Scene, Let it be Spring.
 
I love Birch trees and made a Spring Birch Forest with Stampscapes stamps. The trees were stamped with Watering Can ink and the grass with three different green Archival Inks. I used scrap papers to mask the trees when stamping the grass. The grass was made darker in the front of the scene and lighter towards the back, to increase a sense of perspective. White spring flowers were added to the grass with a gel pen.

Thank you for looking!

Happy Stamping!

Anna-Karin

Supplies:
Stamps: Stampscapes: Sedge Filler 251C, Birch Trees 312I, Birch Trees Sm. 313G, Winter Twigs 367B, Scenic Sentiment Sheet 6
Ink: Ranger Archival Ink: Watering Can, Fern Green, Olive, Sap Green, Jet Black; Adirondack: Willow, Aqua, Pesto, Lettuce, Slate; Distress Ink: Pumice Stone, Peeled Paint; Jenni Bowlin: Weather Vane
Paper: Kromecote glossy cardstock

Saturday, March 1, 2014

CSI case file #112 - Top of the World

Hello everyone! A new CSI:Color, Stories, Inspiration challenge is up, and the case file is gorgeous:
 
 
I did a mixed-media layout:
 
From the evidence I used: something puffy, flowers, something sheer and floral pattern. And from the testimony, I journaled about a travel memory and dream vacation. These photos were taken a few years ago on top of a mountain in Norway, after having walked up. It was fun and quite an adventure. The journaling is written on stamped journaling cards, tucked into a vellum envelope behind the right-hand photo. For the background I used watercolour paper, first coated with gesso and then painted with watered-down acrylic paints. The background was stamped with a map stamp.

Light molding paste was smeared with a palette knife through a Tim Holtz stencil. When dry, I painted them yellow.

The vellum envelope was made with Eileen Hull's Sizzix Seed Packet Envelope die. All the stamps are from Hero Arts.

I used sentiment stamps to add more journaling to the page.

I also stamped the background repeatedly with a flower background stamp, using green and blue Archival Inks, to mimic the texture in the photos.These blocks are from a Hero Arts stencil, also made with Light Molding Paste.

Some of the blocks were painted yellow. Since the paste was applied thinly in places, you can spot the stamped flowers through it.

There is also texture from the gesso on the background, since it wasn't applied evenly.

Thank you for looking!! I hope you will join us this week.

Anna-Karin

Supplies:
Surfaces: Daler & Rowney Watercolour paper; Neenah Smooth Solar White Cardstock; vellum
Dies: Sizzix: Seed Packet Envelope
Stamps: Hero Arts: Travel AC031, Time AC029, Collage Postcard AC023, My Favorite AC030, Delicate Flower CG476, Cherish Yesterday AC032
Ink: Archival Ink: Jet Black, French Ultramarine, Sap Green
Paint: Distress Paint: Bundled Sage, Mustard Seed, Pine Needles; Claudine Hellmuth: Classic Teal
Stencils: Tim Holtz Stampers Anonymous: Rays; Hero Arts: Irregular Checkerboard Background
Medium: Golden Artist Paint: Light Molding Paste