Friday, February 28, 2025

Favorite Things

Hello crafters! There is a brand new release by Simon Says Stamp called Favorite Things and today I am sharing two cards that I made with it. 

Please note: this post has affiliate links, for which I receive a small percentage of sales generated by the link, at no extra cost to you.

Simon Says Stamp Favorite Things,

The Favorite Things release is filled with lots of wonderful perfect for spring and Easter, but also for many other themes. There is also new colors of Simon Says Stamp glitter cardstock, which is one of my favorite surfaces.

I made two circle cards with similar designs, but different color schemes. I used lots of scrap papers for both cards.

Layers of ink - Petal Builder Circle Card Blue tutorial by Anna-Karin Evaldsson.

I used the new Simon Says Stamp Petal Builder, Basic Shapes Circles and Bunny Blessings from the Favorite Things release, for both cards. The first card has a blue, purple and grey color combo. 

Layers of ink - Petal Builder Circle Card Orange tutorial by Anna-Karin Evaldsson.

The second card has a orange, pink and peach color combo and also the addition of glitter.

Die cut Simon Says Stamp Petal Builder.

This is a great way to use small, but interesting, scraps. I picked out a pile of both watercolor and ink scrap papers and die cut the half-moons of the Petal Builder from them. I die cut the base from blue cardstock, but later switched it to a circle instead.

Die cut the Petal Builder from scrap paper.

For the second card, I did the same, just with different colors. I die cut the back piece from Simon Says Stamp Creamsicle cardstock. 

Glue the petals together.

Plan where to place each petal and then glue them down. I left a small gap between the petals on the card to the left. 

Add backing paper.

Here you can see the back pieces, the flower shape from the Petal Builder set for the orange card and a circle from the Simon Says Stamp Basic Shapes Circles for the blue card.

Die cut circles with Simon Says Stamp Basic Shapes Circles.

The Simon Says Stamp Basic Shapes Circles have 18 circle dies! and they can be used and layered in so many ways. I die cut the card base from one of the larger circles. Fold the cardstock and place the cutting pad just inside the fold. The rest of the circles were die cut from watercolored papers and from Simon Says Stamp Shimmer Vellum.

Splatter with white gouache.

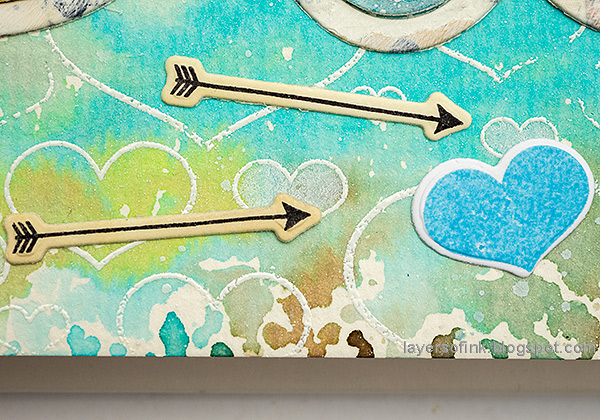
Splatter the design with Winsor & Newton Permanent White Gouache. Add a little water to the paint first.

Die cut circles with Simon Says Stamp Basic Shapes Circles.

The cardbase was die cut from Simon Says Stamp Creamsicle cardstock and the rest of the pieces from inky or watercolored papers.

Add Rock Candy Glitter.

Use Glossy Accents to fill in the space between the petals and sprinkle with Ranger's Rock Candy glitter. Splatter with white gouache.


Distress the edges of the watercolor circles and layer together. The Simon Says Stamp Shimmer Vellum is very pretty.

Add Simon Says Stamp Pawsitively Dazzling Gems.

I glued a button to the center and added Simon Says Stamp Pawsitively Dazzling Prism Gems around the button, with a larger one on top of the button.


The sentiment comes from Simon Says Stamp Bunny Blessings and was stamped on scrap paper.


Even the smallest scrap can be interesting when die cutting. Quite a few of these came from testing combinations of watercolor paint.


The Rock Candy Glitter adds a nice touch to the pink and orange design.

Add a button to the center.

Here I used an orange buttons and Simon Says Stamp Pawsitively Dazzling Peachy Gems.


The sentiments comes from Simon Says Stamp Bunny Blessings and was stamped with Mandarin Pawsitively Saturated ink.

Layers of ink - Circle Petal Builder Cards tutorial by Anna-Karin Evaldsson.

You can make these in any color combo imaginable. 


Thank you for visiting!

Happy crafting!

Anna-Karin

Supplies:

* Please note: the links are affiliate links, for which I receive a small percentage of sales generated by the link, at no extra cost to you.


Thursday, February 27, 2025

Love art journal page

Hello crafters! I hope you are well! Today I have an art journal page to share, but you can also make a card. The page is only 6x3.5, so it is also a good size for a card. 

Please note: this post has affiliate links, for which I receive a small percentage of sales generated by the link, at no extra cost to you.

Layers of ink - Love art journal tutorial by Anna-Karin Evaldsson.

I used products from Simon Says Stamp To Love release and most of them are products that I designed. I just got the parcel a few days ago and am having such fun using the products. This is the first page in my Stamperia Happiness Mixed Media Journal 6x3.5 in. I often leave the first page for later when starting a journal and that was also the case here, but I decided that this statement would be great for the first page of this journal.

Ink with distress ink.

Start by smearing Distress Ink on an acrylic block. Mist with water and stamp on the page. The Happiness Journals have watercolor pagers, which I really like. Leave to dry.

Simon Says Stamp Outline Hearts

I forgot to take a photo of the next step, but I white embossed the Simon Says Stamp Outline Hearts on the background.

White emboss the Outline Hearts and add white hearts with a pencil.

Fill some of the hearts in with a white pencil, for a subtle effect.

Die cut Simon Says Stamp Retro Love.

I am really happy with how this word design turned out, Simon Says Stamp Groovy Love. I aimed for a rounded retro look. I die cut the word from a collage paper that I made some time ago and from four pieces of inky or watercolored scraps. 

Stamp Simon Says Stamp Love Letter.

So fun to see the Simon Says Stamp Love Letter turned out and it is not only for love messages. I stamped the envelope twice and die cut with the coordinating die. Cut the white paper out and glue to the beige envelope. Stamp the hearts and die cut with the coordinating dies.

Splatter with white gouache.

Splatter the background and some of the words with Winsor & Newton Permanent White Gouache. Add a little water to the paint before splattering.

Simon Says Stamp Groovy Love.

You can use so many different combinations of patterns, colors or surfaces for this word. I thought the mix of colorful scraps was suitable for the first page in a journal.


I really like to use scraps and when you use them for die cuts, even the smallest scrap can become interesting.


The 'v' was already splattered. It was a left-over from testing watercolor combination for my Winter Night art journal page from a couple of days ago.

Stamped Love Letter.

The stamp says 'paper hugs', but I only inked up the word 'paper', and then added one of the stamped hearts.


The white pencil gives a soft look to the hearts.


I always like arrows and the way they can be used to guide the eye. I used Simon Says Stamp Very Very Low Tack Tape to keep dies in place when die cutting with the coordinating dies.


Thank you for visiting!

Happy crafting!

Anna-Karin

Supplies:

* Please note: the links are affiliate links, for which I receive a small percentage of sales generated by the link, at no extra cost to you.


Monday, February 24, 2025

Winter Night Art Journal

Hello crafters! I hope you are well and that you had a good weekend. Our beautiful snow didn't last long, but in my art journal it can last forever. 

Please note: this post has affiliate links, for which I receive a small percentage of sales generated by the link, at no extra cost to you.


This week we have a Night Sky (stars/universe/planets) theme at the Simon Says Stamp Monday Challenge Blog. I hope you will join us! Don't miss the last project by our February guest designer Cassie Lynch aka mk_knits.

Layers of ink - Winter Night Art Journal Tutorial by Anna-Karin Evaldsson.

I made a winter night art journal page this week, with a snowy and hilly landscape, a full moon and a sky filled with stars. The page was done in my Stamperia Happiness Mixed Media Journal. I have enjoyed working in this journal lately and really like the tall pages, which reminds me of tags. 

Paint the background with watercolor paint.

Draw a hill with a pencil and then paint the sky with watercolors. Mix all the colors before you start painting and let them blend wet-into-wet. When this layer was dry, I darkened the upper part since I wanted a darker looking sky.

Stamp with Simon Says Stamp Forest Scenery.

I stamped the trees with Simon Says Stamp Forest Scenery, which is one of the stamp sets that I designed. Ink with three shades of Distress Ink and mist with water before stamping.

Add paint to darken the trees.

The stamped Distress Ink was a little light on the dark sky and I added watercolor paint to the trees, to make them stand out better. Paint shadows and some texture on the snow. The bits of yellow is the same color as used for the moon.

Splatter with Winsor and Newton Permanent White Gouache.

For the stars, I used Winsor & Newton Permanent White Gouache. Mix a little water into the paint and splatter it with a small paint brush.

Stamp sentiments and deer with the Forest Scenery set.

Stamp sentiments on the background. Ink the small deer with two shades of Distress Ink, wipe the ink off from the bottom of the legs and mist with water. Wiping ink off makes it appear as if the deer is standing in the snow.

Die cut the moon with Tim Holtz Vault Christmas Magic.

Die cut the moon from Tim Holtz Sizzix Vault Christmas Magic set from watercolor paper and paint with watercolors. 

Apply white gouache around the moon.

Glue the moon to the background and dry brush a little gouache around it for shine.


Some of the sentiments were stamped with Archival Ink Cobalt on white paper and cut into strips. All the sentiments come from Simon Says Stamp Forest Scenery.


Glue one of the sentiments partly overlapping the moon. 

Watercolor stars in a night time sky.

The splatters could also be snow, but on this night, the skies were clear and there were lots of visible stars.

The wonder of nature.

The bottom sentiment was a little crooked and I restamped it on white paper instead, it also looks nice with a third blue sentiment strip on the page.

Stamped and watercolored pine trees.

I covered the trees when splattering, but then decided to add just a hint of splatters on them too, for highlights.


It is fun to combine Distress Ink and watercolor paint and they blend really well. 

Join us this week in our Night Sky (stars/universe/planets) challenge! You have a chance to win a $25 gift voucher to do some fun shopping at Simon Says Stamp. You have until Monday 8am Ohio time. 1pm UK time, 2 pm CET to join in.


Do you use Instagram? If so please add #sssmchallenge so we can see your entries there too.


Thank you so much for visiting today! 

Happy crafting!

Anna-Karin

Supplies:

* Please note: the links are affiliate links, for which I receive a small percentage of sales generated by the link, at no extra cost to you.