Wednesday, September 14, 2022

Autumn Leaves Resist Technique

Hi friends! Today I have an autumn tag to share with a fun resist technique, which you can use for many types of projects.

Please note: this post has affiliate links, for which I receive a small percentage of sales generated by the link, at no extra cost to you.

Layers of ink - Autumn Leaves Resist Technique by Anna-Karin Evaldsson. With Simon Says Stamp Real Leaves stamp set.

Since it is STAMPtember® at Simon Says Stamp I am focusing mainly on stamping techniques this month. This is a fun resist technique using dye ink and heat embossing and creating bright stamped impressions on a darker background. The leaves were stamped with Simon Says Stamp Real Leaves.

Layers of ink - Autumn Leaves Resist Technique by Anna-Karin Evaldsson. Ink the tag with Distress Ink.

Start by inking a heavystock tag with Distress Inks in autumn shades.

Layers of ink - Autumn Leaves Resist Technique by Anna-Karin Evaldsson. Clear emboss Simon Says Stamp Real Leaves.

Emboss leaves from Simon Says Stamp Real Leaves with clear embossing powder. Always be careful when using a heat tool and don't touch the melted powder until it has cooled down completely.

Layers of ink - Autumn Leaves Resist Technique by Anna-Karin Evaldsson.

Ink the tag with darker shades of ink. I used brown and a little black. The embossing will resist the ink and preserve the brighter background. Wipe ink off from the leaves.

Layers of ink - Autumn Leaves Resist Technique by Anna-Karin Evaldsson.

Apply a little Sizzix Luster Wax Gold around the edges for a warm autumn glow.

Layers of ink - Autumn Leaves Resist Technique by Anna-Karin Evaldsson. Apply Ranger Stickles glitter gel.

I wanted one additional element in the background and decided to apply Ranger Starshine Stickles Glitter Gel through Tim Holtz Bubble stencil here and there.

Layers of ink - Autumn Leaves Resist Technique by Anna-Karin Evaldsson. Die cut Simon Says Stamp Acorn Trio.

Die cut Simon Says Stamp Acorn Trio from heavystock paper. These dies were from the STAMPtember® release.

Layers of ink - Autumn Leaves Resist Technique by Anna-Karin Evaldsson.

Ink with Distress Ink, making the hats darker.

Layers of ink - Autumn Leaves Resist Technique by Anna-Karin Evaldsson.

Glue together at least five layers of acorns to create dimension. Shape the body a little and adhere the hat with foam tape. I used Simon Says Stamp new foam tape.

Layers of ink - Autumn Leaves Resist Technique by Anna-Karin Evaldsson. Simon Says Stamp Real Leaves stamp set.

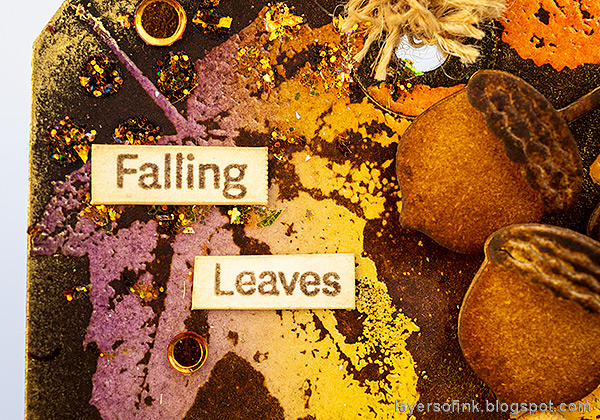
All the textured areas on the leaves will pick up the brown ink, making it look like the leaves were stamped with bright ink on a dark background. Sentiments were stamped with brown ink and cut into strips. This one comes from Real Leaves.

Layers of ink - Autumn Leaves Resist Technique by Anna-Karin Evaldsson.

Adhere the Acorns with foam tape for more dimension.

Layers of ink - Autumn Leaves Resist Technique by Anna-Karin Evaldsson.

The sentiment comes from Simon Says Stamp Sassy Thankful set and was stamped with Pawsitively Sherbet ink and die cut with the coordinating die. Ink the edges slightly and adhere with foam tape.

Layers of ink - Autumn Leaves Resist Technique by Anna-Karin Evaldsson.

I also glued some copper sequins to the tag. This sentiment comes from Simon Says Stamp Forest Scenery. 

Layers of ink - Autumn Leaves Resist Technique by Anna-Karin Evaldsson.

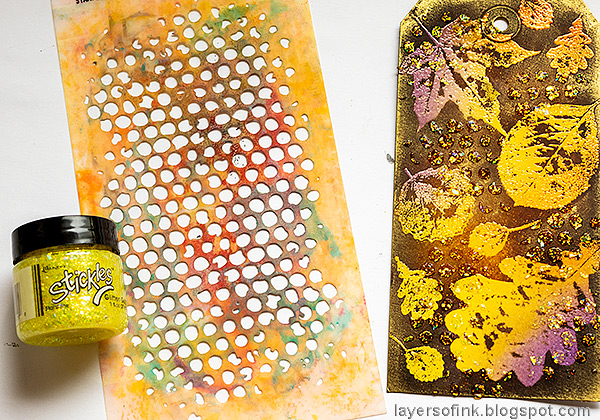
The Stickles glitter gel adds interest and glitter, while still blending into the background.

Layers of ink - Autumn Leaves Resist Technique by Anna-Karin Evaldsson.

By gluing die cuts together, you can make dimensional embellishments also with wafer-thin dies.

I hope you enjoyed this tutorial! Try it out with different types of stamps and color combinations.


Thank you so much for stopping by here today and don't miss the STAMPtember® fun at Simon Says Stamp.


Happy stamping!

Anna-Karin


Supplies:

* Please note: the links are affiliate links, for which I receive a small percentage of sales generated by the link, at no extra cost to you.

No comments:

Post a Comment

Thank you so much for leaving a comment! Happy Crafting!