
Hi and welcome to my blog! I am so happy to take part in the Simon Says Stamp Let's Chill Blog Hop to celebrate the new release. If you are following along in the hop, you should have come here from Jennifer Kotas.
Please note: this post has affiliate links, for which I receive a small percentage of sales generated by the link, at no extra cost to you.


I had such fun making my summery tag.

I wanted to an explosion of summer-time colours on this tag and thought it fit well with the fun Beach Party Umbrellas Background stamp. You could easily turn this into a card instead. I planned to do an art journal page first, but wanted to make very dimensional butterflies and they wouldn't have fitted well in an art journal. The butterflies were made with the Simon Says Stamp Graceful Butterflies set, which is a set with dies and a coordinating embossing folder. You can find five or these sets in the Let's Chill release.

Start by white emboss the Beach Party Umbrellas background stamp on a tag cut from watercolor paper.

I used the Detail Round Blending Brushes from Let's Chill to color the tag with Distress Ink. Aren't these brushes the cutest? Coloring was very quick and the brushes made it so simple.

Use paint brushes and water to blend the inks. I let the colors mix, but cleaned my brushes before moving on to the next color.

When dry, splatter with some more Distress Ink, using the same colors.
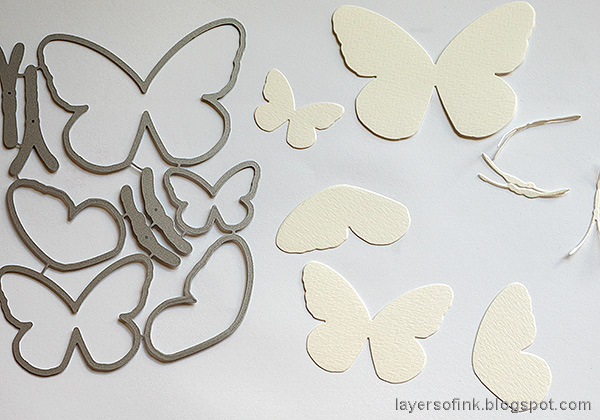
Die cut butterflies from watercolor paper and vellum using the die in the Graceful Butterfly Set.

Emboss in the coordinating folder, turning the flat butterflies into detailed dimensional butterflies in one go.

I wanted a distressed look to the butterflies and applied embossing ink to the raised areas, working quickly and not particuarly carefully.


Apply Distress Ink on a non-stick craft sheet, mist with water and press the butterflies into the ink. Let dry and repeat until you are happy with the look. I aimed for a textured and uneven look.

The sentiments were cut from the Sentiment Strips Chill Summer. I also drew a white border around the tag.

The blending and splattering gives a vibrant and interesting look to the background. I also added some sequins.

The splatters add a nice touch, but you can also leave them if you want a more clean look.

I shaped the wings of the butterflies and layered them with a vellum butterfly at the bottom. Die cut the bodies from white glimmery paper.


The butterflies are pretty dimensional as you can see here.

Don't miss all the inspiration along the hop. There are of course prizes to be won too, and at each stop on the hop SSS is giving away a $25 coupon, randomly drawn from those who leave a comment. The winners will be posted post on the Simon Says Stamp store blog on Wednesday the 22nd of June.
Your next stop on the hop is Sandi MacIver. Don't miss to see what she has created. If you get lost along the way, here are all the stops:
Anna-Karin Evaldsson (you are here)
This is the second blog hop for the Let's Chill, don't miss blog hop day number 1 which was yesterday.

Thank you so much for visiting my blog today!
Happy crafting!
Anna-Karin
Supplies:
* Please note: the links are affiliate links, for which I receive a small percentage of sales generated by the link, at no extra cost to you.
* Please note: the links are affiliate links, for which I receive a small percentage of sales generated by the link, at no extra cost to you.
Fab Tag! Look at your pretty, pretty colors and your beautiful butterflies! Gorgeous! Always a delight to pop in!
ReplyDeleteThis card is beautiful!
ReplyDeleteThe Butterflies pop wonderfully with coloring, dimension & texture.
ReplyDeleteMelissa
"Sunshine HoneyBee:
WOW!
ReplyDeleteSo colorful! I like the way you combined the beach umbrellas stamp with the butterflies.
Thanks for sharing your talent.
Those brushes are so cute! You really can do some small area blending with them!
ReplyDeleteWonderful Art Tag! I love how colorful and dimensional it is.
ReplyDeleteThe speckles look really cool on your butterflies. I love how it tones down the colors.
ReplyDeleteWow - so much color and so much to see! I love it.
ReplyDeleteYour tag is truly and explosion of color...so beautiful! I would have never thought to emboss and sprinkle the butterflies...what a great idea!! Going to have to try that sometime!
ReplyDeleteBrilliant way to distress those beautiful butterflies and layer them up. All with stunning results- thx so much for the tips and inspiration!
ReplyDeleteWow! So much going on on this tag! The colors and texture are beautiful!
ReplyDeleteHoly moly, this tag is stunning!!
ReplyDeleteI am going to try the white embossing with a background stamp. It's a neat technique, thanks for your creative inspiration!
ReplyDeleteSo pretty and what a great tip on cutting out the pieces and then embossing them all! Bright and cheery and the new detailed blending brushes can in handy on the background.
ReplyDeleteThis tag and the butterflies on it...more than a tag..part of gift for sure...and the technique...a new one for me
ReplyDeleteAWESOME tag, the umbrellas make me think of tie die.
ReplyDeleteBeautiful, colorful card. Those butterflies are gorgeous.
ReplyDeleteAbsolutely gorgeous! Love everything about this!
ReplyDeleteWow!!!! Yor project for today is my favorite!!! So amazing details!! Thank you so much for your tutorial and inspiration!!
ReplyDeleteAmazing tag Anna-Karin. Love the bright and cheerful colors... those layered butterflies are so pretty! Thanks for the inspiration!
ReplyDeleteThis is perfect as a summertime piece and the beautiful butterflies add to it's awesomeness!
ReplyDeleteSo colorful, beautiful!
ReplyDeleteDear Anna
ReplyDeleteThe tag with bright colors is very elegant. Love the way you colored the butterflies.thanks for the inspiration.tc stay safe
Love it. Wild and crazy and wonderful.
ReplyDeletethanks for sharing. txmlhl(at)yahoo(dot)com
Love it! So bright and cheerful!
ReplyDeleteLove these beautiful designs and colors! The umbrellas make a fabulous background for your pretty butterflies!
ReplyDeleteI love your creation. It's is an amazing call to summer fun. Love the colors. Thank you so much for sharing!
ReplyDeleteYour tag is so colorful! I love the technique you used on the butterflies. I’m going to have to try that!
ReplyDeleteThis is absolutely stunning and so colorful & cheerful. My favorite!!
ReplyDeleteSuch happy card! I love your gorgeous card!
ReplyDeleteAwesome tag. Love those dies for the embossing folders. So cool. Hugz
ReplyDeleteThese colors just radiate summer.
ReplyDeleteIt doesn't get any better than colorful butterflies and umbrellas!
ReplyDeleteLove your bright and cheerful tag.
ReplyDeleteHow fun and colorful!
ReplyDeleteSo much color! The small blending brushes are perfect for adding detail
ReplyDeleteThis tag is spectacular! It bursts with color and texture, and I love the butterflies layered over the beach umbrella background
ReplyDeleteGreat colors - so bright! Thank you for sharing.
ReplyDelete