Monday, May 30, 2022

Hot Air Balloon Tag

Hi friends! I hope you had a good weekend! It is Monday and I am here with a Simon Says Stamp Monday Challenge Blog project.

Please note: this post has affiliate links, for which I receive a small percentage of sales generated by the link, at no extra cost to you.


This week we have an It's Up In The Air theme at the Simon Says Stamp Monday Challenge Blog. I hope you will join us and don't miss the last project by our May guest designer Ann Chuang aka Ann Chuang Crafts

Layers of ink - Hot Air Balloon Tag Tutorial by Anna-Karin Evaldsson.

I can't believe May is almost over. We had a long weekend here and had fun spending it with family at the Astrid Lindgren theme park. I particularly enjoyed the miniature houses with all the vintage and retro details.

For this week I made a tag with a dimensional hot air balloon, using some favorite techniques. The balloon was stamped on Wendy Vecchi Clearly For Art Modeling Film, which keeps its shape perfectly and gives great dimension.

Layers of ink - Hot Air Balloon Tag Tutorial by Anna-Karin Evaldsson.

Start by stamping the balloon from Tim Holtz Stamper's Anonymous Remnants set with permanent ink on Clearly For Art Modeling Film.

Layers of ink - Hot Air Balloon Tag Tutorial by Anna-Karin Evaldsson.

Cut the balloon out and turn it around. Color at the back with alcohol inks. I forgot to take a photo of the next step. Gently heat the balloon with a heat tool and shape it. It will keep its shape perfectly once it has cooled down. Be careful not to burn yourself.

Layers of ink - Hot Air Balloon Tag Tutorial by Anna-Karin Evaldsson.

Coat a tag with gesso and let it dry. Paint with Distress Paint and mist heavily with water to blend.

Layers of ink - Hot Air Balloon Tag Tutorial by Anna-Karin Evaldsson. Apply paste through a cloud stencil.

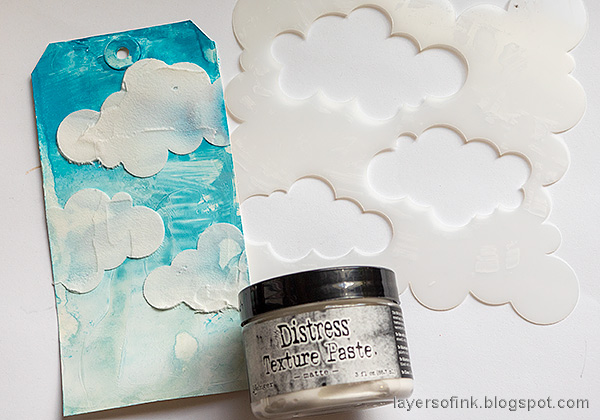
Place Simon Says Stamp Clouds For Days stencil over the tag and apply Texture Paste through it with a palette knife. 

Layers of ink - Hot Air Balloon Tag Tutorial by Anna-Karin Evaldsson.

When my paste was dry, I got the idea of adding some shine to the clouds, which would glitter through the balloon. I placed the stencil back and applied Matte Medium through it. Then it was sprinkled with Distress Mica Flakes.

Layers of ink - Hot Air Balloon Tag Tutorial by Anna-Karin Evaldsson.

Stamp the background randomly with Simon Says Stamp Stained Glass background stamp and Simon Says Stamp Pawsitively Saturated Marine and Royal ink.

Layers of ink - Hot Air Balloon Tag Tutorial by Anna-Karin Evaldsson.

Here you can see the dimension of the balloon better. I stapled it to the background. The Clearly For Art Modeling Film will keep its shape perfectly.

Layers of ink - Hot Air Balloon Tag Tutorial by Anna-Karin Evaldsson.

The tag was finished with Clippings Stickers and Vintage Design Tape. I love using Clippings Stickers to find sentiments. 

Layers of ink - Hot Air Balloon Tag Tutorial by Anna-Karin Evaldsson. Add Tim Holtz Design Tape.

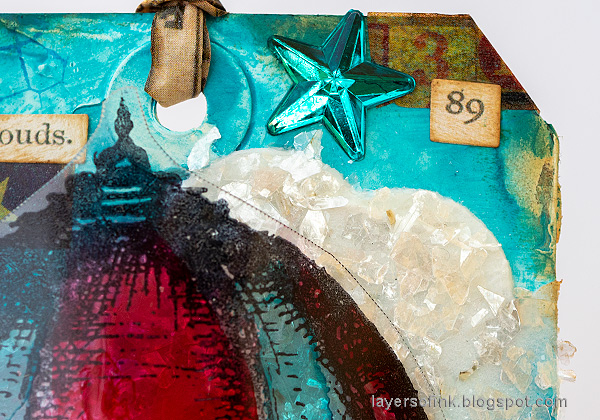
The Mirrored Stars were colored with alcohol ink.

Layers of ink - Hot Air Balloon Tag Tutorial by Anna-Karin Evaldsson.

The mica flakes give a very nice shine to the clouds and you can see it through the balloon too.

Layers of ink - Hot Air Balloon Tag Tutorial by Anna-Karin Evaldsson.

I hope you will join us this week in our It's Up In The Air theme . You have a chance to win a $25 gift voucher to do some fun shopping at Simon Says Stamp. You have until Monday 8am Ohio time. 1pm UK time, 2 pm CET to join in.


Do you use Instagram? If so please add #sssmchallenge so we can see your entries there too.


Thank you so much for visiting my blog today! 

Happy crafting!

Anna-Karin

Supplies:

* Please note: the links are affiliate links, for which I receive a small percentage of sales generated by the link, at no extra cost to you.

No comments:

Post a Comment

Thank you so much for leaving a comment! Happy Crafting!