Monday, March 8, 2021

Shades of green tag

Hello stampers! I hope you are well and had a good weekend. The boys and I did some fun crafting with clay and fibers yesterday and spent a lot of time outdoors. 


This week at the Simon Says Stamp Monday Challenge Blog we have an 'Use something green' theme. Green is one of my favorite colors and I love seeing how nature explodes in shades of green in spring. We aren't quite there yet, but it is starting. 

Don't miss the beautiful project by our March guest designer Sandra Rupp.

Layers of ink - Spring Forest Inky Tag Tutorial by Anna-Karin Evaldsson.

I made a scenic stamping tag this week, with an easy, but very effective inking technique. There is also heat embossing with both metallic and Distress Glaze powders. I was very happy to get the package with the stamp sets I designed from the Simon Says Stamp Love You, Too release, namely the Forest Scenery and the All Seasons Tree. I used the Forest Scenery here.

Layers of ink - Spring Forest Inky Tag Tutorial by Anna-Karin Evaldsson. Ink with Distress Ink.

Start by inking a tag with Distress Inks. I used green shades as well as a little Frayed Burlap.

Layers of ink - Spring Forest Inky Tag Tutorial by Anna-Karin Evaldsson.

Mist with water and add some drops.

Layers of ink - Spring Forest Inky Tag Tutorial by Anna-Karin Evaldsson. Stamp trees from Simon Says Stamp Forest Scenery.

The Forest Scenery set has a variety of pine trees in different sizes, which makes it easy to create a scene and to get a sense of perspective. Stamp one of the larger trees with embossing ink and emboss with Rustic Wilderness Distress Glaze. After embossing the first time, I added another two layers of embossing glaze, not worrying about getting the powder everywhere. This gives shades of green, from just the one powder.

Layers of ink - Spring Forest Inky Tag Tutorial by Anna-Karin Evaldsson. Stamp deer from Simon Says Stamp Forest Scenery.

The larger deer were embossed with Copper powder, adding two layers. Always be very careful when using a heat tool and never touch the melted powder until it has cooled down completely.

Layers of ink - Spring Forest Inky Tag Tutorial by Anna-Karin Evaldsson.

Add a smaller tree and emboss it with Cracked Pistachio Distress Glaze. I also dropped in a little Rustic Wilderness. The group of three smaller trees were also embossed with Cracked Pistachio using three layers. At this stage, you might think that the scene looks a little weird, but just wait until the next step and magic will happen.

Layers of ink - Spring Forest Inky Tag Tutorial by Anna-Karin Evaldsson. Ink with more Distress Ink.

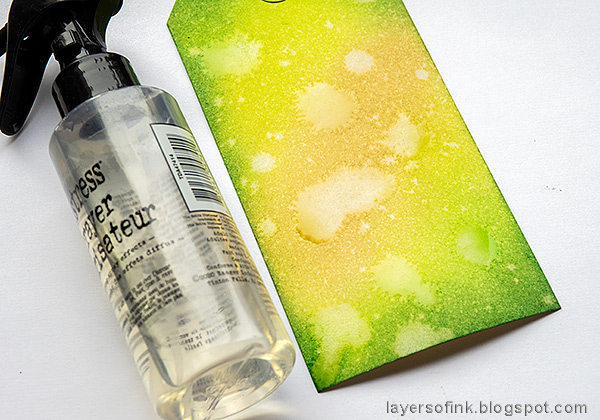
Tear a piece of printer paper into a rough hill and place on the tag as a mask. Ink with Mowed Lawn and Rustic Wilderness. This creates a hill and grounds the stamping to the background.

Layers of ink - Spring Forest Inky Tag Tutorial by Anna-Karin Evaldsson.

Tear another piece of paper and repeat at the group of three trees. See how they suddenly stand on a high hill instead of float in air as they did earlier. 

Layers of ink - Spring Forest Inky Tag Tutorial by Anna-Karin Evaldsson.

I added third hill, using less ink so that it looks fainter and thereby also further away.

Layers of ink - Spring Forest Inky Tag Tutorial by Anna-Karin Evaldsson.

I see deer often on my walks and outside the window and the deer on this stamp set were inspired by the deer who come and visit outside the window. The two layers of copper powder gives a slightly textured look. I rubbed Twisted Citron paint into the words on the Thought Token.

Layers of ink - Spring Forest Inky Tag Tutorial by Anna-Karin Evaldsson.

I don't know if you can see it here, but some of the lighter Cracked Pistachio powder also got stuck to the larger tree, adding another shade of green there.

Layers of ink - Spring Forest Inky Tag Tutorial by Anna-Karin Evaldsson.

The Distress Glaze is very shiny. I love the look.

Layers of ink - Spring Forest Inky Tag Tutorial by Anna-Karin Evaldsson.

I didn't worry about removing all stray powder, which led to one of my favorite parts of this tag. The texture of the strayed powder acting as a resist for the ink. If you look under the trees, you see it clearly there.

Layers of ink - Spring Forest Inky Tag Tutorial by Anna-Karin Evaldsson. Shades of green.

The mummy cloth was dyed with green Distress Inks so that it coordinates with the tag. 

If you want more inspiration using the Forest Scenery set, I had a tutorial on the Simon Says Stamp store blog yesterday, for a spring forest art journal spread.

I hope you will join us this week in our Use Something Green challenge. You have a chance to win a $25 gift voucher to do some fun shopping at Simon Says Stamp. You have until Monday 8am Ohio time. 1pm UK time, 2 pm CET to join in.


Do you use Instagram? If so please add #sssmchallenge so we can see your entries there too.


Thank you so much for taking the time to stop by here today! 

Happy crafting!

Anna-Karin

Supplies:

* Please note: the links are affiliate links, for which I receive a small percentage of sales generated by the link, at no extra cost to you.

3 comments:

  1. Absolutely GORGEOUS tag Anna-Karin!! the whole design is just lovely!!

    Hope you have a great week!
    luv
    Lols x x x

    ReplyDelete
  2. Beautiful, luscious shades of green! Love how you used your stamps, Anna-Karin, to created a lovely forest scene. hugs, Maura

    ReplyDelete

Thank you so much for leaving a comment! Happy Crafting!