Hi crafters! Today I have a video tutorial to share with you for a fun and easy background. I turned my background into an art journal page, but you can also use it for cardmaking, tags or scrapbooking. I am going to try to do more videos. It is mainly a time problem, but I am going to try to do a technique video now and then.
Here is my finished art journal page. I worked in the large Dylusions journal and the main element of the page is the Large Outline Happy die by Simon Says Stamp, from the new Let's Connect release. The background was done with gesso and Distress Paint and it is a great neutral background that works great for many different projects. It has enough texture to be interesting, but without overwhelming other elements and it looks great combined with both bright colors, as here, or with neutral colors.
The project started with a pile of scrap papers, most of them being tests for watercolor paints and combos. They might not look much to the world as they are, but they are great for die cutting.
Die cut the Large Outline Happy from various scrap papers. You can also use scraps of patterned paper.
Die cut it five times from white cardstock and once from black. Save the left-over letters for later.
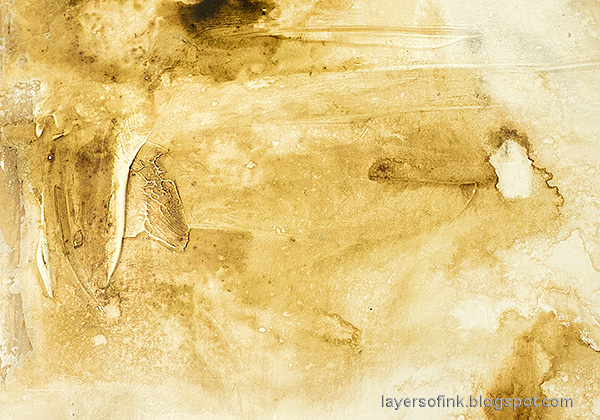
Coat the paper with gesso using a palette knife. Leave some texture marks and don't let the gesso go all the way to the edge. I forgot to say this part in the video. At this stage, I decided that it was a cool effect to see on video, so I moved outdoors where the light was better and recorded the video.
Hands stained with blueberries! You might also spot a little craft injury. I burnt myself pretty bad on the iron while ironing one of the boys' huge Pokemon Hama bead figure.
Here's a close up of the texture. I love the fact that you can't completely control or plan how this background will end up. The texture of the gesso, together with the paint and water gets a life of their own.
And more texture.
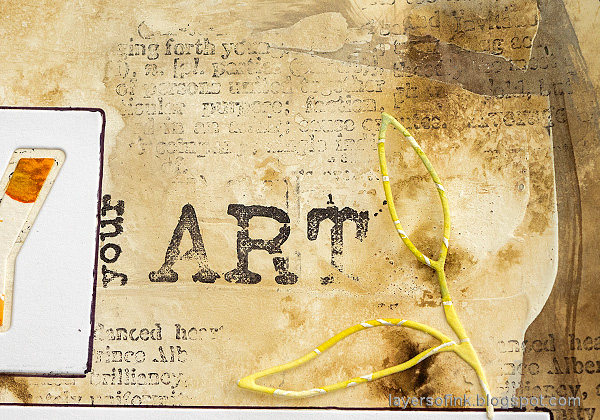
Stamp the background with the Woodware Craft Collection Make Art stamp. I partially planned the placement of the sentiments from this great stamp and tried to avoid the areas where I was planning to place the die cut. Stamp the rest of the page here and there with the SSS Good Reading stamp.
I added a black outline letter to each die cut, spelling out the word HAPPY, starting with the H on the top die cut panel.
The letters on this panel were die cut from a piece of watercolor that had been white embossed with the SSS Spring Flowers Background and then painted. See the nice texture from the white embossing. You could not guess it is in fact flowers.
The stamping was on purpose done in an imperfect manner, since it fitted with the background. Here you can see the difference in color and texture where there is gesso and along the edge where there was no gesso.
Thanks for sharing how you did the background for this in your video, Anna-Karin! Love the technique, and great page! Have fun blueberry picking, Maura
I have a question for you, Anna-Karin! I recently purchased the Leafy Branch die and it WILL NOT cut in its entirety. Do you have problems with yours? What is your *sandwich* for cutting? Thank you. SuZeQ
Hi Sue! Which die cutting machine do you have? Every machine is a little different. Sometimes a paper shim is enough. Another trick is to place a piece of wax paper between the die and the paper. If that doesn't work, and with the very intricate dies, I use the Sizzix Chrome Precision Base Plate. I use a Sizzix Big Shot and the Precision plate usually does the trick - but only use it with wafer-thin dies, never with steel-rule dies. I added it to the supply list, since I seem to have forgotten to add it the first time. I am pretty sure I used it to die cut the Leafy Branch, especially since I used fairly heavy watercolor paper. Try the wax paper trick first and run the die back and forth two or three times. I hope that works!!


Thanks for sharing how you did the background for this in your video, Anna-Karin! Love the technique, and great page! Have fun blueberry picking, Maura
ReplyDeleteI have a question for you, Anna-Karin! I recently purchased the Leafy Branch die and it WILL NOT cut in its entirety. Do you have problems with yours? What is your *sandwich* for cutting? Thank you.
ReplyDeleteSuZeQ
Hi Sue! Which die cutting machine do you have? Every machine is a little different. Sometimes a paper shim is enough. Another trick is to place a piece of wax paper between the die and the paper. If that doesn't work, and with the very intricate dies, I use the Sizzix Chrome Precision Base Plate. I use a Sizzix Big Shot and the Precision plate usually does the trick - but only use it with wafer-thin dies, never with steel-rule dies. I added it to the supply list, since I seem to have forgotten to add it the first time. I am pretty sure I used it to die cut the Leafy Branch, especially since I used fairly heavy watercolor paper. Try the wax paper trick first and run the die back and forth two or three times. I hope that works!!
Delete/ Anna-Karin
Looked your little tutorial - I have some distress ink I've yet to use - looks like a fun way to begin!
ReplyDelete