
Hello friends! I can't believe how close we are getting to Christmas now. Today, I have a Christmas ornament tutorial to share with you, which would also be a great little gift.

This is the second ornament that I make on top of a wooden coaster. I am keeping the first Winter Wonderland one, but this one I will give away as a gift. I found cheap wooden coasters in a shop and thought they would make a great base for projects. If you don't have coasters, you can also use layers of chipboard or mat board, or a small canvas board.

Start by coloring three trees with Pine Needles. Protect your clothing and work surface, since it gets a little messy.
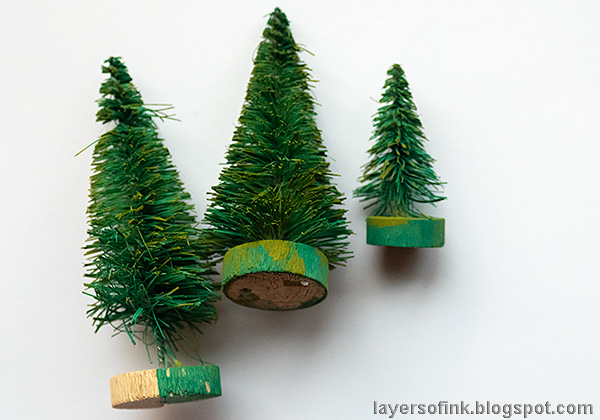
When dry, add some Peeled Paint.

Color mica flakes with alcohol ink. I also made a teal version.
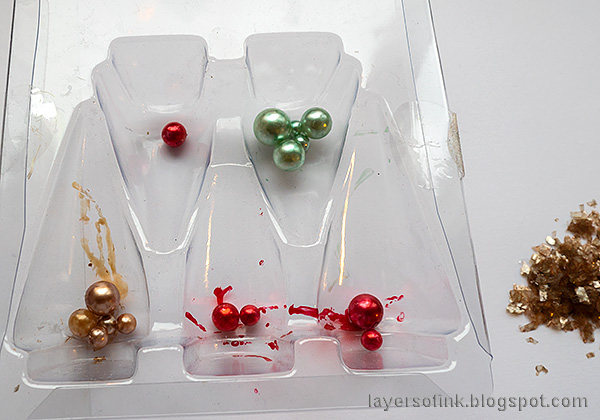
Color baubles with alcohol ink. I placed both baubles and mica flakes in a plastic bad and added a couple of drops of ink.
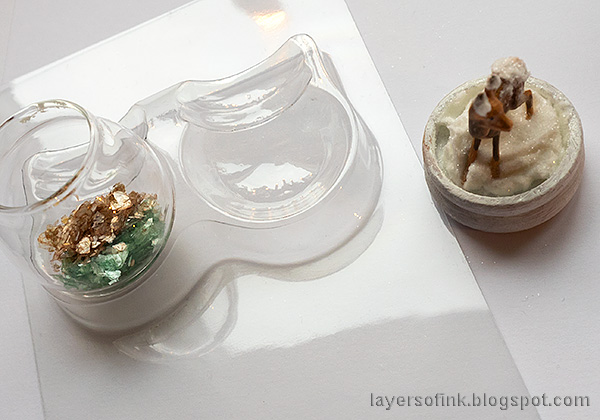
Color a deer in the same way as I did for my Winter Wonderland, add a little texture paste to the base of a snowglobe (first painted white) and sprinkle Rock Candy Glitter on top. You can use the snowglobe packaging to hold the globes in place while working. Add the colored mica, and then a tiny bit of glue around the rim. Place the base onto the glass.

Add some white paint to the trees and then glue baubles in place with Matte Medium. Add more medium to the tree and sprinkle colored mica flakes on top. You can add even more baubles, but I ran out of baubles while making this.
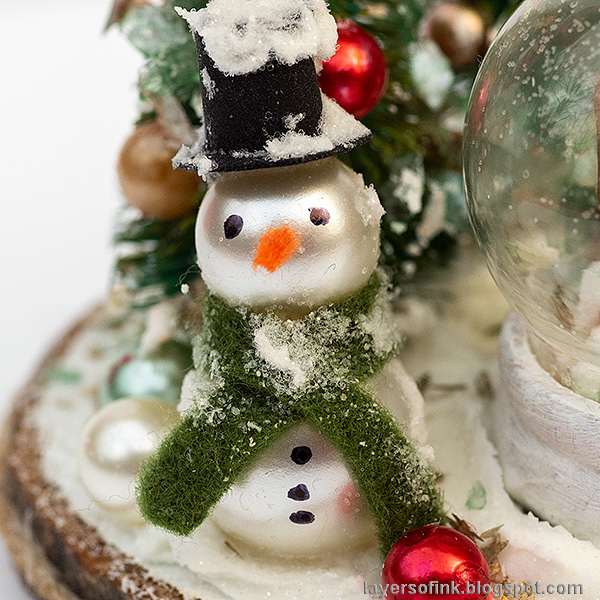
I wanted a little snowman too and had used my last one on the Winter Wonderland project, so instead I made a snowman with baubles. Glue the baubles together and then add a scarf cut from felt. Cut a hat from black paper and glue to the head. Draw eyes and buttons and add a felt carrot as a nose. Apply some texture paste to the snowman and sprinkle Rock Candy on top.

Prepare the coaster as in the Winter Wonderland tutorial. Apply texture paste with a palette knife and press the items into the paste. The paste acts as a glue. I only made an impression for the snowglobe, since I wanted the recipient to be able to remove it and shake it. It looks like it is standing in the snow, but it it lose. Sprinkle some leftover colored mica flakes on top and then sprinkle Rock Candy Glitter everywhere.

I just love the look of these baubles. Here you can also see the glitter from the Rock Candy.
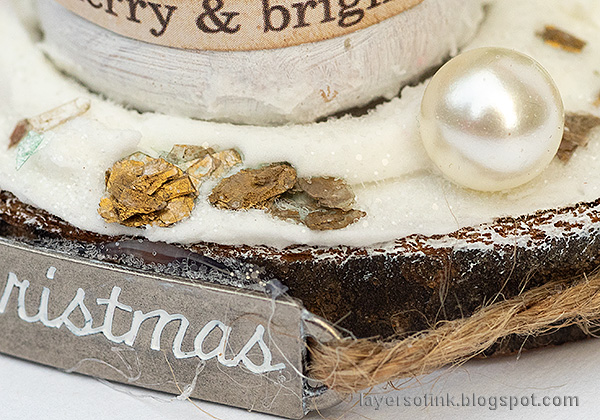
Some of the mica flakes were colored with gold metallic mixative.

I shaped a word band, rubbed white paint into the letters and tied it to the base with twine. Add matte medium to the back of the word band to make sure it stays put.

Here's a close up of the little deer in the snowglobe. Shake the globe and the colored mica flies around.
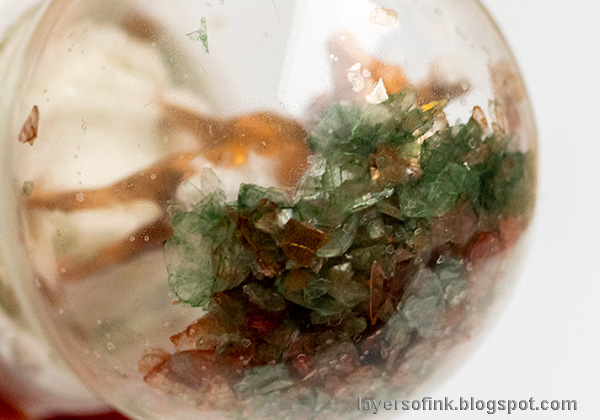
It will look just as nice, or nicer, if you leave the mica flakes their original color, as I used in my Winter Cottage in a Snowglobe, but I wanted to try dyeing some mica to see how it would look.

The ornament looks good from all sides, and even from above.

I hope you enjoyed this project. With some assistance, it would be a great project to do with kids over Christmas. They would love to make their own trees, snowmen and snowglobes.

Thank you so much for taking the time to visit my blog today!
Happy Christmas crafting!
Anna-Karin
Supplies:
* Please note: the links are affiliate links, for which I receive a small percentage of sales generated by the link, at no extra cost to you.
* Please note: the links are affiliate links, for which I receive a small percentage of sales generated by the link, at no extra cost to you.

Cute project...the little Bauble Snowman is adorable...fun stuff! Merry Christmas!
ReplyDeleteJust delightful - I love the deer in the snowglobe and the adorable snowman. The trees look fabulous, all shiny with baubles and mica. Those coasters were definitely a great buy! Hope you have a wonderful Christmas.
ReplyDeleteAlison x