
Hi everyone! I hope your weekend was a good one. We had several sport related activities, which were fun. I also spring-cleaned our windows. It always makes such a big difference. Leo helped, but prefers to water the flowers.

It is a new month and as always when it is a new month, the Simon Says Stamp Monday Challenge team showcases products from a specific designer or company. This week it is Brutus Monroe. You can find all the cool stamps, stencils, embossing powders and coloring media by Brutus Monroe here. You don't have to use their products to join, but it is always fun if you do.
Our theme is 'Add something metallic'. Fun! Don't miss the first project by our May guest designer Ashley with her fantastic blog She Is Crafty. I hope you will stop by her blog to say hi.

I made a butterfly wall-hanging for Leo, which glows in the dark. It is a big hit and he loves the glowing butterfly, trail of sea class and text. I also added metallic bits in the form of embossing powder, faux screws and an embossed sheet of metal. When I was a child, I had a small glow in the dark elephant and a glow in the dark eraser, and I remember how very fascinating I found them. The elephant still stands on a shelf above my desk.

For the background, I started with a sheet of watercolor paper, which was a left-over from my recent play with Distress Resist Spray. You can find the other projects here and here.

Mist with water and drop Aqua Pigment on top. Add more water and more pigment until you are happy with the result. I used Blue Green and Yellow Green Aqua Pigment. Aqua Pigments are liquid watercolors, and there are also metallic versions.

Place the Simple Blend Butterfly stencil on top of mat board and pounce an Emboss It Dabber through it. Emboss with three layers of Glow In the Dark powder. I also added feelers with a marker, but the effect later disappeared somewhat, since I hadn't melted the powder on the feelers properly.

Mix a little water into the Blue Green Aqua Pigment, to make a lighter shade of turquoise. Paint on top of the butterfly.

Around the edge, I embossed Milky Way powder.

Place the butterfly mask on top of the embossed butterfly and then stamp the background with the SSS You Matter Background stamp.

Add a shadow to the butterfly with a pencil.
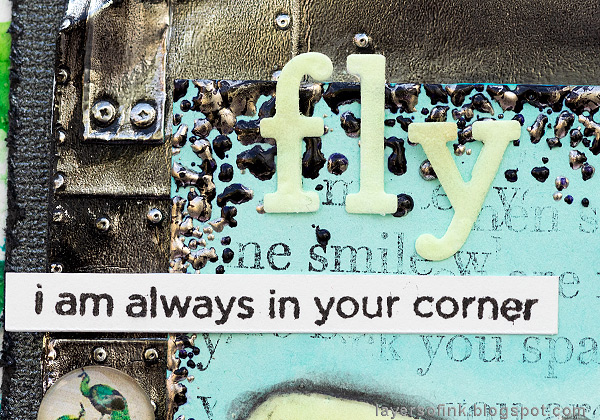
The metallic panel was embossed in Tim Holtz's Foundry 3-D folder and distressed with Black Soot paint. I die cut the title with the SSS Archie Jr Solid set and embossed them with the Glow In The Dark powder.
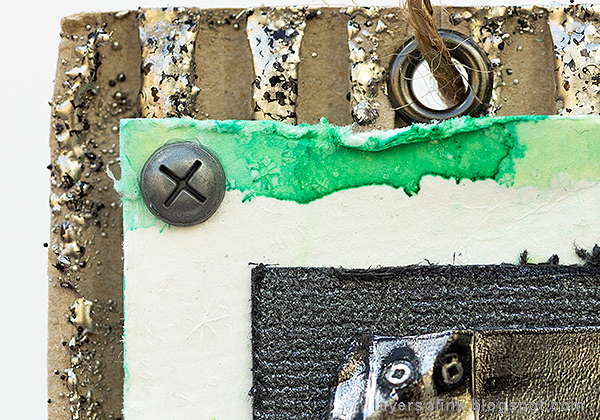
The background is cardboard, embossed here and there with the Milky Way powder. I also used a sheet of Simon Says Stamp Glimmery Coal Cardstock.
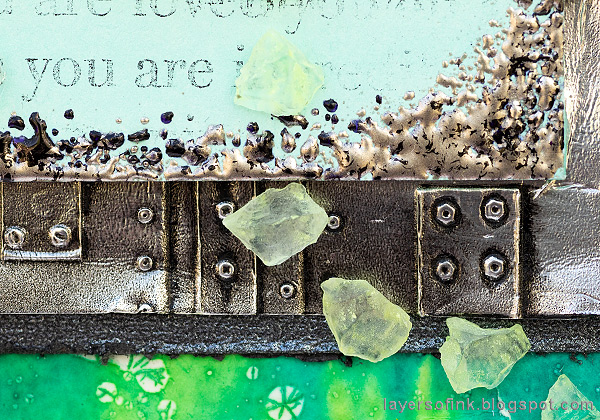
After the butterfly, there is a trail of Glow In The Dark Sea Glass. I love these. For more glow in the dark inspiration, check out the space panel that I made last year.

I also added a couple of Brutus Monroe Peacock Cabochons.

And some of their cool Acrylic Bubbles. I love how they magnify the letters underneath.
I hope you will join us this week in our Add Something Metallic challenge. As always, you have a chance to win a $50 gift voucher to do some fun shopping at Simon Says Stamp. You have until next Monday 8am Ohio time. 1pm UK time, 2 pm CET to join in.


Do you use Instagram? If so please add #sssmchallenge so we can see your entries there too.


Thank you so much for taking the time to visit my blog today!
Happy crafting!
Anna-Karin
Supplies:
* Please note: the links are affiliate links, for which I receive a small percentage of sales generated by the link, at no extra cost to you.
* Please note: the links are affiliate links, for which I receive a small percentage of sales generated by the link, at no extra cost to you.
Fabulous wall hanging Anna-Karin :-) I am sure Leo loves this!! I bought some glow in the dark powder too and havent used it yet, will have to do something with it now!! :-) The whole design of this is gorgeous :-)
ReplyDeletehope you have a great week!
Luv
Lols x x x
Well lookie there a fun and creative glow in the dark Anna-Karin - so beautiful and thanks for showing us how you did it too!
ReplyDeleteLove your project, Anna-Karin! What a delightful gift for Leo to admire both day and night. Beautiful, loving touches! happy May! Maura
ReplyDeletewhat a fun project Anna-Karin and I'm sure Leo will love it and treasure it, hugs kath xxx
ReplyDeleteFun project! love all the layers you created! barbara
ReplyDelete