
Hello and welcome to my blog on this beautiful day! I hope you had a fun weekend and got some crafty time in. We had everything from outdoor soccer in a combination of sleet and wind, to beautifully spring weather later in the day. Nothing makes you quite as wet and cold as sleet, but it was still a fun day.


I had such fun making my project, an altered tin, with lots of tiny details, and telling the story about a tiny boy out on adventures in nature on a beautiful spring day. He has met a friendly bunny, butterflies, ants and ladybugs. I was also inspired by the movie Minuscule: Valley of the Lost Ants, about a ladybug and an ant who becomes friends. We watched it on Friday, and it is really great. Leo loved it. Have you seen it? There is a second movie out now.
I altered an Altoids tin, but you could also make a little shadowbox from a box, or create a springtime scene on a card.
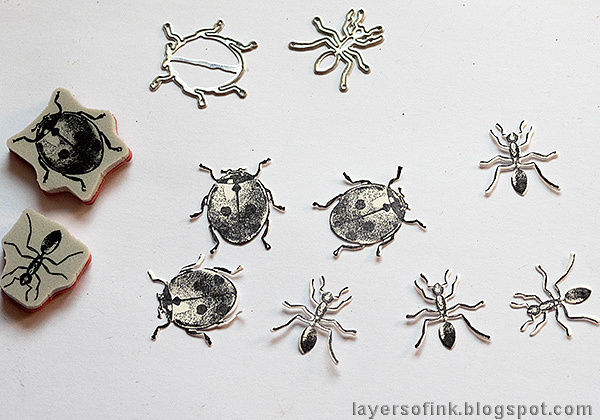
I started out with the ladybugs and ants, stamping them with Tim Holtz Entomology set on watercolor paper and die cutting with the coordinating Sizzix dies. The coordinating dies are very helpful on those thin legs.

Watercolor the ladybugs and ants with Candied Apple and Peeled Paint Distress Ink, by smearing the ink on a craft sheet, misting with water and picking it up with a paint brush. Add details with Distress Markers.

Cut the wings off from one ladybug and coat them with Glossy Accents, also coat the head of the ladybug and the head and body of the ants.

When the Glossy Accents is dry, adhere the wings with foam dots, for dimension.

The flowers and foilage was die cut from watercolor paper using: Funky Floral 1, Funky Floral 2, and Mini Tattered Florals. I watercolored the green paper before die cutting. The bunny and butterflies were die cut with the Springtime Side-order set. I ended up not using the branches and pine cones.


The photos were taken in a field of Wood Anemones, so I kept the flowers mainly white, with just a few of Blue Anemones mixed in. Shape them with the Sizzix Paper Sculpting Tool set.
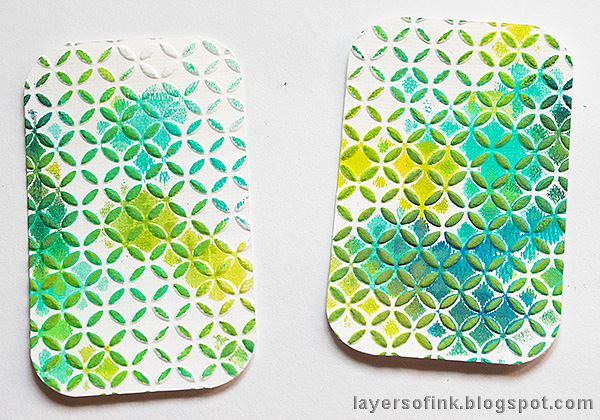
The two inside panels were in my scrap paper box. They were leftover from a gel printing session, and I really like the colors and textures. They had been embossed with Tim's Courtyard folder before using them for gel printing.

I dyed cheese cloth with Distress Ink, to build up the greenery in the background and then layered with foliage, leaves and flowers. In the original photo, Leo holds his hand on a tree stub, but here he is saying hello to the bunny instead. Both of these were mounted with foam dots.

I painted letterpress letters first with white and then with shades of green, and glued them on top of the tin.

The butterflies are meant to be Brimstone butterflies, usually the first butterflies that we see in spring. Shape the wings a little and layer them.

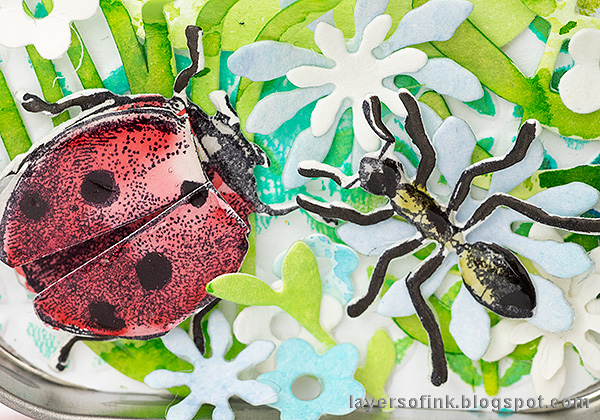
Here is the ant saying hello. You can see the cool effect of the Glossy Accents.

I also tucked some ants in here and there.

On the other side of the tin, I stamped a sentiment from Tim's Warehouse District set, and added more foliage, flowers and bugs.
Here are the two friends from the movie.

On the front of the tin, I added a larger photo taken on the same day, in the field of Anemones. I am looking forward to them making their appearance again soon.

Here you can see the great effect of the Glossy Accents on the ladybugs. It is one of my oldest favorite products, both as a glue and as a coating.

Around the edge of the tin, and on the inside edge, I added some design tape.

Here you can better see the dimension of the different elements. This was such fun to make and the recipient loves his altered tin, with the accompanying story, and already made up new scenarios. For more altered tin inspiration, check out: Vintage Christmas Tin and Winter Scene Tin.
I hope you will join us this week in our Miniature/Tiny Things challenge. As always, you have a chance to win a $50 gift voucher to do some fun shopping at Simon Says Stamp. You have until next Monday 8am Ohio time. 1pm UK time, 2 pm CET to join in.


Do you use Instagram? If so please add #sssmchallenge so we can see your entries there too.


Thank you so much for taking the time to visit my blog today!
Happy crafting!
Anna-Karin
Supplies:
* Please note: the links are affiliate links, for which I receive a small percentage of sales generated by the link, at no extra cost to you.
* Please note: the links are affiliate links, for which I receive a small percentage of sales generated by the link, at no extra cost to you.
Wow... this is such a stunning creation, Anna-Karin. Love all the fabulous details. The glossy effect and those flowers are so beautiful! :)
ReplyDeleteOh my goodness how cute is this!! absolutely adorable!! spring in a tin!! brilliant :-)
ReplyDeleteHope you have a great week!
luv
Lols x x x
I love everything about this! =)
ReplyDeleteand it surely seems that Leo should still be a baby! ;-)
ReplyDeleteWhat an amazing project! This is truly delightful. I bet Leo will love looking at this again and again.
ReplyDeleteWow!!! Your projects are always stunning!! Love this altered tin full of wonderful details!
ReplyDeleteI can't believe he is already so big!!! His pic in this makes this uber fabulous! LOVE the bunny, the bugs, the whole scene in the tin...all so fabulous!
ReplyDeleteSuch a bright and sweet scene with your sweet kiddo as the highlight! I love this, Anna-Karin!
ReplyDelete*mwah*
Steph
Simon Says Stamp!
Oh my, this is a really tiny project with lots of micro details. I love them all used together and I adore the scene you put into the tin. Lovely spring project. Hugs, Macarena
ReplyDeleteLeo must really love this tiny treasure, Anna-Karin! I love, love, love how you put a tiny Leo into the delightful nature scene you created in the tin. This is one make destined to become a family treasure!! Wonderful project, and I have to check out the movie you mentioned...even with no little ones around, I still like watching kids movies. Just saw Mary Poppins Returns. hugs, Maura
ReplyDeleteSo adorable Anna-Karin and so many tiny amazing details and layers, I love how you've included Leo in amongst the flowers with his garden friends! Thanks so much for sharing it, Deb xo
ReplyDeleteBasically, the greatest art here is Leo - just saying - however, your work is always a delight! I am always looking forward to see what you create --- Thanks for sharing this cool tin! Fabulous work - I have on order some embossing paste - so I am plan to get back here - look at some of your work and get my craftroom messy creating! Thanks for all of the cool ideas you share - someday I will grow up to be just like you Anna-Karin! Who knows? Have a blessed day! I am off to visit with our dear friends over breakfast!
ReplyDeleteWhat an incredible idea and creation! I am blown away!
ReplyDeleteThis is really lovely! I can't tell you how many times I've thought how lucky your boys are to have a mom who can preserve pieces of their childhood so beautifully! This is such a great combo of art and photography and was such a treat to see!
ReplyDeleteSo sweet and fun! Love the photo you made center stage!
ReplyDeletethis is just adorable, how cute is Leo meeting his animal and Entomology friends, hugs kath xxx
ReplyDeleteThis is amazing, Anna-Karin! Love this tiny project with all the small pretty items, so cute and fun! Hugs, Sandra
ReplyDeleteI adore the way you insert your family pics in you creation! You create an incredible and beautiful mix! Barbara
ReplyDeleteAwww...what a dear little keepsake! I love everything about this lovely little miniature frame and the details you have added.
ReplyDeleteThank you so much for sharing it! :)