Hello everyone! Today I am sharing a step-by-step tutorial for a very easy and effective technique to use with your
Sizzix embossing folders. I am very fond of resist techniques and wax crayon resist is fun to do with stamps, so I was thinking that there might be a way to do something similar but with embossing folders instead. This dry embossed wax resist tutorial is what I came up with.
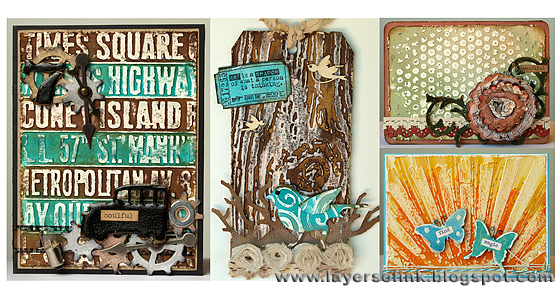
I used
Tim Holtz Sizzix texture fades and made a whole bunch of backgrounds. Three were turned into cards, one into a tag and some I kept for later.
Let's get started:
Emboss watercolour paper in different embossing folders. I also embossed a manila tag (not on the photo), you can try other surfaces as well.
Starting with the cool
Subway folder. Use a white wax crayon and 'colour' all the embossed areas. I used the crayon sort of on its side, and quickly went over the whole surface. The crayon I used was a white Caran d'Ache Neocolor wax oil pastel, but other wax crayons should work too, test them on a small piece of paper first. You will see that the paper turns a bit shiny where you have applied the crayon. Don't worry too much about getting a little bit on the recessed parts too, but it easier to work with an embossing folder that doesn't have too many open areas.
Place your paper on your craft sheet and swipe Distress Stains over it. I used two colours (Gathered Twigs and Peacock Feathers), alternating for each line. The areas with wax crayon resist the ink. You can also use Distress Inks, for example, by smearing them on your craft sheet, misting with water and dipping the paper into the inks. The technique will work just as well with watercolours.
Leave to dry and blot off excess ink from the waxed areas. Cool isn't it, and very easy.
For the next background, I used the
Rays embossing folder and inked the rays with Mustard Seed. As you can see I got quite a bit of ink in between the rays, but that didn't matter for this technique, so I wasn't careful.
Go over the embossed areas with your wax crayon. No need for perfection since we are looking for a distressed result. Since the crayon is white, it will cover some of the ink and make it much lighter. I added some extra rays with the crayon too and covered some of the area below the rays.
Colour with Distress Stains (Mustard Seed, Scattered Straw, Spiced Marmalade) making it lighter towards the top and see the magic happen.
The finished rays, meant to look like a sunset.
I embossed a manila tag with the
Woodgrain folder and another piece of watercolour paper with the
Patchwork folder. The woodgrain was inked by swiping Antique Linen Distress Stain from top to bottom and adding just a bit of Frayed Burlap. The Patchwork was inked with Distress Inks and an ink blending tool.
Apply the crayon over the embossed areas, working from top to bottom aiming for a bit of a streaky appearance.
Colour with Gathered Twigs and Walnut Stain distress stains in a streaky motion. Love how this one turned out. I didn't worry about the unembossed part at the bottom since I was planning to cover it up.
A close-up of the woodgrain textures.
I inked a second Patchwork panel, using darker colours Distress Ink.
As before, apply the crayon to the embossed parts.
The lighter Patchwork panel was covered with Gathered Twigs Distress Stain and the one with the darker inks with Black Soot.
For the
Bubbles, I again applied the wax crayon to the embossed areas. Then I squeezed out a little bit of Distress Stains on my craft sheet (Bundled Sage, Antique Linen, Frayed Burlap), misted the paper with water and pressed into the ink. This gives a lighter, more fluid, watercolour look.
Here's another example using the
Bricked folder and Barn Door and Fired Brick Distress Stains.
You can make embellishments too. I wanted some dimension, so I glued watercolour paper to grungeboard and when the glue was dry I die cut a
bird and two
butterflies from it. The bird was embossed in the
Swirls folder and the crayon applied on top of the embossed areas, as before. On the butterfly, I simply dragged the crayon around the edges and along its body and made some dots on the wings.
Colour with Distress Stains. The bird was coloured with Gathered Twigs, Evergreen Bough and Peacock Feathers, the butterfly with Salty Ocean and Tumbled Glass.
Time to finish some cards:
For the first card, I wanted to continue the New York city theme of the texture fade, and cut some
gears and a
mini jalopy from grungeboard, as well as a
Cargo Stencil number 7. The car and the number were painted black and the gears were coloured with metallic Distress Stains. All the pieces were sanded and inked. The car and the number were coated with Glossy Accents for a shiny look.
I also added a piece of filmstrip ribbon, a light bulb, game spinners, a washer and a chitchat sticker.
A close-up of the car. A piece of mica was placed behind it as windows. The car was attached to the card with foam dots for dimension.
The gears and the number were glued in the upper left-hand corner with the game spinners pointing to the car. I also distressed the edges of the embossed panel.
A totally different effect on this bright and happy card. I didn't want to cover up too much of the rays, so I just used two butterflies, adding twisted wires and chitchat stickers to them. The card was wrapped with two pieces of twine.
A close-up of the resist butterflies, adhered with foam dots.
The edges of the embossed paper were distressed, inked and the corners rounded. I had a left-over flower from my
Love ATC Box tutorial, made with Eileen Hull's
Wrapped 3-D Flower and
Flower Layers w/Heart Petals dies.
Flourishes were die cut from Core'dinations Kraft-Core cardstock, sanded and covered with a bit of Antique Linen Distress Stickles. I also added a piece of lace and a strip of Vintage Lace die cut from red kraft-core.
This flower was too large for my ATC box, but was actually my favourite, so I was happy to use it here. There are step-by-step photos for how I made in the
Love ATC post.
I loved the way the technique worked on manila cardstock. I am always thinking of different ways of getting a woodgrain effect, since I am very fond of it, and this is one of my favourite results so far. I used the
On the Edge Twigs die to die cut a border from kraft-core cardstock, sanded and inked it.
A piece of lace and some Tim Holtz trimmings roses, aged with Antique Linen Distress Stain, were glued to the bottom of the tag, creating a nest for the bird.
The tag was finished with a die cut and stamped
ticket and two wood veneer birds.
I hope you enjoyed this tutorial! I had lots of fun playing around with the technique.
Thank you for looking!
Anna-Karin
Supplies:
Dies: Sizzix:
Mini Flourish,
Mini Butterflies,
Caged Bird,
Twigs On the Edge,
Mini Gears,
Mini Old Jalopy,
Cargo Stencil Numbers set,
Mini Tickets,
Vintage Lace,
Wrapped 3-D Flower,
Flower Layers w/Heart Petals
Surfaces: Ranger manila tag; Tim Holtz Idea-ology grungeboard; Core'dinations Tim Holtz Kraft-Core cardstock; Canson watercolour paper
Stamps: Stamper's Anonymous Tim Holtz Odds & Ends
Ink: Ranger Distress Ink: Mustard Seed, Barn Door, Peacock Feathers, Antique Linen, Evergreen Bough, Walnut Stain, Gathered Twigs; Ranger Archival Jet Black
Stain: Ranger Distress Stain: Peacock Feathers, Gathered Twigs, Salty Ocean, Evergreen Bough, Walnut Stain, Tumbled Glass, Antique Linen, Barn Door, Fired Brick, Mustard Seed, Scattered Straw, Bundled Sage, Spiced Marmalade, Black Soot, Frayed Burlap, Brushed Pewter, Antique Bronze, Tarnished Brass
Stickles: Ranger Antique Linen Distress Stickles
Crayon: Caran d'Ache Neocolor wax oil pastel white
Embellishments: Tim Holtz Idea-ology Trimmings ribbons, Light Bulbs, Game Spinners, Film Strip Ribbon, ChitChat stickers, Paper Twine; Studio Calico wood veneer birds; US ArtQuest mica; lace trim


OMG ! This is fabulous ! I need those neocolor 1 !!! Definitely !
ReplyDeleteUtterly stunning Anna-Karin!!!! This has worked so well - a superb tutorial. Thank you so much for sharing this fabulous idea. Hugs, Jenny x
ReplyDeleteOh wow. What a great tutorial- going down to my studio now to play! Thanks!
ReplyDeleteStunning creations, love the technique.
ReplyDeleteFabulous cards n tag .Loved the technique ..Thanks for the tutorial !
ReplyDeleteI love this technique! I especially like the wood embossed. I have that folder and although I like it, it never looks "right" to me. This technique is PERFECT for that. Thanks, Anna-Karin! :)
ReplyDeleteThankyou for your easy to understand instructions. Your artwork looks great.
ReplyDeleteFantastic tutorial, and what great end results... thank you so much for sharing!
ReplyDeleteAlison x
I love this technique and all of your wonderful projects! Great job!
ReplyDeleteThanks so much for so many wonderful ideas & such great tutorials! These really caught my eye & I can't wait to try them out! Great job!
ReplyDeleteThank you, Anna-Karin! Such a wide variety of effects using your embossing folders and crayon! Great ideas!
ReplyDeleteYour tutorial is fantastic Anna-Karin! The resist really adds new depth to these enbossed papers. I agree with other comments that I have never been able to make the wood grain embossing look anything close to realistic like yours.
ReplyDeleteAs always, I love your details...the mica behind the car windows is awesome! Thanks for sharing!!
Anna-Karin,
ReplyDeleteI'm blown away once again. I don't get to visit everyday, I do try because you always have an awesome project and great instructions. I can't wait to try some of these folders.
What a GREAT tutorial! Love what you have done here with inks, paints, and crayons on the embossed papers! Love them!
ReplyDeleteThis tutorial is awesome! Thanks for sharing! I love the result. I will try with watercolors since I don't own any Distress Inks or Stains and I will let you know the result!
ReplyDeleteHow fun- I learned this technique with the Technique Junkies a long time ago and it is so fun to see it in action with so many different samples- LOVE your work!
ReplyDeleteHello again. I used your tutorial for this card: http://felicitarihandmade.blogspot.ro/2013/03/tattered-flowers-and-change.html
ReplyDeletePlease let me know your opinion on my take.
Thanks! Alina
Stunning!! Thanks for sharing this amazing technique. Wonderful projects!
ReplyDeleteWow! What a fabulous result! I know what i'll be doing in the studio today...
ReplyDelete(I've also seen some items to add to my crafty Wish List!)
Thanks for the awesome tutorial. Looks easy and fun! Your art is gorgeous! Thanks for the inspiration and I'm a new follower too!
ReplyDeleteHugs, Cathy-Lynn
Thanks for sharing the great tutorial and various samples. Fabulous!
ReplyDeleteSo pleased you liked the extension for this fabulous technique on my Friday Focus. I really enjoyed playing with your idea and am thrilled that you left such a lovely comment for me. Hugs, Jenny x
ReplyDeleteTotally gorgeous... amazing details!
ReplyDeleteAbsolutely gorgeous projects. Your embossing skills are amazing! I love your crayon resist technique! Looking at your tutorial is so inspiring . Thank you for sharing!!!
ReplyDeleteWow! How'd I miss this? Fabulous tutorial. I love seeing all the examples. You achieved some wonderful effects.
ReplyDeleteDaria
Definitely going to be using this technique to make some altered art projects! Thanks for the inspiration and wonderful tutorial!
ReplyDeleteGreat tutorial!
ReplyDelete