Today I have a fun and pretty long Sizzix tutorial to share with you, using
Eileen Hull's Candy Drawer ScoreBoards die, and a lot of other Sizzix dies. I love thinking of different ways to use a die, and most dies can be used for many other things than they were originally designed for. With this Candy Drawer die, I already made a
Chest of Drawers and a little
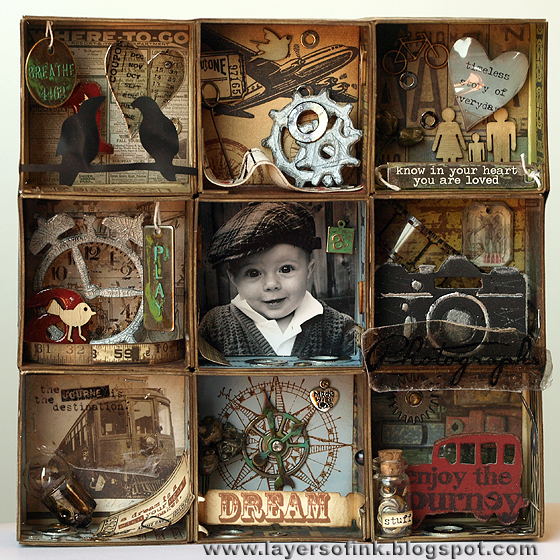
gift box, and I also thought it would work great to make my own little divided shadow box with different compartments. Here's the result:
I loved how this project turned out. First, I was planning to make three shelves, but then I added another three and then another three, so that I could place the photo of my son in the centre and fill the others will all kinds of interesting little things. You could make this as big or small as you want to and add any type of small items inside. Here's how I made this:
First, adhere patterned paper to strips of
mat board, slightly larger than the box you will cut out. I used multi-medium to adhere the papers, but you could use other adhesives too. When dry, die cut them using the drawer part of the Candy Drawer die (the one that looks like the shapes on the photo).
Important: place the mat board with the patterned paper facing up on the die, not facing down as you would normally. This is because we want the patterned paper to be on the inside, so the score lines must face the right way.
Die cut another five pieces from white mat board. Ink them with Stormy Sky, Frayed Burlap and Peeled Paint Distress Ink. Stamp the pieces with Archival Ink Jet Black and Coffee, using stamps that will fit with your projects. I thought these long Tim Holtz Stamper's anonymous stamps worked perfectly, stamped twice to reach all the way around.
Also die cut 9 pieces of mat board of the square, base piece, on the die. These form the back of each little shelf. You don't need to ink them. (I forgot to take a photo of them)
Die cut five squares from patterned paper. The ATC sized papers in Tim Holtz's Idea-ology paper packs were perfect for this since the designs are smaller.
Die cut another four squares for the remaining shelves. I cut two from manila cardstock, one from Specialty Stamping paper and one from a photo. Ink with the same colours used for the mat board, and stamp with images fitting the theme of your project. Now you can start planning which boxes should go together with which square and what items to put in each one. On to the embellishments:
Die cut the fun
Birds on a Wire birds from black modeling film, if the die doesn't cut all the way through, just use a pair of scissors to cut them out completely. Cut a
heart from Specialty Stamping paper, and from clear modeling film. Ink the paper heart.
Heat the birds and the modeling film heart and shape them a bit. Don't burn yourself. They keep the shape perfectly when cool. Stamp a sentiment on the paper heart and put the clear heart on top with a mini staple.
Paint these pieces. You have to cut off the top part of the clock for it to fit inside the box. Sand the pieces and ink them with Walnut Stain. I coated the clock with Crackle Accents.
Die cut three
gears from grungeboard, paint them silver, sand and distress them with a needle tool, then ink them black. I coated the gears and the number 1 with glossy accents.
I also stamped on pieces of mica. The heart was die cut from mica and stamped with a ticket stamp. The clock from the Tim Holtz Stamper's Anonymous Curiosities set fits perfectly inside the mini Alarm Clock die cut. I also added a little piece of mica behind the windows of the car and behind the camera. If you don't have mica, you can use a transparency instead.
I wanted to use a little corked vial and found a bag with tiny washers and small screws that I bought in a hardware store long ago. I aged them with alcohol ink and also gave the same treatment to a bunch of larger washers.
Here you can see some of the embellishments. This was a hard project to photograph because it is so dimensional, so it might be easier to see the embellishments like this.
The metallic embellishments were aged with the new Ranger Vintaj Weathered Copper patina set. The metallic part of the light bulb was distressed with the same alcohol ink colours used for the washers. The 'A' is cut from grungeboard with the
Word Play die, painted red and coated with Glossy Accents.
Here you can see the two hearts and a facet, which was glued to an elephant image from the patterned paper. My son loves elephants, so it fit well. The ruler paper was in my box of scraps.
The flowers which have been gilded with UTEE was a left-over from another project (
see this post), some larger washers and the little vial with the small washers and screws. The 'a' tag is a Vintaj piece which was embossed in the
Lowercase Typewriter folder and painted with the patina inks.
The fun banners is from the
Flagpole w/Lantern & Sign die, but I ended up not using them since there wasn't a place where they didn't cover too much in a box. I'll use them on another project instead. The
ticket and
Tattered Banner was cut from manila cardstock, inked and stamped. The small ticket was stamped and cut out.
Time to assemble everything. If you have pieces that you want to hang from the roof of a box, it is easier to attach them before assembling the boxes. Since the die both cuts and scores the mat board, assembly is easy. First glue the side flaps together, then glue the back mat board square to each piece (no photo of this step). You need to trim the inside paper squares a little bit so that they will fit nicely. Then it is time to adhere all the embellishments. Since some of them are attached to the sides of the boxes, it is better to embellish each box before gluing them all together.
I used multi-medium to glue all the boxes together, you could use other strong adhesives too. I placed a book on top, to make sure that the glue adhered well. Try to line them up as well as possible, two of my last boxes didn't line up perfectly, but it really didn't matter much.
Cut four strips of patterned paper to glue to the sides of the box, measuring carefully. I also cut a large piece of black cardstock to cover the back of the project.
Finished! Here are close-ups of each box:

I circled the date the photo was taken on the ticket at the floor of this box. The birds were stapled to the sides of the box (sorry they are blurry on this photo). I added some Studio Calico wood veneer embellishments and glued remaining washers here and there.
The little ticket was placed on a pin and I also added a piece of ruler ribbon.
A little wood veneer family lives in this box, together with the heart and this sweet word band quote (blurry, I know, it was impossible to take photos where everything inside the boxes was sharp).
Here's a better view of the flowers.
Love how the mica clock turned out. It was attached with foam dots, three on top of each other, for more dimension.
The focal point of the project. I added a bunch of little items around the edges of this box, not wanting to put anything in front of him.
Guess who loves cars and any type of means of transportation?
I glued a whole bunch of left over little pieces of mat board together and painted them black, this piece was placed behind the camera to give it dimension. Foam dots weren't enough since I wanted the camera at the front of this box. The facet was placed behind it and a piece of stamped mica in front of it.
This is one of my favourite boxes. The mica with the quote fit so well over the old train photo. Lots of washers here, a light bulb and a ticket.
Here you can see the gear, washers and ticket better.
A gear and game spinners were placed in the centre of the compass stamp. The banner was glued to the front of the box (which is why it is out of focus here).
Another gear, layered with a small washer was adhered to the back of this box. The car was attached to the project using the same technique as with the camera.
Here's a better view of the little bottle. Love the look of the old washers inside it.
And a last view of the project from the top.
Thank you so much for looking at this very long post!
Happy crafting!
Anna-Karin
Supplies:
Dies: Sizzix:
Candy Drawer ScoreBoards die,
Birds on a Wire,
Hearts Set,
Mini Gears,
Mini Old Jalopy,
Vintage Alarm Clock & Camera set,
Mini Tickets,
Tattered Banners,
Word Play,
Cargo Stencil Numbers,
Embossing folder:
Sizzix Vintaj Lowercase Typewriter DecoEmboss
Stamps: Stamper's Anonymous Tim Holtz: Stuff to Say, On the Railroad, Road Trip, At the Movies, Mini Muse, Odds and Ends, Going Somewhere, Curiosities, Warehouse District, Artful Voyage, Classics #1, Ultimate Grunge Backgrounds
Inks: Distress Ink: Antique Linen, Frayed Burlap, Walnut Stain, Stormy Sky, Peeled Paint, Old Paper, Black Soot; Archival Ink Jet Black and Coffee; Ranger Vintaj Weathered Copper patina kit; Ranger Adirondack Alcohol Ink: Pitch Black and Caramel
Paint: Ranger Adirondack paint dabbers: Pitch Black, Silver; Jenni Bowlin paint dabber Chili Powder
Surfaces:
Sizzix Little Sizzles white mat board; Tim Holtz Idea-ology Lost & Found, Destination paper pads, Grungeboard; Stamper's Anonymous Wendy Vecchi clear and black modeling film; Ranger Manila cardstock and Specialty Stamping paper; US ArtQuest mica
Embellishments: Tim Holz Idea-ology Light Bulbs, Corked Vials, Word Stick, Word Bands, Game Spinners, Sprocket Gears, Mini Gears, Mini screw brads, Film Strip Ribbon, Memo Pins, Philosophy Tags, Facets, Ruler Ribbon, Mini Paperclips; Vintaj Blank Square Tag; Studio Calico wood veneer Birds, Potty People, Tiny Stars, Transportation, Tweets; paper flowers; Collections Elements measuring tape; washers and screws
Adhesive: Ranger Glossy Accents, Crackle Accents; Ranger Claudine Hellmuth matte multi-medium
Tools: Sizzix Big Shot; Tim Holtz mini attacher; paint brush


this is amazing!
ReplyDeleteAnna, it's fantastic! I wish I could ever have Big Shot and a lot of dies to make such beauty.
ReplyDeleteWow, Anna-Karin, I'm completely in love with this... it may be my favourite piece of yours so far! Just love the photos and how you've surrounded them with such delicious stamping and embellishments. Amazing use of the papers with the die... the whole thing is stunning. Thank you so much for the amazing tutorial, and wonderful photographs of the whole process... both the journey and the destination with this piece are spectacular!
ReplyDeleteAlison x
Anna-Karin, I am loving this! Your son is just adorable BTW... Every box is a little masterpiece- the colors and elements tell such a great story. Love how you used the die in such an unusual way. Just perfect as always... thanks!
ReplyDeleteAnna-Karin, this is fantastic! I'm doing a photo display at the moment, but it is not as detailed as yours!
ReplyDeleteOVER THE TOP Gorgeous!
ReplyDeleteI am at a loss of words..... SOOOOO BEAUTIFUL!!
ReplyDeletethank you for showing how you done this. wow...everything have you made. great job!!
ReplyDeletebeautifuls stamps and details.
greetings
This is excellent ! A piece of art ! Thanks for sharing !
ReplyDeleteAbsolutely stunning! Such detail!
ReplyDeleteThis project is beyond fabulous!!! WOW! What a cool die! So many elements but I have to say your son is UBER PRECIOUS!!! What a doll and his little hat completes this project like a cherry on a sundae! Amazing work!!!
ReplyDeleteI am amazed. Seriously.
ReplyDeleteI fell in love with your project!!
ReplyDeleteThis is awesome. I would love to do this with photos of my grandchildren. I pinned. https://www.pinterest.com/pin/415386765606636882/
ReplyDeleteThis is lovely. I hope you keep it to give to your son when he is older. So obviously made with love. And what an adorable boy he is
ReplyDelete