Hello and welcome! The
Eileen Hull Inspiration Team is having a blog hop this week together with
Stampendous. Don't miss all the inspiration, and there are prizes to be won too. This is day two of the hop.
I made a little fairy tale/Hobbit house:
I love to make little houses, something that you might already know. The
stamps we got from Stampendous are adorable and can be used to build houses. Instead of using them with the dies that come with the stamps, I made a circular house with Eileen's
Embroidery Hoop die, which gives a great size circle (3.6 in in diameter). I was planning to make sort of a Hobbit house, even though my son reminded me that it should have had a circular door too, in order to really qualify as a Hobbit house, and it should have been a part of a hill. He did guess that it was a Hobbit house though, so I wasn't all wrong.
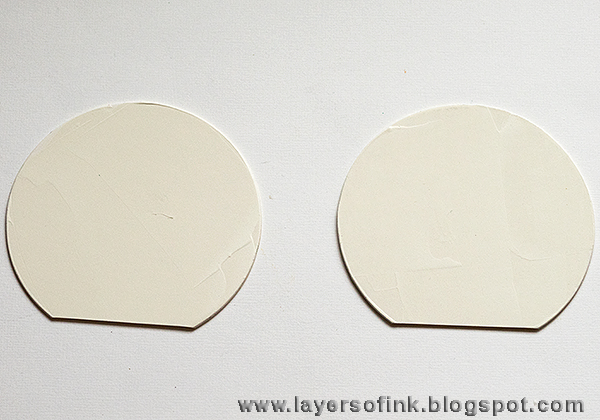
Start by die cutting two circles with the
Embroidery Hoop die. I love dies that are versatile and when I used the Embroidery Hoop for
another tutorial, I thought that the inside circle was very useful and planned to use it for something else. Since it is a Bigz die it can cut though thick material. I worked with
mat board, which is my favourite surface for 3-D projects. To make my house 3-D, I used the clever
Make-It-3D die, which comes with three different parts, so that it can fit different shapes. The one you see here works great for circles. Coat them with gesso.
For the house to stand without problems, I cut off a piece at the base.
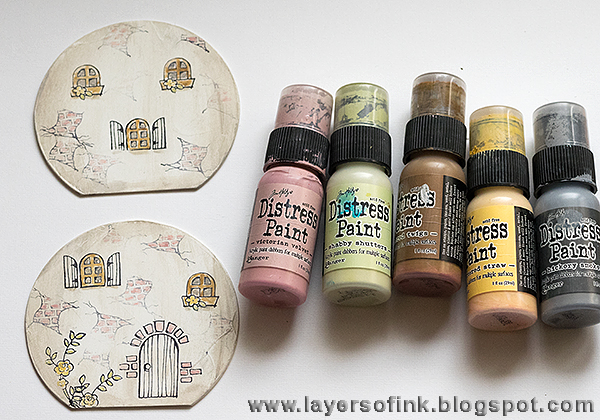
Paint the parts with Picket Fence and Pumice Stone. I wanted a light coloured house, but you can of course use any colour. If your house is dark, you might want to white emboss the stamped details. so that they are clearly visible.
Stamp the house with Jet Black ink. Don't reink the stamp for all the brick impressions.
I also stamped the windows and the door on a a left-over inky paper, and the step on grey paper.
Colour the house with Distress Paint using a fine paint brush.
Assemble the house as shown here, using a strong adhesive. I used Ranger's Wonder Tape and also added some hot glue here and there - be careful not to burn yourself. You'll have to cut off a part of one of the 3-D pieces.
I glued the doors, window shutters and just the top part of the step to the house and also added some
rub-on words and a number. The step was adhered with a foam dot.
It doesn't show well, but there is Glossy Accents on the flowers.
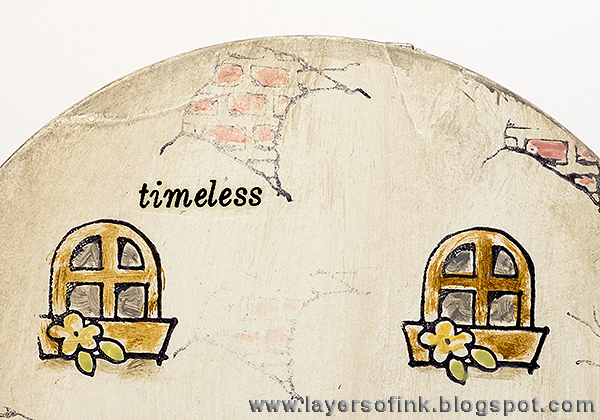
I liked the look of the pink bricks. As with all my little houses, I wish I could stay in them for a little while.
The little window stamps are so cute, and I like that there are two different ones on the
Cottage Home set, so you can easily make a variety of houses.
The edges of the house were dry-brushed with Hickory Smoke Distress Paint.
The fainter impression of some of the stamping adds texture to the background, and just a hint of bricks.
The back of the house looks like this, with more rub-ons and three windows. If you don't want to make a 3-D project, this would look great as a circular card too.
Remember to hop along and comment on the participants' blogs, for your chance to win. Three lucky winners will win their choice of Cottage Home or Mushroom Home plus pre-cut mat board from the
Sizzix Scoreboards Canister Die. Sponsored by
Sizzix. Deadline to comment is February 28th and winners will be announced early next week. See
Official Contest Rules for details.
Thank you so much for stopping by!
Happy crafting!!
Anna-Karin
Supplies:


Lovely ..reminded me of story books from my childhood !
ReplyDeleteThis is AMAZING! So darling and just love the round shape for the home. Thank you for sharing in the hop this week!
ReplyDeleteSo adorable Anna-Karin, love how,you incorporated Eileen's die. Tracy x
ReplyDeleteYour little house is just so lovely Anna-Karin, I just love the shape! I would definitely like to stay there for a little while... Anne x
ReplyDeleteThis is so cute. I love the colors.
ReplyDeletethey look so vintage.
I'll have to check out these dies.
Making the little houses will be so much fun
and will make great gifts.
thanks for sharing.
Illinois.
Oh Anna Karin I do so love your little cute circular house so delicately and tastefully stamped and painted. What a lovely project . Thanks for sharing and inspiring xx
ReplyDeleteSuch a precious fairy house & brilliant idea! I was so WRONG on my guess that you used the Cookie Box Scoreboards die. The glossy accents is such a pretty added touch.♡
ReplyDeleteWow, that is such a cool house. I love all the details.
ReplyDeleteSuch a precious fairy house & brilliant idea! I was so WRONG on my guess that you used the Cookie Box Scoreboards die. The glossy accents is such a pretty added touch.♡
ReplyDeleteI love that you used the cookie box! That was a perfect choice! I love the soft colors you chose! Great project!
ReplyDeleteI love that you used the cookie box! That was a perfect choice! I love the soft colors you chose! Great project!
ReplyDeleteHow clever to use the embroidery hoop die to create the darling house. Well done.
ReplyDeleteCorrection AND the Make It 3D die.
DeleteI always love seeing your little houses Anna-Karin - this little round hobbit house is just adorable - I too would love to spend a night there! Your stamping and painting are perfect - such a creative design! Julia xx
ReplyDeleteAbsolutely adorable. I would love to sprinkle some of these throughout the house. It made me smile. thank you for great inspiration and tutorial.
ReplyDeleteAbsolutely adorable. I would love to sprinkle some of these throughout the house. It made me smile. thank you for great inspiration and tutorial.
ReplyDeleteMy comment got lost, I guess. I don't know much about Hobbit houses but this little house is adorable! I love the colors you used, it is just fantastic.
ReplyDeleteCute--I like the soft colors and the shape.
ReplyDeleteThis is so cute!!! I love the bricks showing through the plaster. I love this house you made. The coloring is fab.
ReplyDeleteThis is so adorable! Reminds me of something I would see in Germany :)
ReplyDeleteLOVE your little cottage, Anna-Karin!! Can't help myself, I just love all little houses and cottages!!
ReplyDeleteLove the new Cottage House stamp and die set. And your round house is adorable!
ReplyDeleteSo so cute. I love your house. The new Cottage House stamps and dies are darling!
ReplyDeleteThis is Mayor Hobbit's house so, it has to look different and more stylish. His front door looks like it isn't closed all the way. That is a very cool coloring effect.
ReplyDeleteAwesome round house! Love the window and door stamps! So fun to create these different houses!
ReplyDeleteWow your attention to detail makes it all come together.
ReplyDeleteyour house is fabulous Anna-Karin! =)
ReplyDeleteAdorable!
ReplyDeleteMarilyn
This is just so lovely!
ReplyDeleteOH MY GOD!! I LOVELOVELOVELOVELOVE this!!! Definitely buying the Embroidery Hoop die!!! I am going to be making lots and lots of these! I love how you stamped it and think this would be lovely on a shelf!!! Thanks for the inspiration!!! I am totally in love with this!!
ReplyDeleteLove your cool hobbit house, both front and back!
ReplyDeleteWhat a sweet little Hobbit habitat! Great tutorial and I love the way you have added the random little windows and brick accents. Now all you need is to dream up some stories about the little characters living in it! :)
ReplyDeleteSo cute - I can see why you would like to live in it for awhile!
ReplyDeleteI am so glad I checked your blog today. I MUST have these stamps because I love to make little houses too. AND I've been making circular houses recently with circular doors, but these stamps are absolutely amazing. So perfect for what I like to do.
ReplyDeleteI can't believe how cute your little circular house is - massively inspiring. Thank you so much for this wonderful, creative, original little house. Lucy
This is so adorable. Love your choice in colors. TFS
ReplyDeleteWhat a wonderful little house. Love how you made it circular. Thanks for sharing with us.
ReplyDeleteBeautifully done, love all the special touches you've done to make it look real!
ReplyDeleteSo creative and just plain adorable! I love it! Very nicely done!
ReplyDeleteWhat a darling house. Wonderful coloring.
ReplyDelete