Saturday, July 19, 2025

Blue and Gold tag

Hello crafters! Today I have a tag to share with a resist effect combined with a dark blue background and metallic gold elements.

Please note: this post has affiliate links, for which I receive a small percentage of sales generated by the link, at no extra cost to you.

Layers of ink - Blue and Gold Tag Tutorial by Anna-Karin Evaldsson.

I was in the mood for a project with a dark background, but also wanted to use these fine leafy stamps from Simon Says Stamp Wildflower Cuttings. I decided to go with two resist techniques: heat embossing and colored pencils. 

Stamp with Simon Says Stamp Wildflower Cuttings.

Start by white embossing several of the detailed leafy designs from Simon Says Stamp Wildflower Cuttings. This stamp set comes from the new Friend Like You release.

Color with pencils.

Color the leaves with Prismacolor pencils.

Ink with Distress Ink.

Ink the tag with plenty of Distress Ink. The embossing and the colored pencil will resist the ink.

Add Tim Holtz Foundry Wax.

Apply Tim Holtz Gold Foundry Wax around the edges with a paint brush. Heat to activate.


Add dots of wax around the edges with a tooth pick.
Die cut Simon Says Stamp Giggle Thank You.

Die cut Simon Says Stamp Giggle Thank You from gold metallic kraft stock and from black cardstock.


Add sticker sentiments using Tim Holtz Metallic Sticker Book. 


Layer the sentiments together to form dimensional words. 

Layers of ink - Blue and Gold Tag Tutorial by Anna-Karin Evaldsson.

I hope you enjoyed this tutorial!


Thank you for visiting! 

Happy crafting!

Anna-Karin

Supplies:

* Please note: the links are affiliate links, for which I receive a small percentage of sales generated by the link, at no extra cost to you.


Monday, July 14, 2025

File Folder Ephemera Card

Hi crafters! It is a new week and we have a new Simon Says Stamp Monday Challenge for you you.

Please note: this post has affiliate links, for which I receive a small percentage of sales generated by the link, at no extra cost to you.


This week our theme at the Simon Says Stamp Monday Challenge Blog is Stitch It. Fun! Stitching adds such a nice tactile feel to projects and can be used instead of adhesive too. Don't miss the gorgeous project by our July guest designer Thom Santilla.

Layers of ink - File Folder Ephemera Card Tutorial by Anna-Karin Evaldsson.

I made a card this week with three file folders and four double-sided tags. The folders were handstitched. I used lots of words, ephemera, fibers, stamping and stencilling. 

Die cut with Tim Holtz Vault Noteworthy.

Start by die cutting the file folders from Ranger Heavystock cardstock using Tim Holtz Sizzix Vault Noteworthy set. 

Stamp and stencil the file folders.

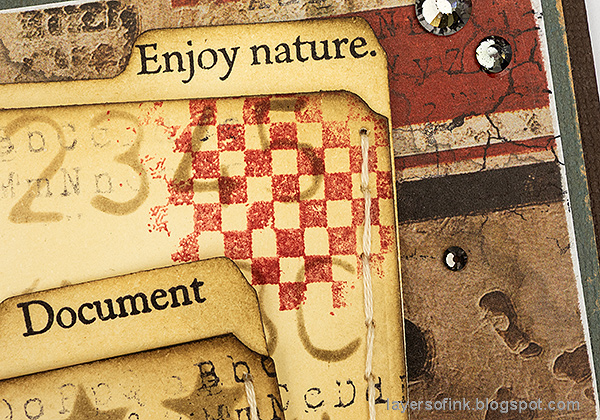
Ink them with Distress Ink and then use stencils to add a pattern to the front of each folder. I also stamped them partially with stamps from Tim Holtz School Desk and Ultimate Grunge, using black and Red Geranium Archival Ink.

Stamp the background paper.

For the background I used a piece of Tim Holtz Backdrops paper and stamped it with the same stamps as the folders, as well as Simon Says Stamp Crackle Background. 

Stitch the edges of the folders.

Pierce holes down the sides of the folders and stitch with DMC floss. 

Cut and embellish the tags.

Cut labels from various Backdrops papers. Add a tag circle and punch a whole. Stamp sentiments, sand and ink the edges. Then add ephemera and stickers. 


Embellish the back of the tags too.

Stamp a sentiment.

I stamped a sentiment from Tim Holtz Warehouse District on the most visible folder.


Round the corners with a We R Memory Keepers Corner Chomper. Mount the background on cardstock and then again on folded brown cardstock. Adhere the three folders. As you can see, I also stamped sentiments on the label part of the folders. Most of them come from Simon Says Stamp Mixed Labels.


I added words from AALL & Create Mindful Moments to the folders and to the tags.

Add Simon Says Stamp Pawsitively Dazzling Gunmetal Gems.


Tags made from ephemera and stamping.

I tied a fibers and twine to the tags. These are the fronts of the four tags (except for the first one).

Add Tim Holtz idea-ology ephemera.

I had fun picking out ephemera pieces that fit together. 


All the tags have postage stamps on them from Tim Holtz Postmarked. The stamped sentiment comes from Simon Says Stamp Mixed Labels.

Stamp with Stamper's Anonymous Classics 1.

This sentiment comes from Stamper's Anonymous Classics #5.


More details.


The backs of the four tags look like this, more words, ephemera and stamps.


I sanded the edges of all the tags and left some almost without ink, so that the white paper shows.


This tag was cut so that the word 'colour' would be visible.


I found a couple of Swedish stamps on Tim's Postmarked set and used them.


An interesting background paper.


I hope you enjoyed this tutorial! 

Join us this week in our Stitch It challenge! You have a chance to win a $25 gift voucher to do some fun shopping at Simon Says Stamp. You have until Monday 8am Ohio time. 1pm UK time, 2 pm CET to join in.


Do you use Instagram? If so please add #sssmchallenge so we can see your entries there too.


Thank you so much for visiting today! 

Happy crafting!

Anna-Karin

Supplies:

* Please note: the links are affiliate links, for which I receive a small percentage of sales generated by the link, at no extra cost to you.


Sunday, July 13, 2025

Colorful Granulating Backgrounds

Hi crafters! I have a tutorial on the Simon Says Stamp store blog today. I made a card and a tag, using granulating watercolor paint and combined with resist techniques.

Please note: this post has affiliate links, for which I receive a small percentage of sales generated by the link, at no extra cost to you.

Layers of ink - Colorful granulating backgrounds.

I made a whole bunch of backgrounds with fun granulating watercolor paint (Zig Kuretake Gansai Tambi Granulating Colors), combined with stencil resist techniques. This watercolor paint is so fun. The paint separates into different colors and gives a great granulating texture at the same time. It is easy and a lot of fun. You will get a different result every time.

I made a whole bunch of backgrounds for the tutorial and couldn’t pick just one for my main project, so I made a card and a tag. Below is a sneak peek of the tag.

Layers of ink - Colorful granulating backgrounds.

To see the full tutorial and all the steps, head over to the Simon Says Stamp Store Blog.


Thank you for visiting! See you again tomorrow!

Happy crafting!

Anna-Karin


Monday, July 7, 2025

Grasses Tag Tutorial

Hi stampers! It's a new Monday and we are back with a Simon Says Stamp Monday Challenge. 

Please note: this post has affiliate links, for which I receive a small percentage of sales generated by the link, at no extra cost to you.


This week we have a Play With Paint theme at the Simon Says Stamp Monday Challenge Blog. Fun I hope you will join us! Since it is the first Monday of a new month, the team is showcasing products by a specific company/designer and this week it is Paper Artsy. You can find Paper Artsy's great range of products here. It is fun if you use their products for the challenge, but it is not a requirement. 

We also have a new guest designer and during July Thom Santilla will be joining us. He created a fantastic project for this week's challenge, don't miss it.

Layers of ink - Grasses Tag Tutorial by Anna-Karin Evaldsson.

I made a mixed media tag using watercolor paint, gouache and Paper Artsy Infusions Colored Stain. The tag was stamped with two stamp sets designed by Alison Bomber: Winter Umbels and Winter Grasses. Just because the title is 'winter' doesn't mean that they are only for winter projects.

Paint the tag with watercolors.

I start out with a tag that I cut from paper that had been watercolored, to use up left-over paint.

Add Paper Artsy Infusions Colored Stain.

Mist the tag with water and sprinkle In the Navy Infusions Colored Stain at the sky area and The Sage on the ground. I had already planned where the stamping would be and added less color there. Mist again with water to blend. 

Stamp with Paper Artsy Winter Umbels and Winter Grasses.

When dry, ink stamps from Winter Grasses and Winter Umbels with Distress Ink, mist with water and stamp.

Splatter with white gouache.

I stamped two sentiments on the background using Simon Says Stamp Forest Scenery and covered them up with Design Tape to prevent splattering. Splatter the tag with Winsor & Newton Permanent White gouache.

Add Simon Says Stamp Pawsitively Dazzling Gunmetal Gems.

Distress the edges of the tag. Here you can see the cool effect of the Infusions Colored Stain. 


The white gouache will pick up some of the color of the ink. I made the ground area more visible with a colored pencil.

Stamp sentiments with Simon Says Stamp Forest Scenery.

The main sentiment also comes from Simon Says Stamp Forest Scenery. I also added some mummy cloth and twine.


I tied the tag with mummy cloth, twine and ric-rac. 

Layers of ink - Grasses Tag Tutorial by Anna-Karin Evaldsson.

Join us this week in our Play With Paint challenge! You have a chance to win a $25 gift voucher to do some fun shopping at Simon Says Stamp. You have until Monday 8am Ohio time. 1pm UK time, 2 pm CET to join in.


Do you use Instagram? If so please add #sssmchallenge so we can see your entries there too.


Thank you so much for visiting today! 

Happy crafting!

Anna-Karin

Supplies:

* Please note: the links are affiliate links, for which I receive a small percentage of sales generated by the link, at no extra cost to you.