Friday, March 28, 2014

Frameworks Mosaic Tutorial

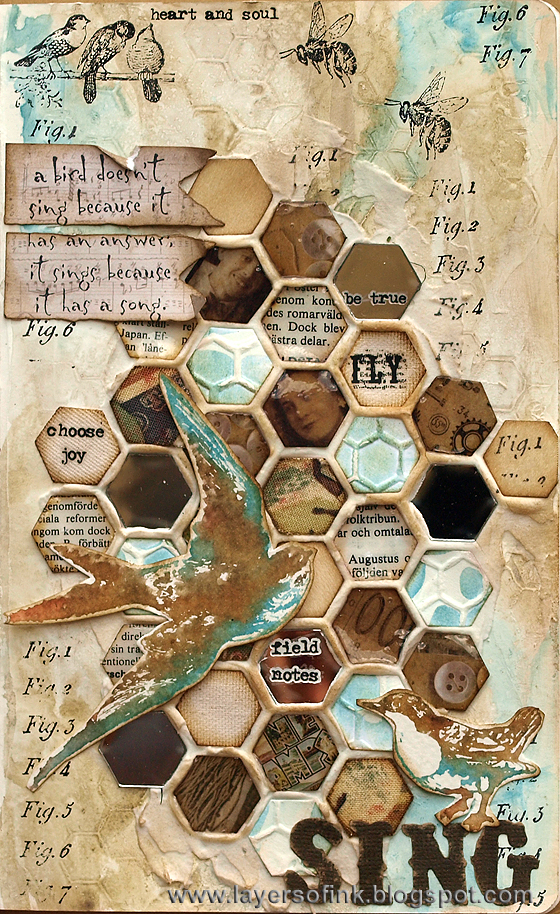
Hello and welcome! I have a Sizzix tutorial to share with you today, made with Tim Holtz new Frameworks dies. These dies are so fun and very versatile. 

Layers of ink - Frameworks Mosaic Tutorial by Anna-Karin
 I made an art journal page, but the technique works just as well on a card, tag or scrapbooking layout. I thought it would be fun to use the Frameworks die to get a mosaic look. A great base for that is Wendy Vecchi's Embossing Paste, which works both as adhesive and grout in this project. The Frameworks die that I used is the Honeycomb one, but you can get the same effect with any of the other Frameworks dies.

Layers of ink - Frameworks Mosaic Tutorial by Anna-Karin
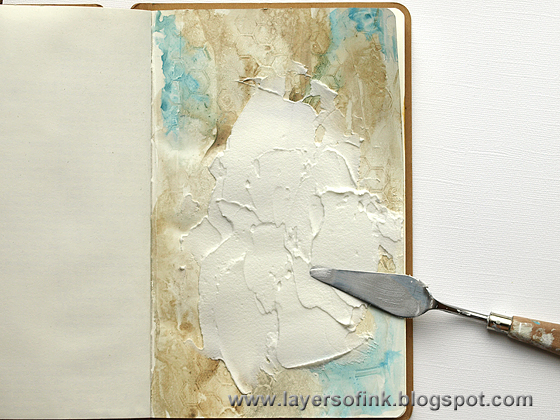
I worked in my Small Creative Journal and smeared gesso with a palette knife. A piece of paper had been embossed in the Honeycomb embossing folder and I pressed it repeatedly into the gesso to make a soft textured pattern. You can also use the embossing folder itself, but then you have to clean it immediately. I also wanted the random gesso effect on the embossed paper. Leave to dry.

Layers of ink - Frameworks Mosaic Tutorial by Anna-Karin
Water down some Distress Paint and paint the page. Mist with water for even more texture. Leave to dry.

Layers of ink - Frameworks Mosaic Tutorial by Anna-Karin
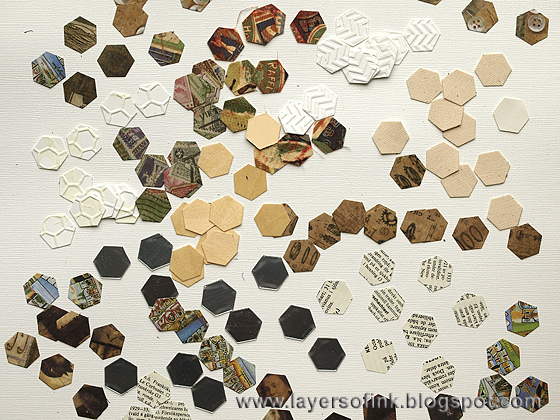
Die cut Honeycomb Frameworks from different papers and materials. I used: natural sticky-back canvas, Mirrored Sheet, wood veneer paper, dictionary paper, the embossed honeycomb paper from earlier, Eclectic Elements Fabric which had been glued to cardstock and various Tim Holtz patterned papers. These are the inside pieces, I will use the frame pieces in a tutorial soon.

Layers of ink - Frameworks Mosaic Tutorial by Anna-Karin
Ink the edges.

Layers of ink - Frameworks Mosaic Tutorial by Anna-Karin
Ink the honeycomb embossed paper with Tumbled Glass and wipe off with a moist cloth. The random spots of gesso resist the ink.

Layers of ink - Frameworks Mosaic Tutorial by Anna-Karin
Smear Embossing Paste on your page in a medium thick layer.

Layers of ink - Frameworks Mosaic Tutorial by Anna-Karin
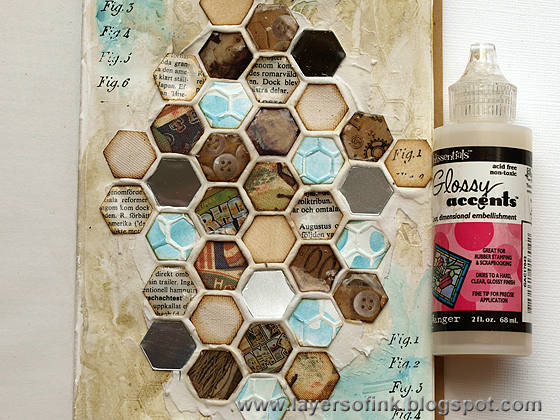
Start placing your honeycomb pieces into the paste, leaving the same space between all the pieces. The paste doesn't dry too quickly, so you have enough time. I made sure to vary the materials. Press the pieces down a bit to make the paste come up in between them.

Layers of ink - Frameworks Mosaic Tutorial by Anna-Karin
Continue until you have covered the paste. I left some paste uncovered because I thought it gave a cool look. Leave to dry.

Layers of ink - Frameworks Mosaic Tutorial by Anna-Karin
Cover all the paper pieces (not the mirrors, wood, canvas, fabric or embossed paper) with Glossy Accents. This gives a great glossy look to them and even more interest and variation to the mosaic pieces. Leave to dry.

Layers of ink - Frameworks Mosaic Tutorial by Anna-Karin
Ink the paste here and there with Gathered Twigs.

Layers of ink - Frameworks Mosaic Tutorial by Anna-Karin
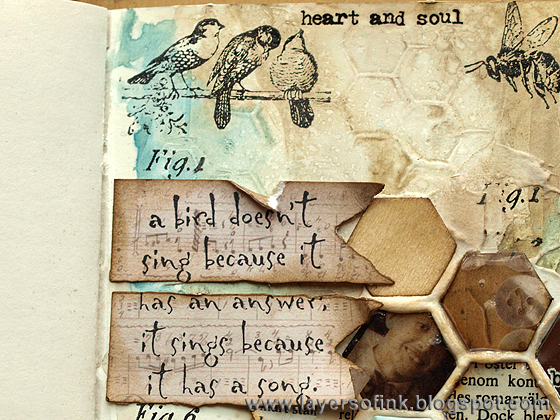
I stamped the background with a few Tim Holtz stamps. Here you can see the honeycomb texture in the gesso.

Layers of ink - Frameworks Mosaic Tutorial by Anna-Karin
The sentiment was stamped on two Ribbon Flags. The stamp comes from a Darkroom Door set.

Layers of ink - Frameworks Mosaic Tutorial by Anna-Karin
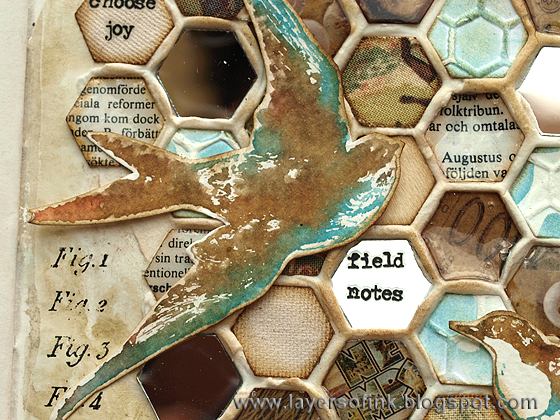
I added rub-ons to some of the tiles. The combination of different surfaces in the tiles makes for a very interesting project. The mirror pieces look like real mirrors (they are hard to photograph).

Layers of ink - Frameworks Mosaic Tutorial by Anna-Karin
I just got Tim Holtz Bird Feather set and wanted to ink up this great bird stamp. It was inked with Broken China and Gathered Twigs, misted with water four or five times and stamped on watercolour paper.

Layers of ink - Frameworks Mosaic Tutorial by Anna-Karin
The little bird is a Hero Arts stamp and was stamped in the same way as the larger one. The title was die cut with the Vintage Market Sizzlits die.

Thank you for looking!

Have a great weekend, I hope you get some time to be creative.

Anna-Karin

Supplies (affiliate links used):


Thursday, March 27, 2014

12 tags of 2014 March

Hello everyone!! It is a busy week on the blog! Today I am sharing my versions of Tim Holtz 12 tags of 2014 March.
 
I happened to have gotten the stamp set Tim used on his tag the day before I made this, so I had fun inking it up (and I used it for more projects after that, I love bird stamps). The smudge stamping technique is lots of fun and like Tim I made two tags, one with first generation stamping and one with second generation. I couldn't quite decide which one I liked the best.  

This is the first generation stamped tag with the darker colours. I inked the bird with Distress Markers, these stamps are perfect for that technique. The egg was stamped with Tattered Rose and the dots on it with Gathered Twigs. I used Gathered Twigs for the nest too. 
 
The background was stamped with a text stamp and Tattered Rose ink, just to add a bit more texture. You can spot the words here and there. I don't have the spritzer yet, instead I just inked through the Honeycomb stencil with Tattered Rose and Victorian Velvet. I also used the Speckles stencil and Gathered Twigs ink for one more layer.
 
I also used the new Butterfly Frenzy die. Love these tiny butterflies. I didn't have purple twine, instead I coloured a cream piece with Dusty Concord.  
 
Here's the second generation tag, that is, stamped without reinking, after stamping the darker tag. The only images that I used first generation stamping for is the base of the egg, stamped with Tattered Rose and the words in the background. Tattered Rose is a little too light in its second generation impression. Love that you can see the stenciled pattern through the tissue tape.

The crinkle ribbons were dyed with Distress Ink. The spots from the Speckles stencil add a nice detail. This tag got a rub-on sentiment.

I also made a little bow with the new Bow-Tied die. So cute.

Thank you for looking!! I'll be back tomorrow with a tutorial using some of Tim Holtz new Sizzix dies.

Anna-Karin

Supplies:
Surfaces: Tim Holtz Idea-ology: Crowded Attic Paper Stash
Dies: Sizzix: Butterfly Frenzy, Bow-Tied
Stamps: Stampers Anonymous Tim Holtz: Bird Feather, Paris to London, Ultimate Grunge
Ink: Distress Ink: Tattered Rose, Victorian Velvet, Dusty Concord, Antique Linen, Frayed Burlap, Gathered Twigs; Distress Markers: Dusty Concord, Vintage Photo, Walnut Stain, Shabby Shutters
Stencils: Stampers Anonymous Tim Holtz: Honeycomb, Speckles
Embellishments: Tim Holtz Idea-ology: Crinkle Ribbon, Word Bands, Laboratorie Tissue Tape, Symphony Tissue Tape, Elements Tissue Tape, Life Quotes Remnant Rubs

Wednesday, March 26, 2014

Transparent Layers Tutorial

Hello again!! A second post for today, don't miss my Watercolour Artist Trading Blocks tutorial below. Today I am also sharing a tutorial on the Simon Says Stamp Monday Challenge blog, for our transparent challenge.
 
My favourite Lego pieces as a child were always the transparent ones, and today, I love to include transparent and translucent products in my art. In the tutorial, I'll show you a whole bunch of these and give some tips on fun techniques to do with them. I made a tag.

I couldn't stop with just the tag, and made a card too.

To see how I made this, and the full tutorial, head over to the Simon Says Stamp Monday Challenge Blog. And don't forget to join us in this week's challenge, since you can be the one who wins a $50 gift voucher from Simon Says Stamp.

http://www.simonsaysstamp.com/servlet/StoreFront

Happy crafting!

Anna-Karin

Watercolour Artist Trading Blocks Tutorial

Hello everyone! Today I have a fun Artist Trading Blocks project to share. If you haven't heard of Artist Trading Blocks, it is a concept developed by Amy Bowerman and Eileen Hull, using Eileen's Sizzix dies. You can read more about it here and I also posted a tutorial for Inky Artist Trading Blocks here. 

When I saw Dina Wakley's new stamps, I knew they would be perfect on an Artist Trading Block and couldn't wait to try it out as soon as I got the stamps. These fabulous sketched faces come in two sizes, I used the set with the smaller sizes here and there are six faces on the set, same as the number of sides on a block. To make these, I used Eileen's 3-D Blocks/Cubes die, which has three sizes of blocks. I used the largest and smallest block on the die. The larger one is 2.5 x. 2.5 in, and the smaller is 1.5 x 1.5.
 
I wanted a colourful and loose watercolour look on these, and made an effort not to colour within the lines. I also made a smaller block with heart stamps.
 
The blocks look different depending on how you place them. None of the sides are the same, but they fit really well together. I took a few step photos:
 
Die cut the blocks from white mat board. Mat board takes ink and paint wonderfully, it is one of my favourite surfaces. I wanted my blocks to be one layer only, with no additional papers or embellishments. Stamp a face on each side, remember to plan where you place the stamps. You need to use a waterproof ink.

Let the Archival Ink dry, or help it with a heat gun. Mix up some watercolours. You need to have all the mixes ready before starting to paints since you have to work relatively fast to take advantage of the wonderful blending qualities of watercolours. Without much planning, I painted each panel at a time, trying not to stay within the lines and leaving some of the mat board unpainted. Leave it to dry. Don't fiddle with watercolours, just leave it. If you want to change something, wait until it is dry.
 
When the paint is dry, use the small sentiment stamps on the All the Gals set and one stamp from Face in the Crowd set. I repeated the same word in each panel, using first to third generation stamping. The only panel that got more than one word is the one to the lower right. Love these small sentiment stamps, and it is a great typewriter font.

At this stage, I decided that the blocks were done and assembled them with strong Wonder Tape.

If you want to have a closer look on each side, here we go.

Love the colours of this one.

These stamps are so great, and perfect for art journaling too.

Make sure that you have a nice colour mix for skin. Love the faint stamped word on her forehead.

This is the panel at the top of the large block. There are also two larger sizes of block dies: Square Box and 3-D Block/Cube/Bank.

And this is the panel at the bottom of the block, which probably won't be displayed so often, since the other heads face the wrong way then.

The little block with the heart stamps is very cute too.

The collage heart stamps are gorgeous. There are three heart stamps of this size, so I stamped them all twice on the block.

I love watercolours since they are so unpredictable and the way they blend is just amazing.

A nice strong heart.

A brave heart.

I repeated some of the word stamps from the larger block, but this one was only used on the small block.
 
The blocks look great stacked on top of each other, but they also look nice side to side.

Just looking at these colourful blocks makes me happy: the colours, faces and the words, and they were so much fun to make.

Thank you for stopping by! I hope I have inspired you to make some Artist Trading Blocks!

Anna-Karin

Supplies:
Surfaces: Sizzix Little Sizzles White Mat Board 6 x 13
Dies: Sizzix: 3-D Blocks/Cubes
Stamps: Ranger Dina Wakley: All the Gals, Collaged Hearts, Face in the Crowd
Ink: Ranger Archival Ink: Jet Black
Paint: Daler & Rowney watercolour paint
Adhesive: Ranger Wonder Tape

Tuesday, March 25, 2014

Enamel Watering Can Tutorial

Hello and welcome! Today I am sharing a step-by-step tutorial on the Sizzix blog for a 3-D Enamel Watering Can and Narcissus flowers.
 
I had this idea that I wanted to make a faux enamel project, inspired by vintage enamel kitchenware and came up with a fun technique using foil tape, stamping and Distress Paint. The can was made with Eileen Hull's Watering Can die and the flowers with Susan Tierney-Cockburn's Narcissus Flower die.

To see the full tutorial, head over to the Sizzix blog.

Thank you for stopping by!

Happy crafting!

Anna-Karin

Monday, March 24, 2014

Transparent Layers

Hello Monday and a new Simon Says Stamp Monday Challenge! This week our challenge is Transparent and it happened to have been my suggestion. My favourite Lego pieces as a child were always the transparent ones and today I love to use transparent and translucent items in my art.

On Wednesday, I'll be sharing a tutorial on the Simon Says Stamp Monday Challenge blog, for a card and a tag. I am going to be using quite many transparent and translucent products and as always some techniques too. This is a little sneak peek.

As always, one participant wins a $50 gift voucher from Simon Says Stamp:

http://www.simonsaysstamp.com/servlet/StoreFront
Happy crafting!

Anna-Karin

Saturday, March 22, 2014

Sindy Mixed Media Layout

Hello everyone and happy weekend! A new CSI:Color, Stories, Inspiration challenge is up. Here's the case file:
My layout:
 
I went through a pile of photos and came up on these that I took of my first Sindy doll and thought they fit the case file pretty well. She is almost in her original clothing, just without the stockings that she came with. From the evidence I used: mixed-media background, stamps, lace, hearts, grid, leaves and clouds. Our electricity was out when I made this layout, so I couldn't check out the journaling links and had to work from memory. It is inspired by the happiness theme. The pink background was a failed gelli print (too much thick, opaque paint), but it worked quite well here. I stamped and added stenciling on top.
 
The patterned paper in the background is by Tim Holtz. I also used one of his new embossing folders to emboss the die cut clouds. Love that fine pattern. And a new favourite die, the Butterfly Frenzy, which die cuts a lot of small and tiny butterflies. The word stamps are by Wendy Vecchi.

The background was stamped with a text stamp and Red Geranium Archival Ink, holding the cling stamp in my hand instead of mounting it on an acrylic block. For the hearts and leaves, I applied white embossing paste through a stencil. When dry, they were dry-brushed with brown paint.

I was in a hurry and didn't wait for the stamped text to completely dry before applying the paste. You can see that the ink has coloured the paste pink in places, loved the effect since it adds an extra layer.

The new Bow-Tied die by Tim Holtz is so sweet. It cuts bows in three different sizes, I used the smaller two here, die cut from leftover gelli print paper. They are very easy to assemble. I didn't have many of these kinds of dolls, but me and my sister had fun making up really long stories with them. I made most of the clothes myself and also wove numerous carpets for them. I think I enjoyed that part more than the actual dolls.

Thank you for the visit! I have a lot of things to share next week, this week was quiet because we are still not 100% recovered from being sick.

Happy crafting!!

Anna-Karin

Supplies:
Surfaces: Tim Holtz Idea-ology: Shabby Chic Paper Stash; Neenah Smooth Solar White Paper
Dies: Sizzix: Butterfly Frenzy, Bow-Tied, Arrows, Banners, Chevrons & Clouds
Embossing folder: Sizzix: Courtyard & Trellis
Stamps: Stampers Anonymous Wendy Vecchi: The Beauty of Art, Collectible Art, New York Art; Hero Arts: Frame with Scrolls K5541
Ink: Archival Ink: Red Geranium, Potting Soil
Paint: Distress Paint: Walnut Stain
Stencil: Wendy Vecchi Stampers Anonymous: Never Enough Hearts, Lovely Leaves ; Jenni Bowlin: Silhouettes
Medium: Stampers Anonymous Wendy Vecchi: White Embossing Paste
Embellishments: BasicGrey letter stickers; lace trim