
Hi stampers! I hope you had a good weekend! We went to a fun Lego exhibit and an autumn market. Today we are continuing our STAMPtember® celebrations at the Simon Says Stamp Monday Challenge Blog.
Please note: this post has affiliate links, for which I receive a small percentage of sales generated by the link, at no extra cost to you.

In honour of STAMPtember® we have a Stamping theme this week. There is nothing better than stamping. Don't miss the fun project by our September guest designer Kerry B.


Start by stamping the image from Simon Says Stamp Birthday Party on heavystock cardstock.

Color with pencils. I used Prismacolors. Color the light areas too, using a light color or white pencils. This is to protect them from the inking.

I stamped the boy one more on Simon Says Stamp Masking Paper and masked him, but this step is not really necessary. I just wanted to make sure that I hadn't missed coloring any skin areas, since those areas would then become blue. The colored areas resist the ink. Ink with Distress Ink.
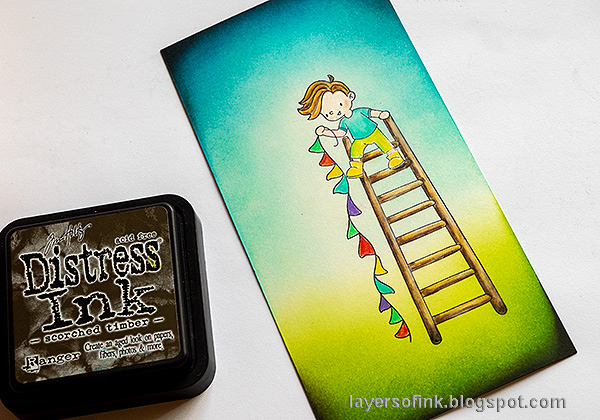
Remove the mask and ink around the edges. I like the way Scorched Timber blends with other colors, creating a dark grey/brown.

Add grass and a shadow with the colored pencils. Then add details and highlights and grass with a black pen and a white gel pen.

I stamped sentiments from Simon Says Stamp Birthday Party on the background. I also added Simon Says Stamp Pawsitively Dazzling Surf Gems. I love these gems. They are so sparkly.

I used bright colors since that fit with the birthday theme.


Do you use Instagram? If so please add #sssmchallenge so we can see your entries there too.


Thank you so much for stopping by here today!
Happy crafting!
Anna-Karin
Supplies:
* Please note: the links are affiliate links, for which I receive a small percentage of sales generated by the link, at no extra cost to you.
* Please note: the links are affiliate links, for which I receive a small percentage of sales generated by the link, at no extra cost to you.
No comments:
Post a Comment
Thank you so much for leaving a comment! Happy Crafting!