Friday, August 30, 2024

Clear Acetate Card Tutorial

Hi friends! Today I have a clear card to share with an alcohol ink background and dimensional paper flowers.

Please note: this post has affiliate links, for which I receive a small percentage of sales generated by the link, at no extra cost to you.

Layers of ink - Blue Peonies and Alcohol Ink Background by Anna-Karin Evaldsson.

I really like to make cards from acetate. You can make them more or less transparent by adding various media and stamping. Here I colored the card front with alcohol ink, aiming for textures. The flowers were die cut with Simon Says Stamp Divine Peony from the Sunny Vibes release, and inked with Distress Ink.

Layers of ink - Blue Peonies and Alcohol Ink Background by Anna-Karin Evaldsson. Die cut Simon Says Stamp Divine Peony.

Start by die cutting the Divine Peony from heavystock paper. Later, I die cut it one more time.

Layers of ink - Blue Peonies and Alcohol Ink Background by Anna-Karin Evaldsson. Ink with Distress Ink.

Ink with Distress Ink using a Tiny Ink-blending tool.

Layers of ink - Blue Peonies and Alcohol Ink Background by Anna-Karin Evaldsson. Shape the flowers.

Shape with Tim Holtz Shaping kit, to add dimension.

Layers of ink - Blue Peonies and Alcohol Ink Background by Anna-Karin Evaldsson. Assemble the flowers.

Glue the flowers with Simon Says Stamp craft glue. 

Layers of ink - Blue Peonies and Alcohol Ink Background by Anna-Karin Evaldsson. Color acetate with alcohol ink.

Color the Simon Says Stamp Acetate Card with alcohol ink. Dabb on different colors ink with a felt ink-blending tool. To add even more texture, dabb alcohol ink blending solution on the background too.

Layers of ink - Blue Peonies and Alcohol Ink Background by Anna-Karin Evaldsson.

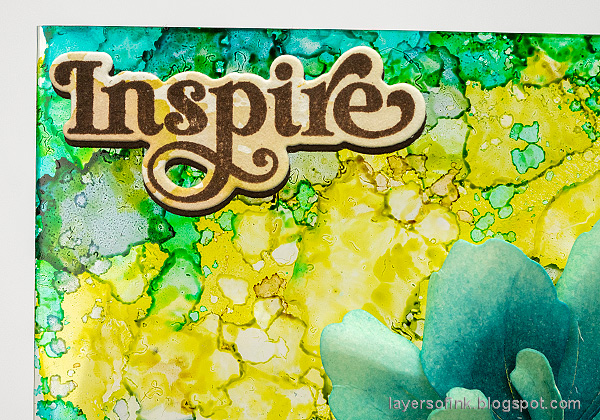
The sentiment was stamped with Simon Says Stamp Create stamp set and die cut with the coordinating Create dies. Die cut it once more from dark brown cardstock for a shadow.

Layers of ink - Blue Peonies and Alcohol Ink Background by Anna-Karin Evaldsson.


Layers of ink - Blue Peonies and Alcohol Ink Background by Anna-Karin Evaldsson.

I like that the Divine Peony set also includes a flower bud.

Layers of ink - Blue Peonies and Alcohol Ink Background by Anna-Karin Evaldsson. Paper flower.

I made one of the flowers mainly blue and the other turquoise.

Layers of ink - Blue Peonies and Alcohol Ink Background by Anna-Karin Evaldsson.

This sentiment also comes from Simon Says Stamp Create and was die cut with the coordinating die. I also added some fibers to the card, as soil. I have had these for a very long time.

Layers of ink - Blue Peonies and Alcohol Ink Background by Anna-Karin Evaldsson.

The card has quite a bit of dimension. The back is entirely clear, but you can add a piece of cardstock to it to write a message.

Layers of ink - Blue Peonies and Alcohol Ink Background by Anna-Karin Evaldsson.

It is hard to photograph clear cards. Here you can see that the card is transparent. 


Thank you so much for stopping by here today! 


Anna-Karin

Supplies:

* Please note: the links are affiliate links, for which I receive a small percentage of sales generated by the link, at no extra cost to you.


Tuesday, August 27, 2024

Olive Branch Tag

Hello crafters! Today I have a tag to share with an olive branch on a dry embossed background.

Please note: this post has affiliate links, for which I receive a small percentage of sales generated by the link, at no extra cost to you.

Layers of ink - Olive Branch Tag Tutorial by Anna-Karin Evaldsson.

I rarely use cardstock for an entire background and had fun making this striped background combined with dry embossing. The olive branches were colored with Distress Ink and Distress Oxide ink. Both the Tuscan Olive Branch and the Swirled Ridges comes from Simon Says Stamp Cheering For You collection.

Layers of ink - Olive Branch Tag Tutorial by Anna-Karin Evaldsson.

I started out by picking three shades of Simon Says Stamp cardstock: Orange Peel, Burnt Orange, and Sunshine. Cut them into strips and adhere to a tag. Trim the edges.

Layers of ink - Olive Branch Tag Tutorial by Anna-Karin Evaldsson. Emboss in Simon Says Stamps Swirled Ridges


Layers of ink - Olive Branch Tag Tutorial by Anna-Karin Evaldsson. Die cut Simon Says Stamp Tuscan Olive Branch.

Die cut Tuscan Olive Branches from heavystock paper. 

Layers of ink - Olive Branch Tag Tutorial by Anna-Karin Evaldsson. Color with Distress Inks.

Smear Distress Inks on a non-stick craft sheet and mist with water. Press the branches and olives into the ink. Let dry.

Layers of ink - Olive Branch Tag Tutorial by Anna-Karin Evaldsson. Add Distress Oxide Ink.

Repeat with more Distress Ink, let dry again and then add Distress Oxide Ink as the last layer. Only dab the branches here and there into the Oxide ink.

Layers of ink - Olive Branch Tag Tutorial by Anna-Karin Evaldsson. Add shape to the olive branches.


Layers of ink - Olive Branch Tag Tutorial by Anna-Karin Evaldsson.

Plan where to place the branches and start gluing them down. I cut some of them in two parts. Adhere the olives with Simon Says Stamp Pawsitively Perfect Foam Tape.

Layers of ink - Olive Branch Tag Tutorial by Anna-Karin Evaldsson.

I also doodled white highlights on the olives with a white gel pen.

Layers of ink - Olive Branch Tag Tutorial by Anna-Karin Evaldsson.

The olive branches stand out nicely against the colorful background.

Layers of ink - Olive Branch Tag Tutorial by Anna-Karin Evaldsson.

The sentiment was stamped and die cut with Simon Says Stamp Create stamp set and coordinating dies. Adhere the larger sentiment with foam tape.

Layers of ink - Olive Branch Tag Tutorial by Anna-Karin Evaldsson.

The May Arts Faux Wrinkled Silk Ribbon was dyed with Simon Says Stamp Pawsitively Saturated inks in colors coordinating with the background cardstock.

Layers of ink - Olive Branch Tag Tutorial by Anna-Karin Evaldsson.

Don't add glue to all the leaves, since you want to dimension.

Layers of ink - Olive Branch Tag Tutorial by Anna-Karin Evaldsson.


Thank you so much for stopping by here today! 


Anna-Karin

Supplies:

* Please note: the links are affiliate links, for which I receive a small percentage of sales generated by the link, at no extra cost to you.


Monday, August 26, 2024

Embroidery Florals Tag

 Hello crafters! I hope you are well and had a good weekend!

Please note: this post has affiliate links, for which I receive a small percentage of sales generated by the link, at no extra cost to you.


Tag It is our theme this week at the Simon Says Stamp Monday Challenge Blog! Tags are such a fun shape. Make a stand alone tag, add a small tag to something or make a tag card. Lots of options!

Don't miss the last project by our August guest designer Carrie Swift aka Redfire Studies.

Layers of ink - Embroidery Florals Tag tutorial by Anna-Karin Evaldsson.


I love to make tags! There is something about the dimensions and often vertical shape that I like. Tags are carefree and a perfect place to experiment with techniques. For this week's challenge I made a tag with a textured crackle background combined with a watercolored flower.

Layers of ink - Embroidery Florals Tag tutorial by Anna-Karin Evaldsson. Coat with crackle paste.

Start by coating a tag with gesso and when dry, add Distress Crackle Paste. The thicker the paste, the larger the cracks. I didn't cover the entire tag.

Layers of ink - Embroidery Florals Tag tutorial by Anna-Karin Evaldsson. Paint with Distress Paint.

When the tag is dry, paint with Distress Paint and mist with water to blend. Add more paint here and there until you are happy with the result.

Layers of ink - Embroidery Florals Tag tutorial by Anna-Karin Evaldsson. Add Silver Luster Wax.

Let the tag dry. It might take a while. Add a little Sizzix Silver Luster Wax with your finger.

Layers of ink - Embroidery Florals Tag tutorial by Anna-Karin Evaldsson. Stamp Tim Holtz Embroidery.

Stamp Tim Holtz Embroidery flower on watercolor paper. 

Layers of ink - Embroidery Florals Tag tutorial by Anna-Karin Evaldsson. Paint with Gansai Tambi.


Layers of ink - Embroidery Florals Tag tutorial by Anna-Karin Evaldsson. Die cut with Simon Says Stamp Embroidery.

Die cut the flower with the coordinating Simon Says Stamp Embroidery die set. I use Simon Says Stamp Very Very Low Tack Tape to hold the die in place when die cutting.

Layers of ink - Embroidery Florals Tag tutorial by Anna-Karin Evaldsson. Ink with Antique Linen.

Ink with Antique Linen.

Layers of ink - Embroidery Florals Tag tutorial by Anna-Karin Evaldsson.


Layers of ink - Embroidery Florals Tag tutorial by Anna-Karin Evaldsson. Stamp the title.

I really like this Create stamp set and the coordinating dies from the Simon Says Stamp Sunny Vibes release. So many versatile sentiments. Stamp 'Create' with Grapefruit ink on inky watercolor paper and die cut with the coordinating die. I die cut it once more from grey cardstock. Stamp one of the small sentiments too and die cut. 

Layers of ink - Embroidery Florals Tag tutorial by Anna-Karin Evaldsson.

The crackle background is pretty cool, and the bits of silver adds even more texture.

Layers of ink - Embroidery Florals Tag tutorial by Anna-Karin Evaldsson.

I glued Simon Says Stamp Dazzling Gems Warm Tones to the background. They are so shiny.

Layers of ink - Embroidery Florals Tag tutorial by Anna-Karin Evaldsson.

The flower was adhered with Simon Says Stamp Pawsitively Perfect Foam Tape. The coordinating die cuts the flower design out with great details and is so much easier than cutting with scissors and/or a craft knife.

Layers of ink - Embroidery Florals Tag tutorial by Anna-Karin Evaldsson. Create stamp.

I added some dyed cheese cloth / mummy cloth at the bottom of the tag to create soil for the flower. The sentiment was adhered with foam tape.

Layers of ink - Embroidery Florals Tag tutorial by Anna-Karin Evaldsson.

Dye the May Arts Faux Wrinkled Silk ribbon with the same dye inks that you used on the project.

Layers of ink - Embroidery Florals Tag tutorial by Anna-Karin Evaldsson.

My favorite parts of the background might be where the crackle areas meet the areas without crackles.

Layers of ink - Embroidery Florals Tag tutorial by Anna-Karin Evaldsson.


Join us this week in our Tag It challenge! You have a chance to win a $25 gift voucher to do some fun shopping at Simon Says Stamp. You have until Monday 8am Ohio time. 1pm UK time, 2 pm CET to join in.


Don't miss the Kid's Summer Vacation Challenge! Read more here. 


Do you use Instagram? If so please add #sssmchallenge so we can see your entries there too.


Thank you so much for stopping by here today! 

Happy crafting!

Anna-Karin

Supplies:

* Please note: the links are affiliate links, for which I receive a small percentage of sales generated by the link, at no extra cost to you.