Thursday, March 11, 2021

Stenciled Circle Background

Hi friends! Today I have a stenciled circle background tutorial to share with you, which would work as a background for many different types of projects.

Layers of ink - Stenciled Circle Background Art Journal Tutorial by Anna-Karin Evaldsson.

I used products from Simon Says Stamp Hello Beautiful release, which arrived here two days ago. It is a gorgeous new release and I was so happy to use the first stencil that I designed, namely the Mix and Match Circles Stencil. There is also a Mix and Match Squares Stencil. I love the versatility of stencils and that they can be used for so many different techniques. I did an art journal page in my Dylusions Small Creative Flip Journal. I really like the size of this journal and that you can so easily work either horizontally or vertically.

Layers of ink - Stenciled Circle Background Art Journal Tutorial by Anna-Karin Evaldsson. Ink the background with Distress Ink.

Ink a page with Antique Linen and Pumice Stone. I placed my non-stick craft sheet under the page.

Layers of ink - Stenciled Circle Background Art Journal Tutorial by Anna-Karin Evaldsson. Ink through the Simon Says Stamp Mix and Match Circles Stencil.

Now for the fun part. Place the Mix and Match Circles Stencil on the background and start inking with Speckled Egg and Shaded Lilac. I was really happy to see the look of these two colors together. Move the stencil and continue with the rest of the page. It is easy to ink a large area with the stencil and if you turn it you will get even more variation.

Layers of ink - Stenciled Circle Background Art Journal Tutorial by Anna-Karin Evaldsson.

Ink here and there through the stencil with Speckled Egg Distress Oxide ink, using a blending brush.

Layers of ink - Stenciled Circle Background Art Journal Tutorial by Anna-Karin Evaldsson. Ink the through stencil with Distress Oxide ink.

Ink through the stencil again, with Wilted Violet, you only need a little.

Layers of ink - Stenciled Circle Background Art Journal Tutorial by Anna-Karin Evaldsson.

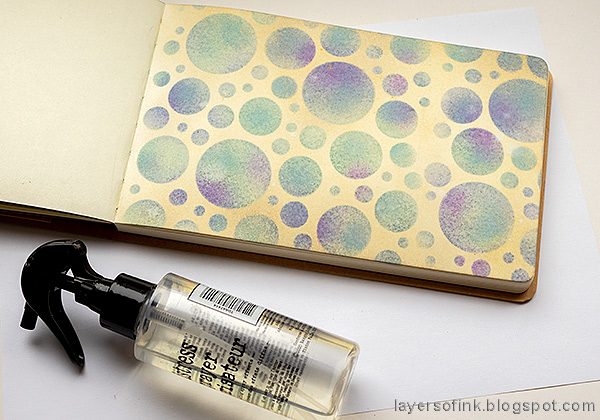
Mist very lightly with water, to add just a little texture.

Layers of ink - Stenciled Circle Background Art Journal Tutorial by Anna-Karin Evaldsson. Ink and emboss with clear powder. Stamp with Simon Says Stamp Mix and Match Circles stamp set.

The stencil coordinates with some of the circles of the Mix and Match Circles Stamp set, and I stamped a few of them on the inky circles. 

Layers of ink - Stenciled Circle Background Art Journal Tutorial by Anna-Karin Evaldsson. Die cut the Simon Says Stamp Beautiful word.

Die cut the Simon Says Stamp Capital B Beautiful word. You can separate the word from the mat, but for now, I decided to keep it together so that I could do an inlay design.

Layers of ink - Stenciled Circle Background Art Journal Tutorial by Anna-Karin Evaldsson. Ink and emboss with clear powder.

Ink the word with Victorian Velvet Distress Ink and Worn Lipstick Oxide Ink. Ink with two layers of clear embossing ink. I added the first layer right onto the Distress Ink, but needed to add Clear Embossing ink before the second layer, to get an even result. Always be careful when using a heat tool and never touch the melted powder until it has cooled down completely.

Layers of ink - Stenciled Circle Background Art Journal Tutorial by Anna-Karin Evaldsson. Ink and emboss with clear powder.

Ink with Pumice Stone Distress Ink and mist lightly with water.

Layers of ink - Stenciled Circle Background Art Journal Tutorial by Anna-Karin Evaldsson. Die cut Tim Holtz Wildflowers Stems 3.


Layers of ink - Stenciled Circle Background Art Journal Tutorial by Anna-Karin Evaldsson. Ink and emboss with clear powder.

As with the word, ink with a mix of Distress Ink and Oxide ink and emboss with two layers of clear powder.

Layers of ink - Stenciled Circle Background Art Journal Tutorial by Anna-Karin Evaldsson. Ink and emboss with clear powder. Stamp with Simon Says Stamp Mix and Match Circles stamp set.

The flowers look so shiny and the dies are very intricate. 

Layers of ink - Stenciled Circle Background Art Journal Tutorial by Anna-Karin Evaldsson. Ink and emboss with clear powder. Stamp with Simon Says Stamp Mix and Match Circles stamp set.

The sentiment was stamped with Simon Says Stamp Beautiful Butterflies, using Slate ink.

Layers of ink - Stenciled Circle Background Art Journal Tutorial by Anna-Karin Evaldsson. Ink and emboss with clear powder. Stamp with Simon Says Stamp Mix and Match Circles stamp set.

If you look closely at the circles, you can see that there is a subtle texture and a variety of shades. The combination of Distress Ink with just a little Oxide ink also makes for an interesting look.

Layers of ink - Stenciled Circle Background Art Journal Tutorial by Anna-Karin Evaldsson. Ink and emboss with clear powder. Stamp with Simon Says Stamp Mix and Match Circles stamp set.

Here you can see the lovely shine from the embossing powder. The second sentiment comes from the Forest Scenery set. It was also stamped with Slate ink. I didn't use any black on this page.

Layers of ink - Stenciled Circle Background Art Journal Tutorial by Anna-Karin Evaldsson. Ink and emboss with clear powder. Stamp with Simon Says Stamp Mix and Match Circles stamp set.

The circle was stamped with Stormy Sky. I also inked around the entire page with Hickory Smoke. 

Layers of ink - Stenciled Circle Background Art Journal Tutorial by Anna-Karin Evaldsson. Ink and emboss with clear powder. Stamp with Simon Says Stamp Mix and Match Circles stamp set.

And a final look at the lovely shiny flowers.


Thank you so much for taking the time to stop by here today! 

Happy crafting!

Anna-Karin

Supplies:

* Please note: the links are affiliate links, for which I receive a small percentage of sales generated by the link, at no extra cost to you.

1 comment:

  1. So pretty... the gentle airbrushed look and the colours work so well for a feeling of light and warm air. Love the new wildflower stems - mine have just arrived. Now to dig the BigShot out of the packing boxes!
    Alison x

    ReplyDelete

Thank you so much for leaving a comment! Happy Crafting!