
Hello friends! It is a new week, and spring is taking a temporary break here it seems. On Friday and Saturday we had gorgeous weather though, and spent a lot of time outdoors. On Friday afternoon, Leo and I went to one of our favorite little lakes where there are lots of things to explore, such as pine-cones, spring flowers, and this year's very first bumblebee.

At the Simon Says Stamp Monday Challenge Blog there is a Down On The Farm theme this week. I am looking forward to seeing all the creations, and don't miss the project by our April guest designer Sabrina Perna. It is a wonderful project.

Easter is coming soon, so I made an Easter tag, with two farm critters, and one additional friend. Lots of pastel colors make the tag look almost good enough to eat. The background and the grass were colored with Distress Oxides. I had planned to take out our Easter decorations this week, but time ran out, so I will try to do it one of the evenings this week instead. All the bright colors are so cheerful.

I started out by adding layers of Distress Oxides on a tag, by smearing the inks on a craft sheet, misting with water and pressing the tag into the ink. Dry with a heat tool in between layers, and mist with extra water if needed.

Stamp with two background stamps using Worn Lipstick and Fossilized Amber. The stamps come from Tim Holtz's Tiny Textures set.

When the background is dry, stamp with a texture stamp and white emboss.

I also added some script stamping with Wilted Violet.

The animals come from Tim's Critters Sidekick set. Each die includes lots of little details.

Die cut from watercolor and black paper.

Watercolor the animals with Distress Ink, by first smearing the ink on a craft sheet, misting with water and picking it up with a paint brush.

When dry, assembly the animals. I adhered some of the pieces with foam dots. Add a black outline shadow at the back, but slightly off-setting one a black die cut piece.

Add brown hearts with the Simon Says Stamp Heart Layers stencil.

The grass was die cut with the Simon Says Stamp Grassy Edges set from watercolor paper and colored with Cracked Pistachio and Twisted Citron, in the same method as above.

Layer the grass pieces on the tag, using foam tape for the front piece.

I also added some stickers as sentiments.

The layers of ink and stamping makes for a really nice effect and each little area of the background is different from the others.

Tuck the animals in among the grass.

The sheep is my favorite.

And the happy duck. I really like the speckled effect in the background, which you can see here.
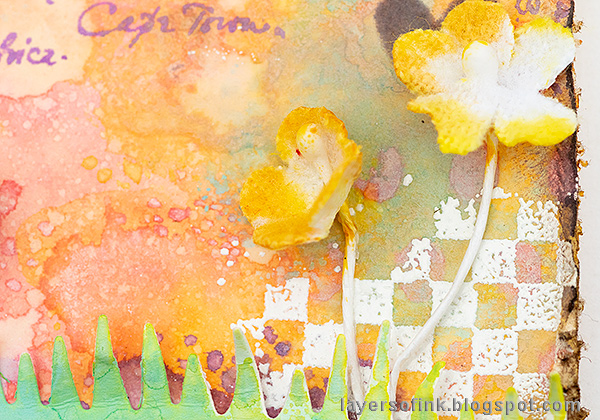
I also added some Bouquet Findings flowers, colored with Distress Ink.

And a title die cut using Tim's Calendar Words set.

Here you can better see the dimension of the animals.

I tied the tag with a piece of ribbon and a twine, which I found on my desk.
I hope you will join us this week in our Down On The Farm challenge. As always, you have a chance to win a $50 gift voucher to do some fun shopping at Simon Says Stamp. You have until next Monday 8am Ohio time. 1pm UK time, 2 pm CET to join in.


Do you use Instagram? If so please add #sssmchallenge so we can see your entries there too.


Thank you so much for taking the time to visit my blog today!
Happy crafting!
Anna-Karin
Supplies:
* Please note: the links are affiliate links, for which I receive a small percentage of sales generated by the link, at no extra cost to you.
* Please note: the links are affiliate links, for which I receive a small percentage of sales generated by the link, at no extra cost to you.
Beautiful and fun tag for Easter, Anna-Karin! Love the adorable critters and spring colors! This made me think of all the cute chicks and bunnies from the farms we start to see for sale for Easter. hugs, Maura
ReplyDeleteOh my goodness so darn cute!!!! Love!
ReplyDeleteAwesome tag. I love the techniques on the background. Those little layered critters are darling. I have to find that die. Love it.
ReplyDeleteaww what a cute tag! the whole design of this is absolutely adorable! :-) Love these little critters ❤️❤️❤️
ReplyDeletehope you have a great week!
luv
Lols x x x
Your springtime tag is so soft and gentle! I love all your little animals. They are even more special done with the watercolours. What a fun idea to create all the layers of inks and details. Thank you for sharing your lovely work! :)
ReplyDeleteThis is so cute and artsy! Love it!
ReplyDeleteI always love to see what you do with new products and this is no exception! I love how you went with an Easter project for the theme.
ReplyDeleteThis Easter tag is SO darn cute, Anna-Karin! I love the way you cleverly placed the bunny so he's popping out from behind the grass :)
ReplyDelete*mwah*
Steph
Simon Says Stamp!
Your creations are very lovely.
ReplyDeleteThey are so cute!!!!! Love so much this tag, colors are fantastic and design too! barbara
ReplyDeleteThis tag is so cute and the tiny animals are sweet. I can see they have lots of really micro pieces, wow! Lovely Easter project. Hugs, Macarena
ReplyDeleteThese animals are so so so darn cute!p.s. sorry for the late comment but have been w/o internet
ReplyDeleteHave a great day! xo Zoey