Hello and welcome! It's a busy start of the month here on the blog. Today, I have a
Sizzix tutorial for you, using dies by
Tim Holtz, Distress Crayons and embossing powder.
I just love to play around with background techniques and this was no exception. To build up the layers on this tag, I used several different easy techniques. Last week, when I posted my
Butterfly Textures layout, I said that I was going to show you another technique with the
Detailed Butterflies die set. If you compare the butterfly on this project, with the ones on the layout, done with the same dies, you'll see one example of the versatility of dies.
Start by die cutting the flourish die from the
Mixed Media set #2, from a tag or another background. For another use of the Mixed Media sets, check out my
Vellum Inksheets Flowers from yesterday.
Stamp with the
Cracks background stamp, or you could use another background stamp.
Apply Dina Wakley's
Clear Gesso on top. The Clear Gesso has great tooth and leaves a matte surface on the project, which works great as a base for Distress Crayons.
Colour with Distress Crayons, blending them with a soft cloth or your finger.
Place a
stencil on top and remove some of the colour with a slightly moist cloth.
Apply
Distress Crazing Collage Medium mainly to the edges, using your finger or a palette knife.
When the medium has dried, rub Black Soot crayon into the cracks to make them more visible.
I tested a whole lot of different backgrounds for the tag, and ended up picking a silver
Deco Sheet. The wonderful shine of the Deco Sheet looked great through the die cut flourishes. Adhere to a piece of cardstock and die cut with the Tag & Bookplates die.
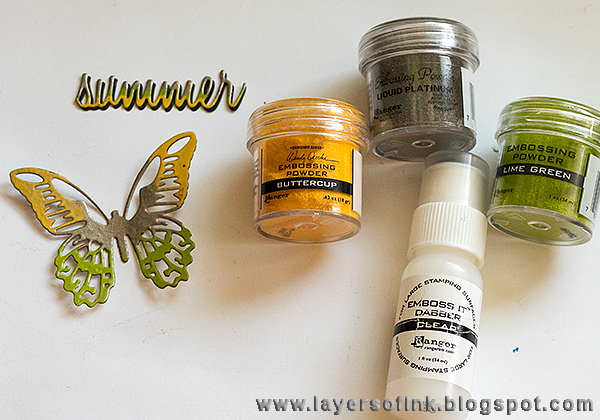
Die cut an outline butterfly from cardstock and paint black (or die cut from black cardstock).
Apply embossing ink to the butterfly with a dabber. First sprinkle Buttercup powder on the top of the wings, tap to remove excess powder. Repeat with Lime Green for the bottom wings and finish with Liquid Platinum for the middle part. Some of the platinum will stick here and there in the coloured powders, giving a bit of texture. I always cut a couple of sheets of printer paper in half and fold them in the middle, before starting to use embossing powders, so that they are ready and I don't mix any powers. It also makes it easy to pour the powders back into the jar.
Repeat with a die cut word from the
Vacation Words Script (I had glued it to a black die cut word before taking this photo).
Die cut the solid butterfly from book paper and black cardstock.
Glue the body of the embossed butterfly to the book paper one, and then to the black one, offsetting it slightly. The Pen Nib was coloured with black alcohol ink.
Did you know that the
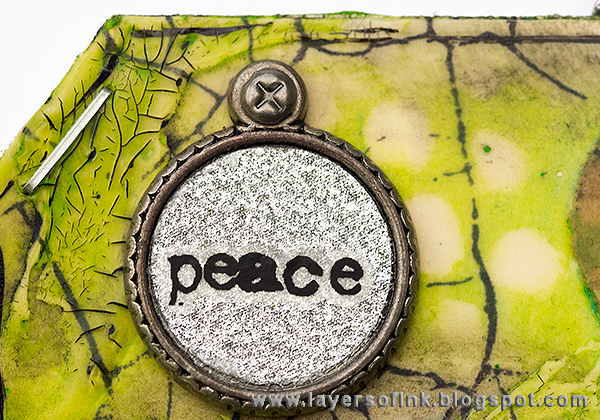
Small Circle punch fits perfectly into the
Charmed idea-ology pieces? Punch a Deco Sheet circle and add a rub-on on top.
Fasten it with a Mini Fastener. If you look at the Crackle stamping on this photo, you can see that it is below the other layers, particularly because of the Clear Gesso. I really like that effect of depth.
Add some rub-on words on top of the tag, for another layer. I folded a strip of silver Deco Sheet tape over on itself and used as a tie for the tag, together with paper strings.
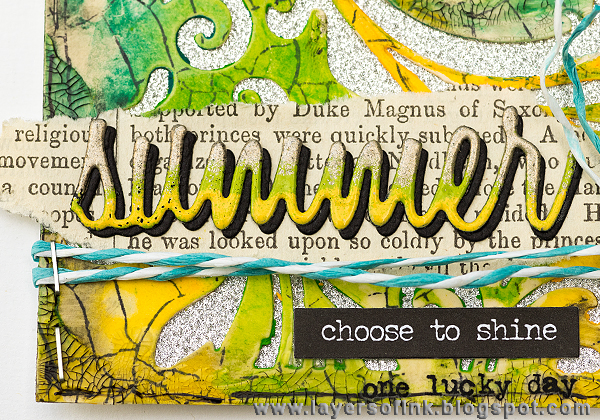
Another photo showing the layers on the tag.
The silver Deco Sheet looks really nice through the flourish, especially with all that colour and texture on the flourish. This is a fun way of using the Mixed Media dies.
I added a strip of book paper under the word to make it stand out, and a Small Talk sticker. A rough border was drawn around the tag with a pen.
I hope you enjoyed this tutorial and thank you for looking!
Happy crafting!
Anna-Karin
Supplies:


As always you amaze me with your design and color choice. So beautiful! I especially like the book pages, both at the bottom of the tag and behind the butterfly.
ReplyDeleteIts Amazing ..beautiful mix of various techniques !You tutorials are always packed with info about various mediums n products and fab way to use them ! Thanks a lot !
ReplyDeleteReally beautiful. Thank you for giving us such details about how you made this. That is wonderful.
ReplyDelete