Hi friends! I hope you enjoyed your weekend! We went to a children's theater play, made a gingerbread house and some more Christmassy things. Today, it is Monday again and a new Simon Says Stamp Monday Challenge, Holly Jolly stamping.
I made a winter church and was so into my project that I totally forgot to add any stamping at all. As children, we had a church which played music, and it was one of my favourite ornaments. I don't know what happened to it, but this church is inspired by my memory of that church. Tim Holtz
Village Dwelling die was used for the base of the church, and the
Bell Tower die turned it into a church. This is such a clever concept by Tim and I hope there will be even more dies to go with the basic house in the future. I did a fun technique for the texture of my church, and took some step photos. For another example, using the Village Dwelling, check out my
Autumn Village Dwelling tutorial.
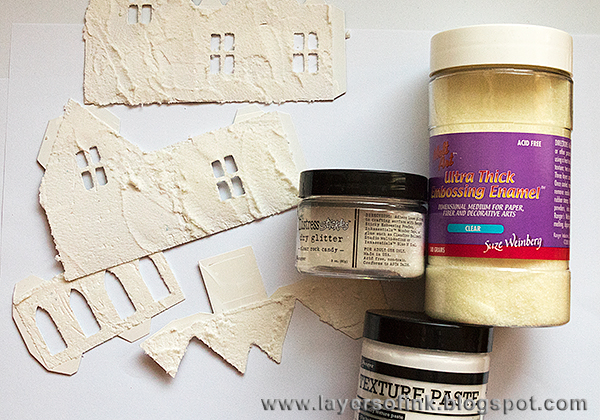
Start by die cutting the pieces that you need. I used mainly packaging from a Tim Holtz paper pad, which I find to be just thick enough. You could also glue white paper to a thicker cardstock. I adhered silver
Deco Sheets on some of the pieces. The thin pillar pieces in the middle were die cut from mat board.
I wanted textured walls, similar to how I remembered the old church ornament. To get the rough texture I was looking for, I mixed about equal parts
Rock Candy distress glitter and
UTEE into
Texture Paste. You want the paste to become thick and gritty. It was smeared on the walls and I really liked the effect. I avoided getting it on the flaps, by masking them with masking tape.
I changed my mind and die cut the roof from kraft-core cardstock instead, gluing it to the chipboard. It was
embossed and sanded. The windows and door were die cut from the same cardstock. I love how the arch windows instantly turns the building into a church.
I love to use mica for windows and glued pieces of mica to the inside of the houses. You can also colour acetate with alcohol ink.
The house is easy to assemble. I used a hot glue gun (be careful!), but you can also try other adhesives. When I was done, I thought it wasn't quite wintery enough.
To give it more of a winter feeling, I dry-brushed the roof with Picket Fence paint and then added Texture Paste. I also used the paste on joints. It was sprinkled with Rock Candy glitter to make it look like snow.
I wanted a small pot plant and borrowed my own idea from my Autumn House. The pot was quilled and I used Simon Says Stamp
Partial Cut Flowers to die cut Poinsettia shaped flowers. Cut the last part with a pair of scissors. The flower were sanded and shaped a little.
After rolling up two strips of quilling paper and shaping it into a pot, I placed some glue inside. I added some scrap paper to the bottom of the pot and glued my Poinsettia inside.
I added a pool of Glossy Accents to the flower and some
Prima beads. It was glued to the base and some more paste smeared around it.
Here you can see the front of the church a little better. The door got a pearl handle.
I also added paste to the porch, making it look like the door had pushed the snow out of the way.
In the tower there is a bell, with some white paint on as snow, hanging from a wire. You must place it into the tower before adhering the pieces together.
I also added some paste right on top of the tower.
I liked the combination of the textured roof, gritty wall texture and more glittery snow areas.
The beams and porch were painted black.
The side of the church.
Because I added the gritty paste on the windows too, some of it shows through also after I glued on the arched frames. It looks like snow having collected on the windows.
This is the back of the church. I love that the Village Dwelling has windows on all sides of the house.
I wish you could see the gritty texture of the church a little better. It was hard to photograph, it is both gritty, but also a little glittery, although not at all as much as the snow.
The church isn't glued to the base, so you place an electric tea candle inside and it looks beautiful as the light flicker through the windows.
I hope you will join us in our
Holly Jolly challenge. As always you have a chance to win a $50 gift voucher from
Simon Says Stamp. You have until Monday 8am Ohio time. 1pm UK time, 2 pm CET to join in.

If you use instagram add
#sssmchallenge to your challenge entry uploads, so that we can see them on there too.


Thank you so much for stopping by today!
Happy crafting!
Anna-Karin
Supplies:


Incredible! I especially love the last shot - the glimmer of the glitter and warm glow from the windows... If I didn't know better I'd think it was a real, lovely village church. Merry Christmas!
ReplyDeleteAdorable! I love the edition of the plant also! :D TFS
ReplyDeleteFantabulous!! Love this detail work, Anna Karin! Church is absolutely gorgeous!!
ReplyDeleteGorgeous , I love all the snow texture and the added glitter . Looks so gorgeous when it's lit up and your flower pot is fantastic. Tracy x
ReplyDeleteoh my gosh Anna-Karin this is simply gorgeous!!!
ReplyDeletethis is so wonderful Anna-Karin! =)
ReplyDeleteThis is the most amazing thing I have ever seen. I would need a whole crafting house to get all the stuff I would love. These houses are amazing. You are so clever and I bet your house looks a million bucks at Christmas. Your kids must love it. <3 It makes me happy over here. :D
ReplyDeletewow, this awesome!! stunning creation.
ReplyDeleteWhat have you made this so amazing. I like it!
OH WOW ! this is absolutely GORGEOUS Anna-Karin, I love the little bell in the belfry and the way it lights up at night, AWESOME :-)
ReplyDeleteluv
Lols x x x
p.s thanks again for all of your help last week XXX :-)
This is just a fabulous project Anna-Karin!!!!! :D
ReplyDeleteI love it to bits, just the pot itself is so perfect and lovely ooh!!!
But the church also is WONDERFUL.. this is really a Christmas dream, you're an angel :)
Hugs!
Coco xxx
My poor little church has been cut out and waiting for me to put him together. Yours is inspirational and has me thinking about assembling mine! Beautiful church and the plant is ingenious!
ReplyDeleteAnna-Karin, I love that your church lights up too! It is so pretty all covered in snow, and the textures you created are wonderful - it looks real!
ReplyDeleteWow... this is such a gorgeous creation, Anna-Karin. Love all the beautiful details. :)
ReplyDeleteFAb project Anna Karin! love the details, they're incredible! As always an inspirational work! Barbarayaya
ReplyDeleteWhat an endearing little church you've made! Love how it's frosty, but still totally warm and inviting. Brilliant detail!
ReplyDeleteThis is gorgeous, Anna-Karin and you've captured the feel of a cold and frosty winter's day...perfectly! A gorgeous piece of 3D art... :)
ReplyDeleteAmazing, Anna-Karin! Love your little church! So much texture and details. The flower pot on the porch. So pretty! Love it very much! Hugs, Sandra
ReplyDeleteFantastic!!
ReplyDelete