Hello friends! Today I have a sweet project to share made for Eileen Hull's Art with Heart challenge. The November theme is
A Stitch in Time. There is still time to join and as always there is a great prize to be won.
I made a wall hanger using new Sizzix
Stitchlits Collection by Eileen, with the focal point being the
Embroidery Hoop die, which is such a fun die. Before I got really into paper crafting, something like 13 years ago now, I had a period when I did quite a bit of embroidery and I had fun taking out my DMC floss for this project. I was going for a soft feminine look and used Prima's
Royal Menagerie papers.
Start by gluing Simon Says Stamp
Birch wood veneer paper to mat board and die cut the embroidery hoop. I die cut it a second time from mat board and glued behind the frame, to make it thicker, and to make it look more like a real embroidery hoop. The metal part was die cut from
Ranger's foil sheets. I will use the wooden circle for another project. This die is certainly not only for embroidery hoops, you can use the solid circle for lots of things, and the smaller circle is a great frame.
I used a thin piece of fabric that I found in my stash and attached it to the hoop, as you would attach fabric to a real hoop, but without adjusting the tension of course.
Press the smaller circle from the back. My fabric was thin, so it worked really well, if you use thicker fabric, you might need to press a little harder.
Stitch a frame around the hoop with a running stitch. I used three strands of floss.
The new
Flower & Leaf Stitchlits set is wonderful. There are several flower, leaf and stem shapes, some with and some without holes. Some of these dies are two step dies, so first you die cut the stem with the die at the top right, then you position the stem to the left over the die cut paper stem to die cut the holes. The same applies to the leaves. The Sizzix Magnetic Platform is very helpful when using these dies.
I also die cut a stem with the
Buttons, Border & Trim die, and used one of the hole leaf dies from the
Flower & Leaf Stitchlits set to make holes in the leaves. Use this sandwich: Sizzix Magnetic Platform, cutting pad, paper, die facing down, second Cutting Pad.
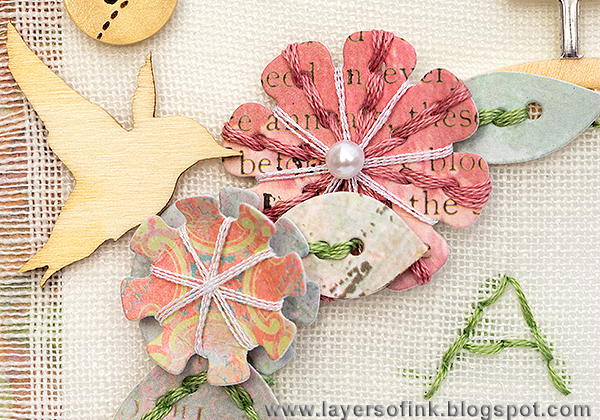
For the flowers without holes, I decided to wrap metallic white floss around them. Start with a piece of tape at the back. These flowers have great notches between the petals which made this technique easy.
Move one notch to the side with each wrap until you have completed the flower.
Here you can see the final result. I used three strands of floss for these.
The flowers with the holes were stitched to create a great textured look. Since the holes are already there, it is very easy. I tied the floss at the back to secure it. For this flower, I used a full six strands of floss.
Later, I decided to wrap some pearl white thread around the same flower. The smaller flowers were layered on an unwrapped flower with a foam dot.
I stitched the leaves and stems in the same way as the larger flower, using the same green thread as for the frame around the hoop. The project was embellished with some
Prima wooden shapes, which fit nicely together with the wooden hoop.
I cut a piece of chipboard (6.7 x 6.7 in) and glued Prima paper on top. The fabric and hoop were layered on white cardstock, since I didn't want too much of the background paper to show through the thin fabric. I attached the fabric with wooden buttons. I punched holes with my
Crop-a-Dile and set an eyelet in them.
You can layer
these flowers in many different ways to create different looks each time. I added pearls to some of the large flowers.
I wanted my embroidery hoop to look like a work in progress, as if someone started an embroidery project, but hadn't quite finished it yet. 'A' is a favourite letter in our house, so I embroidered a simple 'A' on the background.
The embroidered 'A' also fits together with the wooden sentiment at the bottom of the hoop: 'a little story'.
The metallic part adds a great touch to the hoop and I really like the wood veneer effect, since it makes the hoop look like a real embroidery hoop.
I hoop you enjoyed this project! It could easily be turned into a Christmas project too, if you used different colours and sentiments.
Happy crafting!
Anna-Karin
Supplies:


So pretty! And different than what we are used to seeing here. I just realized, there is no stamping! I do like this wall hanging, though.
ReplyDeletethis truly is a beautiful piece!! and your hoop does look so real!! fabulous as always
ReplyDeleteVery beautiful! Great idea with the hoop, I'm so inspired! .. (rushed to buy bigz die embroidery hoop and netal foil:) )
ReplyDelete