Hi everyone! Today I am sharing a step-by-step
Sizzix tutorial using
Karen Burniston's new
Journey collection. You can see all the dies
here, each one is so much fun and they work wonderfully together and in combination with Karen's previous collections.
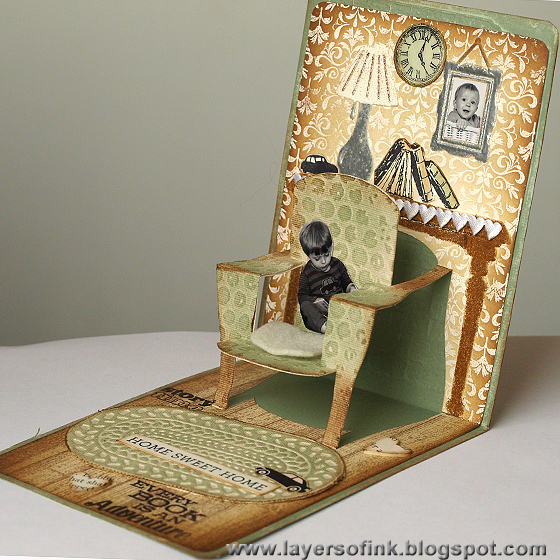
This is the inside of the card, a really cute indoor scene, with the super fun
3-D Chair in the centre. I love to create little scenes and to add photos to my pop-ups (see
this tutorial too), and knew that someone had to sit in that chair, so I created a cozy reading corner for my son. We'll be doing both dry and heat embossing to create the different textures on the card.
Since you need a door to walk into a room, I used Karen's
Opening Door die on the front of the card. Let's start with the tutorial:
Place the
Chair pop-up in the
Pop 'n Cuts Base die and die cut from smooth cream cardstock. The Journey collection has a new
square base die with an ornate edge, but I didn't use it here, since I wanted a bit more space to build my scene.
There are
two embossing folders that coordinate with the Chair pop-up and we'll be using both here. One great technique to use together with the folder that has a table, lamp and frame, is the kissing technique. Ink up a stamp with embossing ink and stamp it on the embossing folder, on the side where the pattern is recessed. Ink and stamp again to cover the whole folder. Place the top of your die cut chair cardstock on the other side of the embossing folder (so that it lines up with the floor of your pop-up) and carefully close the folder and emboss.

Sprinkle white embossing powder on your paper and watch how the stamped impression has transferred to the paper from the embossing folder, but only to the parts that aren't embossed. I removed the embossing powder from the chair with a small paint brush, but you can leave it too. Sometimes it can be harder to adhere things on top of melted powder, which is the only reason why I removed it. If there is any stray powder on the table, lamp and frame, brush that off too. Melt the powder with a heat gun.

I decided to continue playing with embossing powders. Carefully apply embossing ink with a pen to the embossed parts, one section at a time and sprinkle with embossing powder. Brush off any stray powder with a small paint brush. Melt the powder and continue to the next section. I used silver powder for the frame and the lamp post, Seafoam White for the lamp shade and Vintage Photo Distress powder for the table, to give it a different texture. I did the table in three sections. You can use other colours of embossing powder and get a different effect. If you want to, you can leave out this step, and just ink the scene instead.
Ink with Antique Linen and Gathered Twigs Distress Ink, using an ink blending tool. Watch the magic as the embossing resists the ink.
Die cut just the chair again from natural sticky-back canvas and emboss in the
Bubble folder.
Adhere natural sticky-back canvas to a piece of cardstock and emboss in the mat folder. Love this texture. Adhering the canvas to the cardstock first, gives the embossing a bit more punch. Cut the mat out and fray the edges a little.
Ink both the chair and the mat with Bundled Sage and Gathered Twigs.
Our room needed a floor, and I love a wooden floor. The Darkroom Door Woodgrain stamp was perfect for this and was stamped with Versafine Vintage Sepia ink. Place a piece of scrap paper at the fold of the paper, to avoid stamping on the wall of the room. Don't worry about stamping on the chair since we are going to cover it up.
One of my favourite dies from the Journey collection is the
Flower & Heart, which die cuts five perfect little hearts. I had a left over piece of mat board which had been covered with old book paper and die cut hearts from that.
To further embellish my little indoor scene, I printed two photos in two different sizes. We always have cars everywhere you look, so I stamped two small cars. The books were stamped, inked and cut out, to be placed on the table and the room needed a little clock on the wall. I also used my favourite
Birds on a Wire die (but for the outside), the birds were inked with Bundled Sage and Gathered Twigs. I ended up only using one of them. I also found a little heart ribbon as a table cloth.
Adhere the sticky-back canvas chair on top of the cardstock one and glue the photo to the chair. I cut a little pillow from cream felt. Looks cozy, doesn't it?
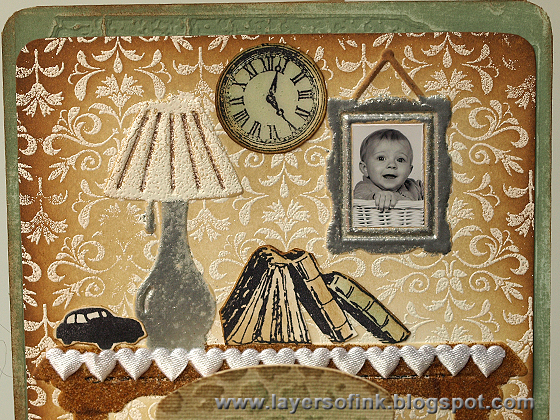
I placed a tiny photo in the frame. The clock was coated with Glossy Accents and left to dry before gluing it to the wall. I used a Distress Marker to add some detail to the lamp shade. Glue a ribbon table cloth to the table and place small stamped items on top.
You can see the texture of the embossing powder and Glossy Accents better on this photo.
Adhere the mat to the floor at an angle and place a small stamped image on top. I also stamped the floor with two sentiment stamps, added another one stamped on a strip of paper and used three of the little hearts.
I used Core'dinations Tim Holtz Distress Color-Core cardstock (Bundled Sage) for the base. The front was embossed with the
Bricked folder, sanded and inked with Gathered Twigs.
Die cut the
door from cream cardstock, ink with Antique Linen and Gathered Twigs and stamp with the Woodgrain background stamp, as on the floor on the inside of the card.
Mount the panels with foam dots and colour the handle with Brushed Pewter Distress Paint before gluing it to the door. Adhere the door to a piece of torn old book paper and tape to the background.
On the inside of the door (which is inked with Antique Linen), I stamped another sentiment, adhered the larger of the two photos and a word with Tim Holtz Label Letters.
Coat the bird with Glossy Accents and let it dry before gluing it to the top of the door.
Here's another view of the pop-up from the top. I can think of so many different things to do with this chair die. It is so much fun and imagine the face of the recipient opening a card with this pop-up inside.
Thank you for joining me in this tutorial!
Happy crafting!
Anna-Karin
Supplies:
Surfaces:
Sizzix Little Sizzles white mat board 6 x 13; Core'dinations Tim Holtz Distress Color-Core cardstock; Claudine Hellmuth Natural Sticky-Back Canvas; Neenah Smooth Cream cardstock; felt, old book paper
Dies: Sizzix:
3-D Chair pop-up,
Flower & Heart,
Opening Door & Wreath,
Birds on a Wire,
3-D Card Horizontal A2
Embossing folders: Sizzix:
Foyer Set,
Bubble & Honeycomp set,
Bricked & Woodgrain
Stamps: Stamper's Anonymous Tim Holtz: Tiny Things; Darkroom Door: Woodgrain Background; Hero Arts: Antique Flower Background S5264,I love Books ST506, Come Fly With Me 331481, Going CL478, Home Sweet Home ST513; Artistic Outpost: Favorite Book
Ink: Ranger Archival Jet Black; Distress Ink: Antique Linen, Bundled Sage, Gathered Twigs; Versafine Vintage Sepia; Tsukineko Versamark pad and pen
Paint: Distress Paint: Brushed Pewter
Embossing powder: Ranger Distress Embossing Powder: Vintage Photo, Ranger Seafoam White, Silver
Embellishments: Tim Holtz Idea-ology Label Letters; ribbon


Thud! That's my chin hitting the table. Love this!!
ReplyDeleteTotally amazing!
ReplyDeleteOH EM GEE! Anna-Karin. I have no words. I love that technique for the wallpaper so much that I want to try it RIGHT NOW but then my students would have no kits for the class on Sunday. (pout) This is absolutely incredible. Seriously. Amazing.
ReplyDeleteStunning project, so clever and inventive!! Also LOVED your tut on the SSSS blog!
ReplyDeleteI usually lurk, but had to pop in to say Wow!! You did an amazing job with this card. You are so creative and artistic. I love it!
ReplyDeleteWow what a fabulous job with all the little details on your card! Awesome job!
ReplyDeleteGreat card!!!
ReplyDeleteI am amazed by your creativity :)
Fabulous and amazing Anna-Karin! I love the vintage feel and the great pics of your son too. NancyD
ReplyDeletefab make , tutorial is amazing and oh boy I need that flower/heart die!!hugs trace x
ReplyDeleteWow! Just WOW!
ReplyDeleteHow fantastic is that?! A whole little dollshouse room on a card - just brilliant!
ReplyDeleteAlison x
Amazing!! Love it!! :)
ReplyDeleteEverything about this project is amazing, I'm so glad you shared how you put it all together!
ReplyDeleteThis comment has been removed by the author.
ReplyDeleteAbsolutely fabulous card!!!
ReplyDeleteToo much to absorb in one sitting!
Might have to get the chair die... At least! Maybe all !
Anna-Karin, this card is so precious! The pop-up is fabulous but the embossing puts it over the top awsome!
ReplyDeleteI think you should call this embossing magic! So fabulous!
Thanks for sharing your talent and such terrific techniques!
This is a fantastic card and tutorial Anna-Karin - have bookmarked for future reference. Stunning crafting. Nicola x
ReplyDeleteWhat an awesome card, love the kissing tip, boy sitting on chair & using canvas for chair & rug....oh my thanks for all the great tips.
ReplyDeleteWow Anna-Karin this is absolutely wonderful - every little detail so well thought out and executed - lovely!!
ReplyDeleteWow, this is so cool! You did a great job! Love it!
ReplyDeleteFirst off I'm totally wowed by your pop up card. the details are fantastic and that rug is so denominational and it all is so great and the little boy the wall behind.
ReplyDeletewhat can I say. It's fantastic really I just had to tell you ..your work is outstanding and so realistic. Love it really
pat
Oh my goodness. What a treasure.
ReplyDeleteAnna-Karin you just made those dies and embossing folders come to life. I love your work. Awesome!
ReplyDeletePretty amazing card.
ReplyDeleteThis is an incredible piece of art.
ReplyDeleteOh my GOSH!! I've been doing cards for a long time, and some very intricate, but this one BEATS anything I have ever seen or done!!!! AMAZING!!!! SUPER SUPER AMAZING!!!!
ReplyDeleteSuperb!
ReplyDelete