Tuesday, August 23, 2016

Wire and Felt Flowers Tutorial

Hello friends! Today I have a tutorial to share with you using Eileen Hull's new Twist & Style Tool by Sizzix.
 
I like to try out tools and this one is lots of fun. You can use it to twist wire, cords, floss, fibers and more. 

Layers of ink  - DIY Wire and Felt Flowers Tutorial by Anna-Karin
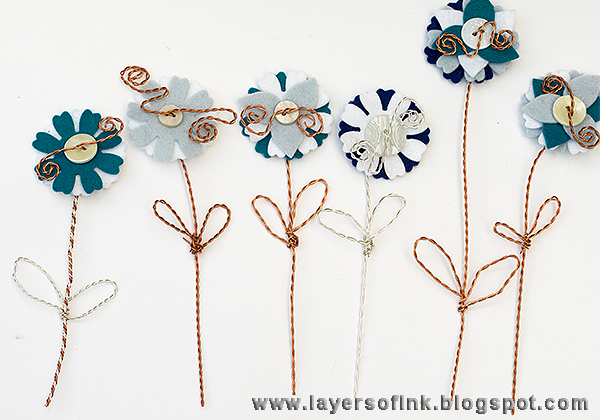
I made some very simple, but durable, felt and wire flowers, which you can do quickly for yourself or as a gift to someone. They look great together in a vase, but I almost prefer just the one flower on its own in a glass jar. I also made a serviette ring using the same technique.
Layers of ink  - DIY Wire and Felt Flowers Tutorial by Anna-Karin with the Sizzix Eileen Hull Twist and Style Tool.
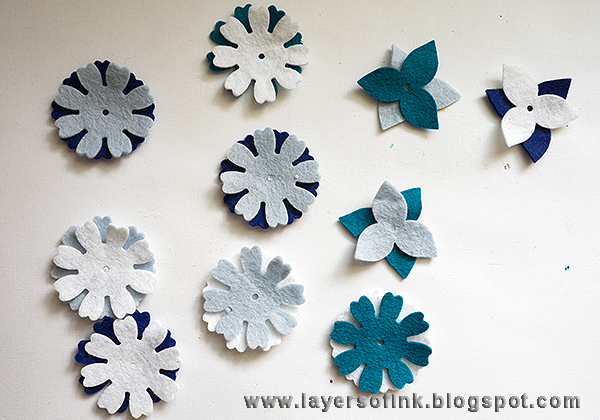
Start by die cutting flowers in any colour felt that you'd like. I used wool felt, which makes the flowers more durable than if you use ordinary felt. Any of Eileen's flower dies will work great. I used the Heart & Soul Flower and the Pansy Flower. But the Romance Flower, for example, would also look great.

Layers of ink  - DIY Wire and Felt Flowers Tutorial by Anna-Karin with the Sizzix Eileen Hull Twist and Style Tool.
I used mainly copper wire for my flowers. I am not sure what gauge it is, since my roll of wire didn't have that info. I've had this wire for a really long time. If the wire is too thick it might be hard to twist (also depending on how hard the wire is). I also used some silver coloured wire. 

The Twist & Style tool consists of two parts, a handle and a holder. The latter has a suction cup underneath and you want to make sure that you place it on a smooth surface. I used my floor since my desk wasn't smooth enough. 

Cut a piece of wire and fold it. Place the folded end over the peg on the suction cup part and tuck the two loose ends into the handle. Turn the handle to twist the wire. You can find a video where Eileen shows you how to use the Twist & Style Tool here

Layers of ink  - DIY Wire and Felt Flowers Tutorial by Anna-Karin with the Sizzix Eileen Hull Twist and Style Tool.
Here's a close-up of the ends being tucked into the handle. Use the screw to make sure they are stuck.

Layers of ink  - DIY Wire and Felt Flowers Tutorial by Anna-Karin with the Sizzix Eileen Hull Twist and Style Tool.
The handle itself looks like this. It is very easy to twist the wire. The tool comes with instructions.

Layers of ink  - DIY Wire and Felt Flowers Tutorial by Anna-Karin with the Sizzix Eileen Hull Twist and Style Tool.
I cut off a part of a twisted wire to use for the flower. Pierce holes through the fabric and thread the wire through the holes. Bend it underneath the flower and thread the stem onto the folded wire. That is, the loop part of the stem which had been placed around the peg on the suction cup holder of the tool.

Layers of ink  - DIY Wire and Felt Flowers Tutorial by Anna-Karin with the Sizzix Eileen Hull Twist and Style Tool.
Thread the wire through a button. I used buttons from the Cotton Candy jar by May Flaum/28 Lilac Lane. Use pliers to shape the wire. Buttons from the same jar were used on yesterday's Wilderness layout.

Layers of ink  - DIY Wire and Felt Flowers Tutorial by Anna-Karin with the Sizzix Eileen Hull Twist and Style Tool.
I made some different shapes, with twisted wires in varying lengths.

Layers of ink  - DIY Wire and Felt Flowers Tutorial by Anna-Karin with the Sizzix Eileen Hull Twist and Style Tool.
Here's a look at the silver coloured wire.

Layers of ink  - DIY Wire and Felt Flowers Tutorial by Anna-Karin with the Sizzix Eileen Hull Twist and Style Tool.
Cut another piece of twisted wire and shape into leaves, fold the wire around the stem and press with pliers to make sure that they are stuck.

Layers of ink  - DIY Wire and Felt Flowers Tutorial by Anna-Karin with the Sizzix Eileen Hull Twist and Style Tool.
I also mixed silver-plated and copper wire. This particular stem has two pieces of wire folded over and twisted, so it is thicker than the others.

Layers of ink  - DIY Wire and Felt Flowers Tutorial by Anna-Karin with the Sizzix Eileen Hull Twist and Style Tool.
You could make the flowers all the same, or mix shapes and colours as I did.

Layers of ink  - DIY Wire and Felt Flowers Tutorial by Anna-Karin with the Sizzix Eileen Hull Twist and Style Tool.
The serviette ring was made in the same way, using two folded pieces of wire for the ring part, so that it would be sturdy enough. I only made one to show you as an example, but it would be easy to make them for a whole table.

Layers of ink  - DIY Wire and Felt Flowers Tutorial by Anna-Karin with the Sizzix Eileen Hull Twist and Style Tool.
You can place the flowers in any type of vase or jar, as long as the top is not too narrow for the leaves. Instead of using a vase, try twisting the stems to attach them to something, or stick one into a flower pot.

Layers of ink  - DIY Wire and Felt Flowers Tutorial by Anna-Karin with the Sizzix Eileen Hull Twist and Style Tool.
I like the way the twisted stems look through the jar. This particular jar is one of Tim Holtz Mini Mason jars.

Layers of ink  - DIY Wire and Felt Flowers Tutorial by Anna-Karin with the Sizzix Eileen Hull Twist and Style Tool.
I placed the other flowers into some vintage jars that I found at a second-hand market.

Layers of ink  - DIY Wire and Felt Flowers Tutorial by Anna-Karin with the Sizzix Eileen Hull Twist and Style Tool.
You can of course make the flowers from other materials, such as printed paper, old book paper, leather, grungepaper, matte board, or really any kind of surface that you can die cut with a Bigz die, which are a lot of different surfaces.

Layers of ink  - DIY Wire and Felt Flowers Tutorial by Anna-Karin with the Sizzix Eileen Hull Twist and Style Tool.
Some of the flowers are two layers, some three and some (like this one) have four layers of wool felt. I liked this glittery button.

Layers of ink  - DIY Wire and Felt Flowers Tutorial by Anna-Karin with the Sizzix Eileen Hull Twist and Style Tool.
They look great on their own too, and you can easily make many to give as a little gift at a party or maybe a wedding.

Layers of ink  - DIY Wire and Felt Flowers Tutorial by Anna-Karin with the Sizzix Eileen Hull Twist and Style Tool.
Here you can see all the flowers together in the one jar. 

Layers of ink  - DIY Wire and Felt Flowers Tutorial by Anna-Karin with the Sizzix Eileen Hull Twist and Style Tool.
I was having a look for serviettes in the kitchen and only found either Christmas or superhero serviettes. There are a lot of pretty serviettes stored in the basement, but I didn't have time to go get them, so spider-man it is. 

Thank you so much for stopping by today and don't miss all the inspiration posted this month by the Eileen Hull Inspiration Team on the Twist & Style Tool

Happy crafting!!

Anna-Karin

Supplies:


5 comments:

  1. You have used the Twist & Style tool beautifully Anna-Karin, I love your flowers with the twisty centres, they are so elegant! Anne x

    ReplyDelete
  2. I just love your beautiful stems Anna-Karin! Julia xx

    ReplyDelete
  3. That looks very nice and decorative. The flowers are a good decoration for different things like gifts,napkins and others. Bravo!
    Dear Greetings
    Sabine

    ReplyDelete
  4. Your flowers are so pretty! I love the look of the twisted wire for the stems. No need to cover them up with florist tape now. The mixed metals really step up the style. Leave it to Eileen to come up with something fresh and fun. Thanks for sharing your take on using them! :)

    ReplyDelete
  5. What a cool idea to use the twists in the middle of the flowers! Love these Anna-Karin!

    ReplyDelete

Thank you so much for leaving a comment! Happy Crafting!