Saturday, May 31, 2025

Ribbon Quilt Art Journal

Hello friends! Today I have an art journal project to share with a new, fun die set by Simon Says Stamp. 

Please note: this post has affiliate links, for which I receive a small percentage of sales generated by the link, at no extra cost to you.

Simon Says Stamp Moments In Time.

I used products from the brand new Moments in Time release by Simon Says Stamp.

Layers of ink - Ribbon Quilt Art Journal Tutorial by Anna-Karin Evaldsson.

I wanted to test the fun Simon Says Stamp Ribbon Quilt die set. You can do lots of fun designs with this set. I was in the mood for an art journal page and decided to let the Ribbon Quilt flow down the page, with the title at the bottom of the page. The page was done in my Stamperia Happiness Mixed Media Journal 4.5x8 in.

Die cut Simon Says Stamp Ribbon Quilt.

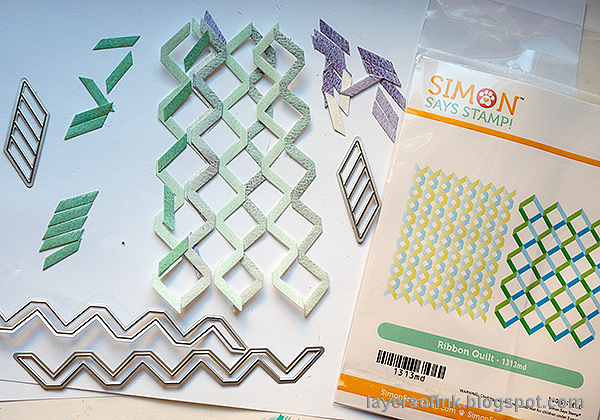
I die cut the ribbons from two colors of watercolored paper, one with a blue tone and one that was grey-purple. The I die cut the smaller strips from a darker shade. They go in two directions, test on scrap paper first, so that you know that you are using the right die. 

Assemble the ribbon quilt.

Glue the strips to the ribbons as shown.

Ink the page with Distress Ink.

For the background, I applied Distress Ink to an acrylic block, misted with water and stamped it into the journal. Repeat for the lower part of the page. 

Stamp with Simon Says Stamp Thank You Text.

When dry, I stamped it with the Simon Says Stamp Thank You Text, also from the Moments in Time release.


I glued the ribbons on the background, lining them up to create a continuous pattern.


The sentiments were stamped with Simon Says Stamp Create and die cut with the coordinating dies. 


I used Simon Says Stamp Poised Primula to die cut small flowers from Ice Vellum and old book paper. I have used this die a lot lately. Small flowers are very useful. I sprinkled them over the page.


There are more flowers around the sentiments.

Stamp and die cut with Simon Says Stamp Create.

The title also comes from Simon Says Stamp Create and was inked with Peacock Feathers and Wilted Violet Distress Ink. Mist with water before stamping. Die cut with the coordinating die.


I really like the acrylic block technique of applying Distress Ink to a background. It gives such wonderfully unpredictable results.

Layers of ink - Ribbon Quilt Art Journal Tutorial by Anna-Karin Evaldsson.


Thank you for visiting! See you again tomorrow!

Happy crafting!

Anna-Karin

Supplies:

* Please note: the links are affiliate links, for which I receive a small percentage of sales generated by the link, at no extra cost to you.


Floral Watercolor Dry Embossing

Hello crafters! Today I have a dry embossed and watercolored tag to share, a fun technique to do with embossing folders.

Please note: this post has affiliate links, for which I receive a small percentage of sales generated by the link, at no extra cost to you.

Simon Says Stamp Moments In Time.

I used an embossing folder from the brand new Moments in Time release by Simon Says Stamp.

Layers of ink - Floral Watercolor Dry Embossing Tutorial by Anna-Karin Evaldsson.

I used the gorgeous Simon Says Stamp Floral Bunches embossing folder for my tag and watercolored the design. One of the fun things with watercoloring on a dry embossed paper is that the paint will usually sink into the debossed areas and look darker there, even more so, if you drop a darker shade of paint into still-wet paint.

You can of course make a card instead, if you would rather do that. 

Dry emboss Simon Says Stamp Floral Bunches.

I die cut a tag from watercolor paper. Mist the paper on both sides and emboss in the Floral Bunches folder.

Paint the background with Daniel Smith Lunar Blue and Buff.

Paint the background with watercolor paint, working one area at the time. I dropped a light shade of paint into the first paint to get more color variation and texture. The blue paint is Lunar Blue by Daniel Smith. 

Paint the flowers and leaves.

Paint the flowers pink and drop in a little purple.


Paint the leaves green and drop in a darker shade of green.

Stamp with Simon Says Stamp Thank You Text.

When the paint is dry, stamp here and there with Simon Says Stamp Thank You Text.

Add Stickles and pen work.

Add some highlights with a white gel pen and some shading with a black pen. I also added a little Frosted Lace Stickles around the edges.

Die cut Simon Says Stamp Giggle Thank You.

The new Simon Says Stamp Giggle Thank You was die cut from paper painted with the same pink as the flower, from Soft Navy cardstock and from Ice Vellum (not included in this photo).


Distress the edges of the tag. I really like the blending of the paints in combination with the text stamping.


I added Simon Says Stamp Pawsitively Dazzling Opal Gems to the center of the flowers.

Thank you sentiment.

The Giggle Thank You is a great size and I also really like the font.Yesterday I used it with the coordinating mat, today I decided to use on the the words. You will find that post here, the Snake Plant Art Journal Page.


The text on the Thank You Text stamp is very small, which I like, since you can then stamp words on small areas, such at the petals of flowers.

Layers of ink - Floral Watercolor Dry Embossing Tutorial by Anna-Karin Evaldsson.

For more Moments In Time inspiration, don't miss the blog hop that was yesterday and the second blog hop today.


Thank you for visiting! See you again tomorrow!

Happy crafting!

Anna-Karin

Supplies:

* Please note: the links are affiliate links, for which I receive a small percentage of sales generated by the link, at no extra cost to you.


Friday, May 30, 2025

Simon Says Stamp Moments in Time Blog Hop

Hello and welcome to my blog! I am so happy to take part in the Simon Says Stamp Blog Hop to celebrate the new Rain or Shine release. If you are following along in the hop, you should have come here from Miriam Prantner.

Please note: this post has affiliate links, for which I receive a small percentage of sales generated by the link, at no extra cost to you.


The Moments in Time release is full of wonderful new and versatile stamps, embossing folders, stencils, dies, ink and sequins, perfect for summer-time crafting. You can find the entire Moments in Time release here.

The exclusive and not-yet-released Best Fishes stamp set will be automatically added to your cart that contains Moments in Time release products! This gift with purchase will expire 6/1 at 11:59 pm EDT or while supplies last. 

Simon Says Stamp Moments In Time.

I made an art journal page, but you can also easily turn the design into a card.

Layers of ink - Snake Plant Art Journal Page Tutorial by Anna-Karin Evaldsson.

Quite many years ago, I got a snake plant from a neighbour and it is still thriving. I thought it was a fun idea to have it in my art journal. This plant has a funny name in Swedish, namely 'mother-in-law tongue'. The plant was done with the new Simon Says Stamp Snake Plant stencil set.

Ink through Simon Says Stamp Snake Plant stencil.

The Simon Says Stamp Snake Plant set consists of five stencils. I accidentally deleted the first step photo. For the first stencil, I used Twisted Citron Distress Ink and for the second Twisted Citron Distress Oxide Ink. Hold the stencils in place with Simon Says Stamp Very Very Low Tack Tape.

Ink with Rustic Wilderness.

Next use Rustic Wilderness Distress Oxide Ink.


For the first of the pattern stencils, I used Mowed Lawn Distress Ink.

Ink through the last stencil of the Snake Plant set.

And for the last stencil, I used Rustic Wilderness Distress Ink.

Make a mask with Simon Says Stamp Masking Paper.

I wanted to mask the snake plant and used a pencil to draw around the first stencil on Simon Says Stamp Masking Paper. Cut the paper out to create the mask and place it on the design.

Ink the page with Distress Ink.

Ink the page with various Distress Inks.

Remove the mask.

Remove the mask.

Stamp with Simon Says Stamp Thank You Text.

Stamp here and there on the background with Simon Says Stamp Thank You Text and Fern Green Ink. I stamped on the plant in a few places, but mainly avoided the plant. 

Die cut Simon Says Stamp Giggle Thank You.

The new Simon Says Stamp Giggle Thank You is so cute and a great size. Die cut it from Simon Says Stamp Pine glitter cardstock, Midnight Green cardstock, Ice Vellum and left-over inky paper.

Use Simon Says Stamp Ice Vellum.

I glued the sentiment as shown, off-setting both the mat and the words. The stamped sentiment comes from the Mandala Blossom set, from the Your Are My Favorite release.

Stamp with Simon Says Stamp Birthday Dragons.

This sentiment comes from the new Simon Says Stamp Birthday Dragons set. I stamped and cut into strips, avoiding to stamp 'birth' in 'birthday'. I wanted a few small embellishments and die cut the Simon Says Stamp Poised Primula from glitter paper and Ice Vellum. This die comes from You Are My Favorite.


The shapes and patterns of these stencils are really great.


Don't worry if a little bit of the background shines through, it just adds highlights.

Layers of ink - Snake Plant Art Journal Page Tutorial by Anna-Karin Evaldsson.

Don't miss all the inspiration along the hop! There are of course prizes to be won too, and at each stop on the hop SSS is giving away a $25 coupon, randomly drawn from those who leave a comment. The winners will be posted post on the Simon Says Stamp store blog on 4 June.

Your next stop on the hop is Heather Ruwe. Don't miss to the stunning project she has created. If you get lost along the way, here are all the stops:


For more inspiration, remember to check out the Moments in Time gallery at Simon Says Stamp, and if you make something with products from the range, it is fun if you post it in the galleries too. There are galleries for all releases, and for the card kits, full of inspiration.

This is the first Moments in Time blog hop, don't miss blog hop number day number 2, which is tomorrow.


Thank you so much for stopping by here today! 


Anna-Karin

Supplies:

* Please note: the links are affiliate links, for which I receive a small percentage of sales generated by the link, at no extra cost to you.