Monday, December 23, 2024

Gingerbread Cookies Tag

Hi stampers! I hope you had a good weekend! How can it already be this late in December?!

Please note: this post has affiliate links, for which I receive a small percentage of sales generated by the link, at no extra cost to you.

This week we have a Cold and Frosty theme at the Simon Says Stamp Monday Challenge Blog. I hope you will join us! Don't miss the last project by our December guest designer Anita Rao. This challenge runs for two weeks and we will be back in the new year with a new challenge. 

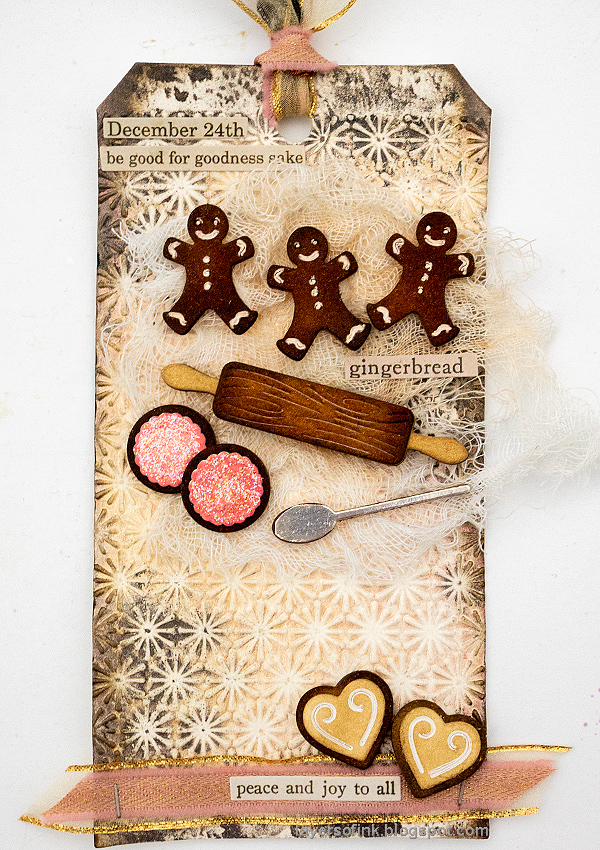
Layers of ink - Gingerbread Tag Tutorial by Anna-Karin Evaldsson.

I made a gingerbread tag with a frosty background and frosting on the cookies. The background glimmers and so does some of the cookies. We usually bake gingerbread cookies before Christmas and this tag celebrates that.

Die cut Simon Says Stamp Holiday Baking.

Start by die cutting a lot of Simon Says Holiday Baking Essentials from heavystock paper.

Ink and assemble the cookies.

Glue them together to form dimensional cookies and utensils. Ink the top layers with Distress Ink. I die cut the top layer of the spoon from silver kraft-stock paper.

Add glitter to the cookies.

Add frosting with a white gel pen and glitter with Stickles.


Emboss a watercolor tag in Simon Says Stamp Star Lattice folder.

Apply Micro Glaze.

Apply Distress Micro Glaze to the tag.

Mist with Distress Spritz.

Mist with Distress Spritz inks. The Distress Glaze will resist the ink and create a textured background.


You need to go over them a few times with the white gel pen, since the brown ink will bleed through. I glued some cheesecloth under the pieces as a baking or table cloth.


I used stickers from Tim Holtz Christmas sticker book for sentiments.


The cookies with the glittery pink frosting look almost good enough to eat.


Overlap some of the cookies for more dimension.

Add frosting to the cookies with a gel pen.

I added two ribbons at the bottom of the tag.


It is hard to see the shimmer effect, but it is pretty cool in real life.


Apply some Distress Micro Glaze to the edges too, for even more texture.


Do you use Instagram? If so please add #sssmchallenge so we can see your entries there too.


Thank you so much for visiting my blog today! 

Happy crafting!

Anna-Karin

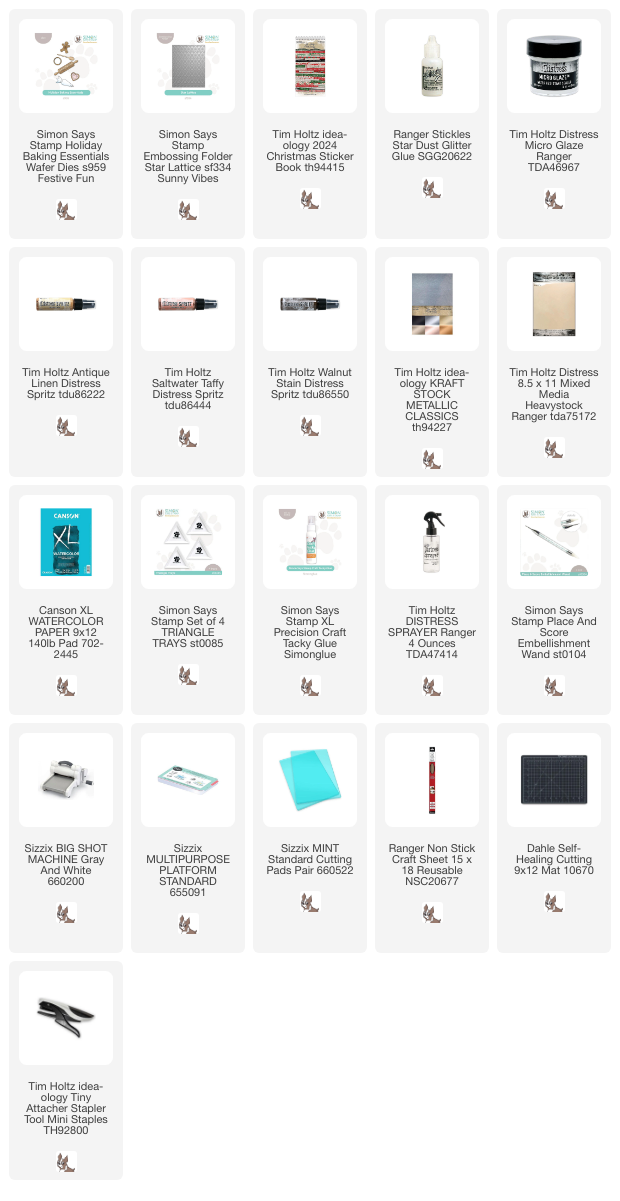
Supplies:

* Please note: the links are affiliate links, for which I receive a small percentage of sales generated by the link, at no extra cost to you.


Saturday, December 21, 2024

To Love Gift Box

Hi friends! I am taking a little break in all the Christmas crafting and preparations to share a gift box made with Simon Says Stamp new To Love release.

Please note: this post has affiliate links, for which I receive a small percentage of sales generated by the link, at no extra cost to you.


You can find the entire To Love release here. The release has a Valentine's theme, but hearts and messages of love are really great all year around. I am also very happy to have designed some of the products in the To Love release, namely the Outline Hearts stamp and Outline Hearts Stencils, the Love Letter stamp set, the Retro Hearts stamp set and the Groovy Love die. I won't be using them in this post, but I am looking forward to crafting with them soon. 

Layers of ink - To Love Gift Box Tutorial by Anna-Karin Evaldsson.

I made a little gift box, which can hold a small gift or perhaps some candy. For the box, I combined the Simon Says Stamp Sweethearts Box and Friends Furever set, both from the To Love release. The box was watercolored and I just added some gems and hearts die cut from glitter paper.

Die cut the gift box.

Start by die cutting the Sweethearts Box from watercolor paper and fold along the score lines.

Stamp with Simon Says Stamp Friends Furever.

Stamp one of the stamps from Simon Says Stamp Friends Furever on the front of the box. This cute stamp fits perfectly. This is a really cute stamp set.

Die cut with the heart from the same set.

Use one of the hearts from the Sweethearts Box set and die cut a window in the stamped heart balloon.

Paint with watercolors.

Watercolor the image. Leave some of the paper showing for highlights.

Stamp more balloons.

I decided to add some sentiment stamps and more heart balloons. By mistake, I dropped the heart balloon stamp on the project...not a fun thing to do if you are a stamper. Later, I managed to cover most of it with a gel pen.


Watercolor the rest of the box. Add a light layer of blue for the sky.

Add vellum to the window.

I glued a piece of Simon Says Stamp vellum behind the heart window.

Splatter paint on the background.

Splatter some watercolor paint on the project.


This box closes in a very clever way.

Balloons with vellum heart window.

I die cut the small heart from Simon Says Stamp White Glitter cardstock too and added some Pawsitively Dazzling Peachy gems.


Use a white gel pen to add dots as highlights.

Die cut the sentiment.

This sentiment also comes from the Sweethearts Box set and was die cut from left-over painted paper and white glitter paper.


I stamped one of the sentiment down the side of the box.

Handmade gift box.

Assemble with a strong adhesive, such as Red Line Tape.

Layers of ink - To Love Gift Box Tutorial by Anna-Karin Evaldsson.

When the box is open, you can see the sentiment at the top too.


Thank you for visiting!

Happy crafting!

Anna-Karin

Supplies:

* Please note: the links are affiliate links, for which I receive a small percentage of sales generated by the link, at no extra cost to you.


Friday, December 20, 2024

Glimmering Pines

Hi crafters! Today I have a card to share with a glimmering forest created with an embossing folder, ink, glitter glue, pens and gems.

Please note: this post has affiliate links, for which I receive a small percentage of sales generated by the link, at no extra cost to you.

Layers of ink - Glimmering Pines Tutorial by Anna-Karin Evaldsson.

I just love any embossing folder with trees, and perhaps particularly pine trees. Here I aimed for a light and glittery look, a snowy forest during day time. You can get a totally different look if you use darker inks. I used Simon Says Stamp Feathery Pines for the card.

Emboss Simon Says Stamp Feathery Pines embossing folder.

Start by applying Distress Ink directly to the Feathery Pines embossing folder. Mist the paper with water and emboss. You get a lovely random effect with this technique and you could stop here if you want to.

Paint with Distress Ink.

I smeared Distress Ink on a non-stick craft sheet and dry brushed the trees using a paint brush. Dabb off some of the ink you you get too much on the brush. This way, you will mainly get ink on the embossed parts.

Splatter with distress ink.

Splatter with two shades of Distress Ink, using a paint brush and adding some water to the ink on the craft sheet. 

Stamp with Simon Says Stamp Poinsettia.

Stamp the sentiment on the background with Simon Says Stamp Poinsettia Swag. Add white dots and lines with a gel pen. I added white to the branches of the pine trees with the white pen too.

Add Ranger Moon Dust Stickles.

Apply a little Moon Dust Stickles Glitter Gel to the branches. 


The embossing folder techniques gives a great mottled effect to the ink, which forms a nice backdrop to the forest and all the splattering.

Add Simon Says Stamp Pawsitively Dazzling Gems.


Stamp and die cut with Simon Says Stamp Mixed Labels.

The label was stamped with Tropic Pawsitively Saturated ink using Simon Says Stamp Mixed Labels and die cut with the coordinating die. It was adhered with foam tape.


Thank you for visiting!

Happy Christmas crafting!

Anna-Karin

Supplies:

* Please note: the links are affiliate links, for which I receive a small percentage of sales generated by the link, at no extra cost to you.


Wednesday, December 18, 2024

Frostie Watercolor Snowman

Hi stampers! The snow comes and goes here, but a paper snowman will always stay. Here is another snowman project.

Please note: this post has affiliate links, for which I receive a small percentage of sales generated by the link, at no extra cost to you.

Layers of ink - Mr Frostie Watercolor Snowman Tutorial by Anna-Karin Evaldsson.

I have done quite a few snowman projects this year and for this tag, I wanted to use the larger snowman from Tim Holtz Mr Frostie. He is covering most of the tag, with a dark snowy and sparkly sky as a backdrop. It looks pretty cold!

Stamp Mr Frostie on a watercolor tag.

Start by stamping Mr Frostie on a tag die cut from watercolor paper.

Draw the snowman's body with pens.

Extend his body to the bottom of the tag and add buttons. You need to use waterproof pens for this step.

Stamp on Simon Says Stamp Masking Paper.

Stamp him one more time on Simon Says Stamp Masking paper. Cut out and roughly cut the body too.

Stamp snowflakes.

With the masking paper in place, white emboss the Simon Says Stamp Twinkling Stars on the background. I got some embossing powder on the hat too, but that didn't matter.

Paint the snowman with watercolors.

Paint the snowman and the background with watercolor paint. Don't worry about perfection and leave some of the paper white.

Add Gansai Tambi Starry paint.

I added some shimmer to the sky with Gansai Tambi Starry Colors (the lightest shade).

Add snowflakes with a gel pen.

When dry, add more snow to the background and some white highlights to the snowman.

Add Stickles and Glossy Accents.

Add Glossy Accents to his eyes and Star Dust Stickles to the hat and here and there in the sky.

Mixed Media snowy winter night.


I don't know if you can see the Glossy Accents on his eyes here, but it adds a nice touch. 

Add more shadows and lines.

Add shadows to the snowman and more black linework if needed.


The sentiment also comes from the Mr Frostie set and was cut into two strips to avoid covering too much of the snowman.


Thank you for visiting!

Happy Christmas crafting!

Anna-Karin

Supplies:

* Please note: the links are affiliate links, for which I receive a small percentage of sales generated by the link, at no extra cost to you.