
Hello friends! We had a fun weekend here. My dad visited and we did some outings, such as going to a lake to swim. Because of the unusually warm May weather, the water is already pretty warm. We also had a whole bunch of soccer related activities.

This week at the Simon Says Stamp Monday Challenge Blog we have a Masculine theme. Don't miss the last project by our May guest designer Alison Bomber.

I told the story of one of my relative's adventures at sea on a tag, using stamps, dies and words. The base is a Tim Holtz Medium Etcetera tag, which is very sturdy, almost like wood, and bigger than you might think (12 x 6.5 in). I don't always check the size of things when I order products and I was happily surprised to see how big the tags are. Lots of space!
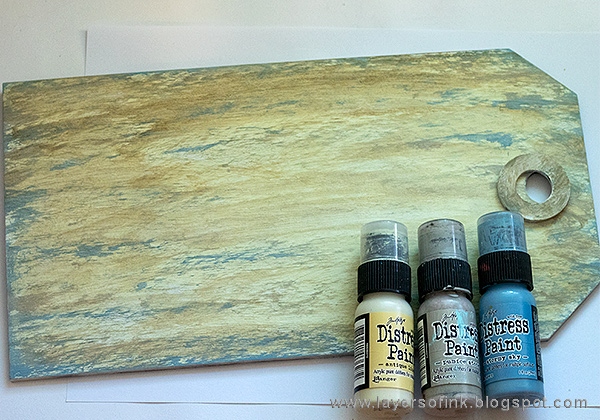
After giving the tag a coat of gesso, I painted it with Distress Paint, aiming for the look of an old painted and worn wood plank.

Some of the stamps were stamped on tissue paper and then adhered to the background - with one layer of glossy multi-medium below the tissue paper, and one on top. These were the images where I wanted the stamping to be as good as possible (the ship, map and journey word), while I wanted a more distressed look to the rest of the stamping and stamped directly on the background. All the stamps are by Tim Holtz.

A little Faded Jeans paint was mixed into embossing paste and applied through a stencil. I also used black paint and paste through a word stencil, and smeared the left over blue paste under the ship as waves. I smeared the left-over black paste around the edges of the board, also giving the edges a rough feel.
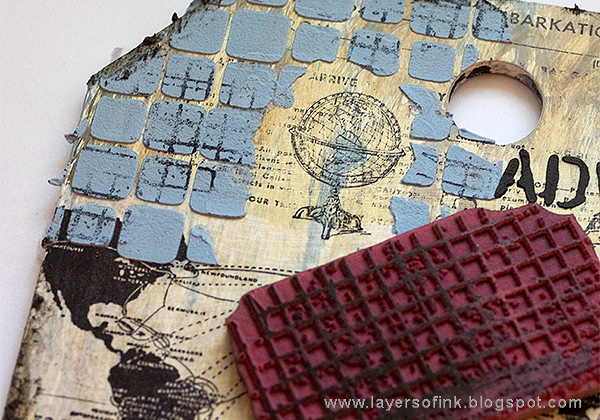
When the paste was dry, I stamped it randomly with a grid stamp.

I painted the boat with Distress Paint, darkened the edges and dry brushed brown, white and silver paint on the paste areas. The background needed a little more red, and I stamped dots with Candied Apple paint.

The tag was embellished with some idea-ology pieces and ephemera papers. Here you can see the silver dry brushing on top of the word.

Alcohol ink was used to color the Gumdrop Hearts. I also used a whole bunch of die cut gears. They were die cut from a paper that had been misted with various Distress Spray Stains, also including metallic sprays.

A big metallic gear was glued to the circle and I tied the tag with Linen Ribbon.

The relative in question was an electrician, which is why I stamped the bulbs here and there.

The gears have a cool texture and some of them are very metallic looking. The ephemera tag was sanded, torn and inked.

This stamp comes from the Traveling Friends set.

By dry brushing on top of paste areas, you can easily increase the texture and make the paste look even more interesting.
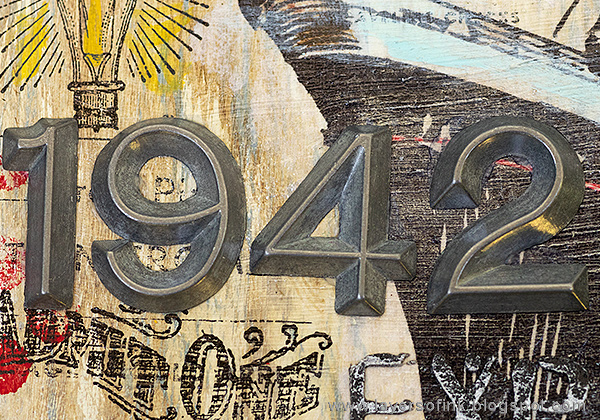
I like these metallic idea-ology numbers.
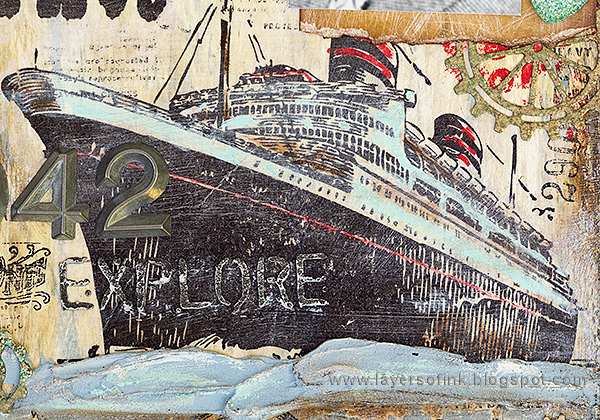
This ship stamp is a favorite of mine and I have used it quite many times before. I really like the perspective of the stamp and how the boat almost comes into the project.

Here's a closer look at the texture of the waves under the boat.
I hope you will join us this week in our Masuline challenge. As always, you have a chance to win a $50 gift voucher to do some fun shopping at Simon Says Stamp. You have until next Monday 8am Ohio time. 1pm UK time, 2 pm CET to join in.


Do you use Instagram? If so please add #sssmchallenge so we can see your entries there too.


Thank you for taking the time to stop by my blog today!
Happy crafting!
Anna-Karin
Supplies:
* Please note: the links are affiliate links, for which I receive a small percentage of sales generated by the link, at no extra cost to you.
I really love how your tag tells a story, Anna-Karin! You really have put a lot of love into this, from the great background to little details like the cog you tied on at the top. Love this! hugs, Maura
ReplyDeleteYour tag is stunning! I love especially the background and the mix of colors you gave it, the result is really cool. All the stamping looks great on the background colors and the blue paste gives a lot of interest. I also love those tags, I have the "small" version which is still huge. Hugs, Marzena.
ReplyDeleteThis is such gorgeous tag, Anna-Karin. Love the beautiful stamping and embellishments you created on the background. All the details are stunning. :)
ReplyDeleteSo much in this tag, stories layers colours and texture, it is wonderful, thanks for sharing x
ReplyDeleteI love this tag! There's so much adventure in all those layers and all those elements, the stamping, the texture, the embellishments. I love the gear at the top, fastened with the linen ribbon - it looks very nautical! I must get that large ship inky again some time soon... what a brilliant image.
ReplyDeleteAlison x
Oh Anna-Karin, I LOVE this tag. The woodgrain effect still shines through the other elements and it all works so beautifully together. I love how you brought in the different references to his life all on one tag! WOW!
ReplyDeleteThis is an incredible tag! It's so beautifully created with all the interesting details...I love it!
ReplyDeleteThis is beautiful Anna-Karin...the story that you've told through your work is just fabulous and you've added so many wonderful details that are such a treat for the eyes! Gorgeous work as always... :)
ReplyDeleteThis is extraordinary! Love the background and the story is wow. Love reading through all of this!
ReplyDeleteAmazing colors and textures on your tag! SO many fun things to look at :)
ReplyDeleteBeautiful work once again! I love to see your techniques and I especially like how you're able to combine so many different types of images and supplies to create a scene. Lovely!
ReplyDeletebeautiful tag Anna-Karin, love everything about it and how lovely that it tells a personal story, hugs kath xxx
ReplyDeleteGorgeous tag, Anna-Karin! Love the sea theme and that you told a story about your relative with it! Fabulous techniques! Hugs, Sandra
ReplyDeleteLove your nautical tag! Fabulous mix of textures, stamps and embellishments!! barbara
ReplyDeleteI do have a question.. I tried using Dylusiond on a tag and my tags warped. Being wood like I could not get it to return to its flat self. Is there a trick to keep the tags flat? Love what you have done with your tag. Awesome
ReplyDeleteHi Susan! Thank you for your comment! Did you use mist or Dylusions paint? The most important thing is the paper the tag was made of - some papers do warp, so it is best to use papers that can handle wetness, such as watercolor paper, or mixed media papers. A first layer of gesso can also help with warping, or placing the tag under a heavy book for a while. The large tag I used in this project is made from thickboard, and is very thick, so it won't warp. If I misunderstood, and your tag was made from wood, I am guessing it must have been thin wood veneer? In that case, gluing it to heavy cardstock first might do the trick. Good luck and let me know how it goes! / Anna-Karin
Delete