Hello everyone! Today I have a
Sizzix tutorial for you, using a fun and simple resist technique. I made a layout, but the technique work for many types of projects. Indeed, the result might be better on a somewhat smaller surface.
When I got
Stephanie Ackerman's new words dies, I wanted to do a background using most of the words. Leo has just started to walk and I realised that I hadn't scrapped about when he learnt to sit, which was a big thing for him, gaining a whole new perspective on his toys and other things. I am tucking more photos and journaling in behind the layout. The dies were used to create masks, which resisted the watercolour paint. I used Prima's watercolours, but any watercolour paint will have the same effect. Ordinary table salt created the cool texture.
These are the Thinlits sets and Framelits that I used:
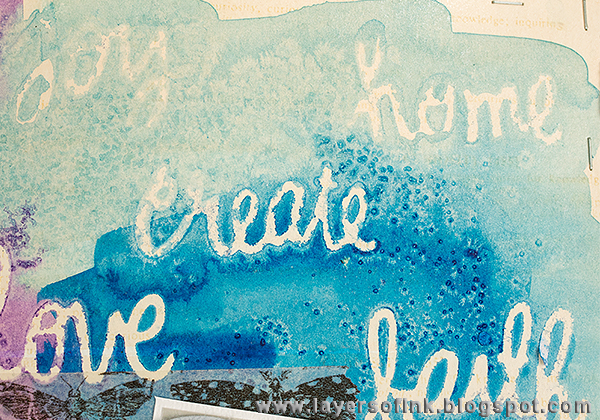
Circle Words: Faith, Create, Brave & Joy,
Circle Words: Yay, Thanks, Sweet & Awesome,
Circle Words: Love, Hello, Happy & Home, and the
Circles & Icons, Hearts & Star. I love word dies and these are all so versatile and useful, great for scrapbooking, cardmaking and art journaling.
I didn't want the words to be stark white, so I started by giving my paper beige wash.
Next the background was stamped here and there with a
curiosity definition stamp, using Antique Linen and Frayed Burlap inks.
I die cut the words from
Eclipse Masking Tape, using this sandwich: Sizzix Magnetic Platform, Cutting Pad, tape, die facing down, second Cutting Pad.
Prepare the paints before you start. I used smooth (hot-press) watercolour paper, simply because it was next to my desk. The next time I do this I will use NOT (textured) watercolour paper, since it is easier to work on. The paints dry much faster on smooth paper and on top of that it was a warm summer day when I made this. I wanted the colours to blend smoothly together, but the paint dried too fast, so you can see that there are some hard lines. Since the paint dried so fast, I had to sprinkle salt into it as I went along. You need to sprinkle the salt when the paint is still wet, but not totally wet. If you work on a smaller surface, you won't have to worry much about drying time. I tested the technique on a small piece of paper first and it worked just as planned, but on the large piece, the drying time became a problem.

Remove the masking tape (I like to use a craft knife to lift up the tape). As you can see, most of the words are perfect, while paint seeped under some of them. I might not have stuck those down properly.
The salt makes little star like textured shapes. I did the salt technique again today, on textured paper, and it was more dramatic, since the paint was wetter. When the paint is completely dry, brush the salt off.
I misted the background with
Pearl Mica Spray.
Ink up a row of circles from
Tim Holtz Rings stamp, and then repeat using different rows, for variation.
Using your dies to make your own masks and stencils, is a great way to get even more out of your dies. Aren't these words great?
Here paint leaked underneath the masking tape, but these are actually my favourite words. I liked the effect and the less stark words. To achieve this effect, don't press the masking tape down too hard, and use more watery paint. The blending between the two shades of blue that you see here, is what I wanted for the whole layout, but because the paint dried so fast, I got hard lines instead. I would have redone it, if I had had the time. Instead, I decided to leave it be.
I adhered some tissue tape to the background. Wafer-thin dies cut perfectly through
wool felt and the felt added a nice soft touch to the layout. These were die cut with the dies from the
Circles & Icons, Hearts & Star set. I didn't use the coordinating stamps for this project.
I added some cheesecloth under the photos. The sticker at the top is a really old Making Memories sticker defining 'success', which I came upon when I was looking for something else.
I love circles and rings and you'll find both in the
Circles & Icons, Hearts & Star set. The title translates 'new perspectives'.
I don't know if you can see the effect of the Pearl Mica Spray a little on this photo, it is hard to capture.
Thank you so much for stopping by today and enjoy the rest of your weekend!
Happy crafting!
Anna-Karin
Supplies:


I love the colors and how you used the dies as masks. It turned out so pretty with all the words around your little Leo. It seems it was just recently you announced his arrival and he's walking now! I'll bet you are a busy Mom. Thank you for all the photos and step by steps you do for us showing techniques. I know it must take a lot of time.
ReplyDelete