Hello friends! Did you have a good weekend! I went to a fun antique fair and found some really great stuff, such as a printer's tray. I've always wanted a printer's tray and it was the only one there, so I was lucky.
It is Monday and a new
Simon Says Stamp Monday challenge is up. This week our theme is
Butterfly Beauty. I love adding butterflies to my projects, since there are so many things you can do with them, it is easy to make them dimensional and they have lovely colours and shapes.
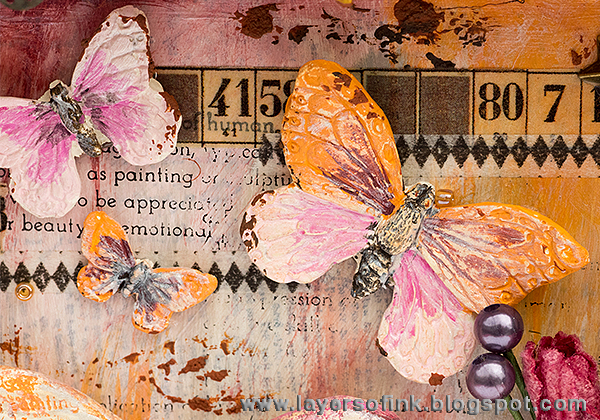
Today I made a shadow box using mainly products by Prima. It has been a long time since I worked with clay, and I was happy to use Prima's
paper clay for this project and to make my own embellishments. There is a lot going on in this shadow box, which measures 6 x 6 in. There are also some metallic butterflies, pretty flowers and lots of texture. I took step photos.
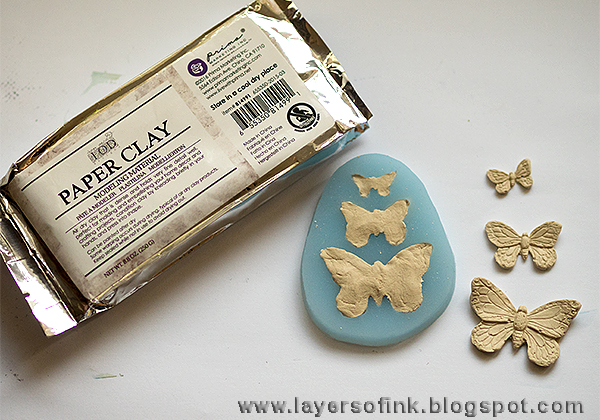
For the butterflies, I used
WOW's Butterfly Trio mould. Start by conditioning the
clay briefly by kneading it. Press pieces of clay into the mould. Pop them out carefully.
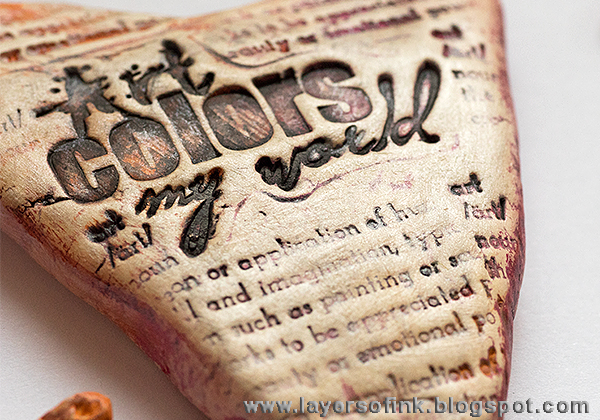
I also made three chunky hearts from the clay and stamped them. The two on top were stamped with stamps from the
Art Supplies set and the smallest one with the
Texture Iron Orchid stamp. Leave to dry before painting, it took quite some time, because they are thick. The butterflies were much quicker. Drying time will depend on the climate where you live too.
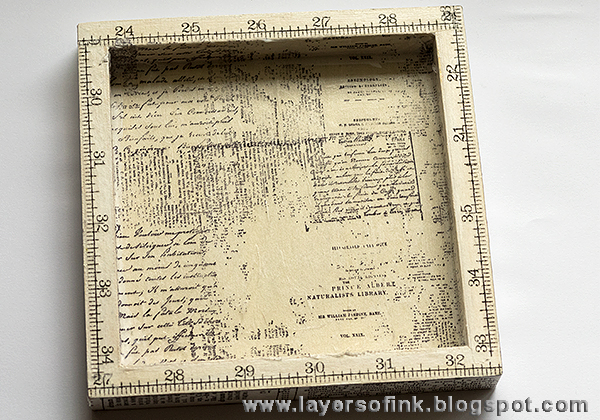
Stamp Tim Holtz
Plain Tissue Wrap with the
Texture Iron Orchid stamp, using Jet Black ink. I also used this new tissue paper on my
Because You have a Song canvas.
I used the largest of Prima's
Square Tray set. Glue the tissue by applying one layer of
gloss gel underneath and one on top. On the edges, I used tissue tape instead.
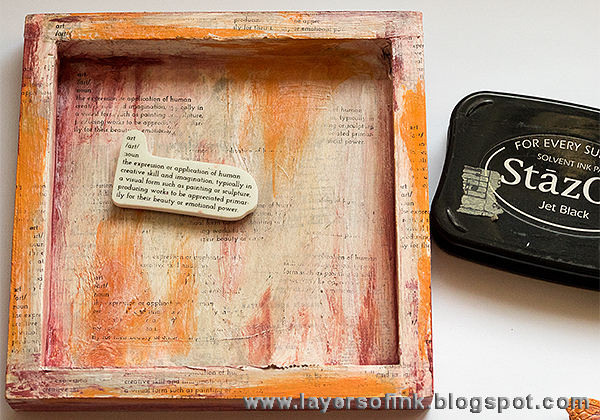
When dry, first give the box a thin coating of gesso (I forgot to take a photo of this step) and then paint with Distress Paints. I later added some more paint.
Paint the heart with Picked Raspberry and Spiced Marmalade. I was planning to rub black paint into the words, but didn't wait long enough and rubbed off quite a lot of the pink and orange too. I really liked the look and decided to keep my heart like that.
Paint the butterflies with Distress Paint.
I mixed a little
Pale Silver Mica Powder into gloss gel and painted the clay shapes and the box with it to give them a subtle shine.
It is hard to capture on photo, but maybe you can see some of it here.
Stamp the background with the same
art definition stamp as used on the heart.
After gluing everything into the box, I added some of Finnabair's cool
Rust Pastes, a little of all of them. Use a palette knife for a great random effect.
You can see the effect of the paste better here. Very cool stuff, it gives great texture.
I glued a butterfly to the heart and added a tiny bit of paste. As you can see, I also added some tissue tape to the background before gluing everything down.
At the bottom of the box, I added a thicker layer of the pastes, using all three of them, to make it look like soil. Gold Mica flakes and Plum seed beads were sprinkled into the paste.
The lovely flowers come from
Spring Prism Floralia Relics and Artifacts and I used the whole pack since I really liked how they looked together.
Grungy Butterflies were glued to the flowers. I shaped the wings a little and glued seed beads to their bodies.
I also added some seed beads to the flowers, and a tiny bit of rust paste.
At the other side of the box, there are two flower buds.
I used three of these pretty
Grungy Butterflies by Finnabair, and also some of her new metallic
Mini Stars.
The clay butterflies look great and are so easy to make with the moulds. The are a little fragile, so if you use them on a card, you might need to add some padding.
Here's another look at the rusty and golden soil. A piece of lace trimmings and twine were wrapped around the bottom.
Art truly does colour my world and I could not imagine being without it.
I hope you will join us in our
Butterfly Beauty challenge. As every week, you have a chance to win a $50 gift voucher from
Simon Says Stamp. You have until Monday 8am Ohio time. 1pm UK time, 2 pm CET to join in.

If you use instagram add
#sssmchallenge to your challenge entry uploads, so that we can see them on there too.


Thank you so much for stopping by today!
Happy crafting!
Anna-Karin
Supplies:


WOW!! this is absolutely stunning! the colours and whole design is amazing! LOVE it :-D Love your step by step photo's too, brilliant! :-)
ReplyDeleteluv
Lols x x x
Ay! I love the clay elements! The stamp looks amazing as letterprinted on the clay heart. The outdoos scene is fabulous and the colors are awesome!
ReplyDeleteHugs, Marzena
thera are many nice details. fab. work
ReplyDeletegreets
alexa
Anna-Karin, this is an absolute delight! In my opinion you can never have too many butterflies... and I just love, love, love this!!! Hugs, Anne xx
ReplyDeleteStunning project, Anna-Karin! The colors and dimension really pack a PUNCH!!
ReplyDelete*mwah*
Steph
Simon Says Stamp!
This is such a joyful creation which must have been inspired by such a heart-felt sentiment!
ReplyDeleteGorgeous shadow box!! Love all details!!
ReplyDeleteA work of heART!
ReplyDeleteWow! This is gorgeous, Anna-Karin! Pinks and oranges look fab together, and I love how you used the paper clay and molds. I have to try those pastes after seeing what you've done with them.
ReplyDeleteThis is gorgeous, Anna-Karin! I love how you were able to make this look like something right out of a springtime garden and I love all the beautiful bright colors. Just beautiful! Cathie <3
ReplyDeleteGreat projects!!! You rocked it!!!💓
ReplyDelete~God bless
Anna, I love your creations! The colors on the butterlies are so cute! Thank you for sharing and inspiring me!
ReplyDeleteWow... Anna-Karin I love your gorgeous creation! All the details are amazing! :)
ReplyDeleteThis is so pretty, Anna-Karin! Love all the gorgeous elements. Need to look into the paper clay now! Hugs, Sandra
ReplyDeleteClay elements are stunning! You're an incredible and so creative artist! Love this shadow box ! butterflies and colors are gorgeous! BArbara
ReplyDeleteamazing project Anna-Karin...it just sings Spring...love all the interesting elements and woohoo your clay elements are amazing...hugs kath xxx
ReplyDeleteSo, SO beautiful ~ the colours are just a wonderful combination and perfect for this time of year and I there is just so much to look at and admire...it's stunning! :)
ReplyDeleteGood heavens! You are UNSTOPPABLE! Love how you totally made your own clay elements and the paint job you did on the box itself is phenomenal! This causes me to ask, yet again, Is there anything that Anna-Karin CAN'T do?
ReplyDelete