Hi and welcome! It is a new week and my favourite part of the beginning of a week is that there is a new
Simon Says Stamp Monday Challenge. Valentine's Day is coming and we have a
Love is in the air + red theme for this week's challenge.
I don't normally do a lot of Valentine's projects, and yesterday I posted an
art journal tutorial showing how to use Valentine's dies for a different topic. Heart dies, for instance, are really useful year around and are one of my favourite shapes of dies. More than ten years ago, I did quite a bit of decoupage and I still have wooden blanks left-over from that period. I found this pen holder and thought it would work great together with
Ranger's Distress Mosaic Kit, which I have been wanting to try out. I took some step photos. You can do the technique on almost any surface.
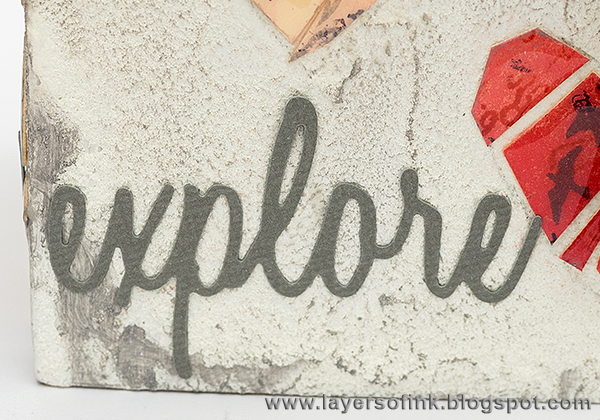
I started by painting my pen holder with white gesso, to cover up the wood. Then I applied a thin layer of the Distress Paper Mosaic Grout on all four sides, but leaving the wood uncovered here and there. The grout has a really cool gritty texture.
When the grout was dry, I made it a little less white by inking with Pumice Stone.
I used Sizzix Tim Holtz
Mini Hearts and Stephanie Ackerman's
Hearts #4. Die cut from masking paper, or you could just use printing paper.
Trace the hearts with a pencil. I used a watercolour pencil first, but it was a little too faint because it was grey, so instead I just grabbed the nearest pencil on my desk.
You can use patterned paper for the tiles, but I wanted to make my own papers instead. Three sheets of manila cardstock were coloured with Distress Paints. Apply paint to a craft sheet, mist with water and press the papers into the paint. Let dry.
The papers were stamped with Tim Holtz stamps, using both smaller detail stamps and background stamps. I used Red Geranium, Jet Black and Watering Can Archival Inks. It is important to use a waterproof ink, so that it doesn't run when you glaze the tiles later.
Each paper was stamped with a different set of stamps, so that they wouldn't look the same. This one is mainly
Tiny Things.
And this is the pink paper, with, for example,
Distressed Damask and an
Ultimate Grunge background stamp.
Cut the papers into irregular tiles. I only used a small piece of each paper and will save the rest for later.
Arrange the pieces on the background. You might need to cut the tiles a little to make them fit nicely. I put mine a little too close together, especially for the heart. Glue down with Mosaic Glue and add a thin layer on top too. Let dry.
Now to the really cool step. Apply Distress Paper Mosaic Glaze on the tiles, working carefully. It is pretty thick stuff, so it doesn't run. Leave to dry completely before continuing. My pen holder took a bit of time since it had to dry before doing the other sides. The glaze seems to be similar to Glossy Accents, but a little thicker.
I drilled a hole in one of the sides and attached a Swivel Clasp with a piece of wire. The areas which weren't covered with grout were painted with grey and so was the inside of the box. I also dry-brushed some grey over the grout.
At this stage, Anton came into my room and very much wanted to have the pen holder for his pens, so he got to chose what to hang on the clasp. He picked an
airplane.
And a
shield with the word strong - after choosing between 'strong' and 'brave'.
He also picked a
Heart Charm which says 'forget me not', so that 'every time I will see the pen holder, I will think of you'. Sweet.
I die cut
words from grey Core'dinations paper and glued to each side of the box.
Here you can see what it looks like from the top. It is a good high pen holder. I have the same one, although an older one that I decopaged probably ten years ago, and keep my tall paint brushes in it.
I covered two of the sides basically completely. This one has a tall red heart and a smaller pink one.
I love that you can see little details and words here and there, almost like a puzzle which has been all scrambled up.
The tiles look really cool with the glaze surface. It is hard to quite catch the effect on a photo.
The two other sides have two or three hearts and more of the grout exposed.
Some of the pencil marks still show, but I was okay with that, since the pen holder is indeed meant for pencils. You can easily paint them over with white paint.
If you use smaller tiles, you can make even small shapes on your project. Don't worry too much about finding the perfect tile shapes, they are supposed to look uneven.
Here you can peek a cup, a watch, birds, an elephant, and lots of great words. I really like the look of these glossy tiles together with the rough grout.
A pen holder full of pens an pencils holds the potential for lots of adventures and discoveries. I am happy Anton wanted this, and he also needs a pen holder much more than I do at the moment, since his markers and pencils somehow end up everywhere.
I hope you will join us in our
Love is in the air and red challenge. As always you have a chance to win a $50 gift voucher from
Simon Says Stamp. You have until Monday 8am Ohio time. 1pm UK time, 2 pm CET to join in.

If you use instagram add
#sssmchallenge to your challenge entry uploads, so that we can see them on there too.


Thank you so much for stopping by today!
Anna-Karin
Supplies:


How wonderful that you customized your creation at your son's request. Thanks for the step-out. It really is charming and I especially like the softer colors and gray accents with the pops of red. I love my Tiny Things stamp set and this would be a great way to use it!
ReplyDeleteGreat pen holder, I really like it. I love how you use stamps.
ReplyDeleteooh, you are so clever! the whole design of this is fabulous! I love how you left some of the grout uncovered to give it a more masculine industrial look, BRILLIANT!! LOVE it :-)
ReplyDeleteluv
Lols x x x
Anna-Karin, that is AMAAAAZING! you made me want to try out the paper mosaic kit!!
ReplyDeleteLove every single detail on this project!
xx Zoey
so, this is what you were working on! It turned out brilliantly, I must say! I haven't tried it, but it looks like fun, and what a great gift. Love your hearts and the dangles. Anna-Karin, another fabulous project!!
ReplyDeleteThank you Maura! Yes, that is what I was working on, and it took a little longer, because of all the drying time. well worth it though!
DeleteReally, really cool Anna-Karin. I love that each side is different!!
ReplyDeleteThank you so much Paula!
DeleteTotally gorgeous pencil holder! Love the mosaic look!
ReplyDelete*mwah*
Steph
Simon Says Stamp!
This is so awesome, love the colors and that Tiny Things Stamp...OMG so cool! And swivel clasp what a great idea... love it !
ReplyDeleteI really like the sweet little images on the tiles and the added words to the heart charm. What a fun new technique.
ReplyDeleteI really like the sweet little images on the tiles and the added words to the heart charm. What a fun new technique.
ReplyDeleteSuper neat beautiful project.
ReplyDeleteI love how you've utilized so many different stamps to make a beautiful mosaic, great project Anna-Karin!
ReplyDeleteNow I want Paper mosaic kit! Wonderful creation! barbara
ReplyDeleteGorgeous project, Anna-Karin! Love this pen holder with the mosaic pattern. It maked me want to go on vacation to spain! Hugs, Sandra
ReplyDeleteWow the mosaic surface of your box looks so great and the charm looks very good too.
ReplyDeleteGreetings
Sabine
This is really fabulous and unique. Thanks for the step by step description!
ReplyDeleteWhat a fabulous piece! I love how you are always innovative with your ideas. I think this is an extraordinary interpretation of the love theme and I especially like how you incorporated the word, "Strong."
ReplyDeleteGreat tutorial! Love your beautiful box, Anna-Karin. The texture and colors are awesome! :)
ReplyDeleteFabulous project Anna-Karin, love how you used the templates for your mosaic hearts and that you made your own patterned papers! Thanks so much for sharing it (and now I have to go and buy Tim's Mosaic kit!!) Deb xo
ReplyDeleteAnother beautifully clever idea from you! Your creativity never fails to astound me. I have been so happy to be on a DT with you! You constantly inspire me. I will still be popping over to see what is happening in your creative world!
ReplyDeleteI have been so happy to be on the DT with you too Sue! We will miss you!
DeleteAnother brilliant project and great tutorial, Anna-Karin and I love the texture and colours you've incorporated into this fabulous pen holder!
ReplyDeleteSo cool! Love all the photos here, and the glossy mosaics are perfectly scrumptious! I haven't done mosaics in a really long time. Thanks for the inspiration!
ReplyDeleteLucky Anton. It looks terrific. I love every little detail. Lots of inspiration.
ReplyDelete