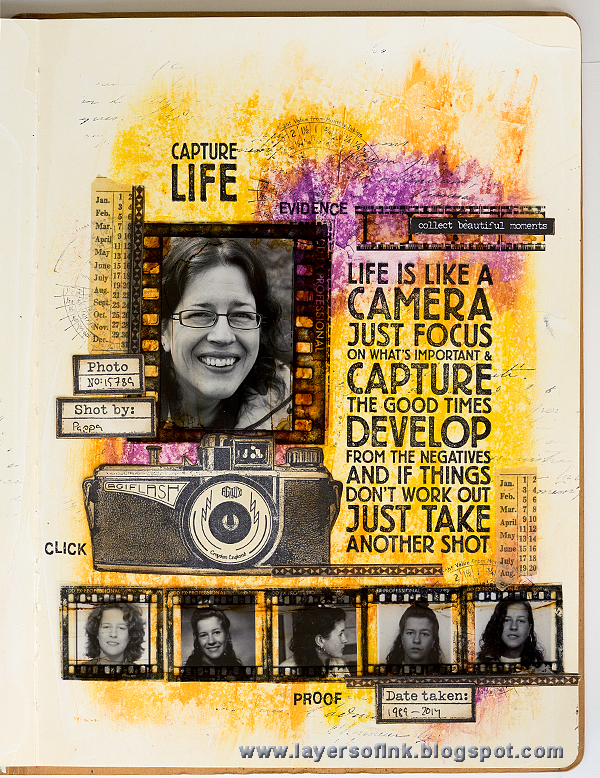
Hi and welcome!! Today I have an art journal tutorial to share with you, made with Darkroom Door stamps, and I discovered a fun texture technique with Tim Holtz Distress Crayons by mistake too, I am calling it the 'accidental paper towel technique'.
I used the wonderful Capture Life set for this page in my large Dylusions journal. This could just as well have been a scrapbooking page. I mix my scrapbooking and art journaling a bit, depending on the theme and what I feel like. At first, I was just going to include just the one newer photo, but then I got the idea of stamping a film strip on acetate and using a bunch of old photos too, since I thought it fit so well with the great sentiment stamp. I also used some other stamps by Darkroom Door.
My page was first coated with gesso and when that was dry, I scribbled a generous amount of Distress Crayons on top.
Mist with water to blend the colours.
The background technique was a fun discovery and totally unplanned. I was planning to mist the background and blend the colours with a paint brush. But I had forgotten to take the first step photo, so after misting some water, I took a roll of paper towels, to just remove the water for the photo. The paper towel roll gave a really cool texture to the background. Roll a roll of paper towels over the misted background. Repeat with more water, if needed.
Stamp the background with the two sentiment stamps and Jet Black ink.
Stamp randomly with French Script and the circular stamp from the Photography set. Use second and third generation stamping (stamp on a piece of scrap paper first).
Stamp the Film Frame and the smaller frame from Photography on acetate.
Distress with Adirondack alcohol ink. I later removed some of the ink, so that there wouldn’t be too much ink over the photos, but mainly around the edges.
Stamp one of the vintage cameras From Capture Life and three labels from Photography on Mixed Media cardstock and cut out. Ink with Antique Linen and Ground Espresso.
Adhere small photos behind the frames, my photos didn’t quite fill the frames, but I let it be like that since I liked that you could see some of the background.
I was really happy with the texture created with the accidental paper towel technique.
The vintage camera stamps from Capture Life are wonderful. There is a second one too, with a large external flash.
I also used a small piece of Tim Holtz idea-ology
Film Strip Ribbon and a Small Talk sentiment.
Thank you so much for stopping by today! Have a lovely weekend!
Happy crafting!
Anna-Karin
Supplies:
And:
Stamps: Darkroom Door: Film Strip frame


Love your happy mistake....
ReplyDeleteand the finished project!
Just love this AK xo
ReplyDeleteWOW, an other great inspiring project: pinned!
ReplyDeleteIts wonderful !!
ReplyDeleteIts wonderful !!
ReplyDeleteBeautiful! I love this page, it wpuld be a great design for anyone's photos. Even though there are large stamps used, the photos still stand out. Neat technique with the Distress Crayons, too.
ReplyDeleteWonderful!
ReplyDeleteI still haven't had a chance to experiment with the crayons, so it's great to see this inspiration. Love the vivid colours setting off the great b&w photography elements.
ReplyDeleteAlison x