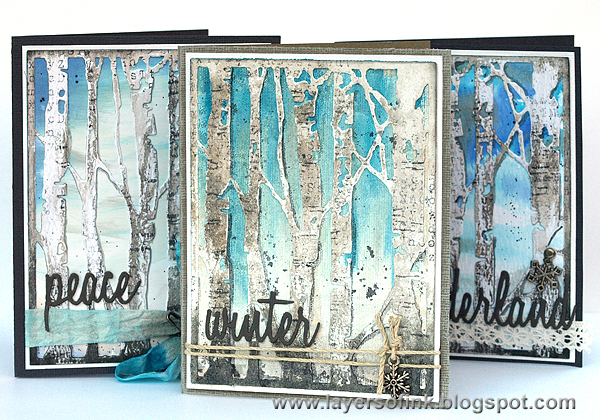
Hi and welcome!! I hope you are all well. The temperature has dropped here and we are hoping for snow any day now. I love snow, especially newly fallen snow on branches. On that theme, I have a
Sizzix tutorial to share with you today, featuring a wintery Birch forest.
As I am sure you know, I also love trees, and Birch trees are one of my favourites, so I just had to get
Tim Holtz new
Birch Trees die. In this tutorial, I will show you how to use it on two different surfaces and with three different background techniques and surfaces. These would make great Christmas cards, pick your favourite and make a whole batch. I used watercolour paper, glossy cardstock, natural sticky back canvas and Sizzix new fun
Paper Leather sheets.
Start by die cutting the Birch Tree die from
watercolour paper, twice. Sandwich: Sizzix Magnetic Platform, Cutting Pad, paper, die facing down, second Cutting Pad.
Also die cut it from white
Paper Leather, which works really well together with detailed dies, even though it is quite thick and very durable. You can read more about it in
this tutorial of mine.
To create texture similar to the texture you find on real Birch trees, I reached for one of my favourites, namely
Distress Micro Glaze. Apply it sparingly with your finger, but don't cover all the paper. To see the glaze in action, check out
this video tutorial of mine. Speaking of videos, I am planning to make more soon, I am just sorting out the lighting situation in my studio first, because it is too cold and dark to shoot them outdoors now.
Press Pumice Stone and Hickory Smoke Distress Ink on your craft sheet, mist with water and press the papers into the ink. Repeat for each die cut. The Micro Glaze resists the ink and creates a great texture. As you can see, I applied less of it to the leather paper (to the right).
When dry, I stamped them just here and there with second and third generation impression, using my favourite alphabet background stamp, from the School Desk set. Stamp on a piece of scrap paper first.
I smeared Black Soot on my craft sheet, misted once with water and picked up with a paint brush, to add the lines that you find on Birch Trees. The edges and base of the trees were inked with Black Soot. Now when the trees are done, lets move on to the backgrounds.
For the first card, I used Ranger's
Gloss cardstock as my background. I liked the difference in texture between the smooth gloss background, compared to the textured watercolour paper.
Cut a piece of gloss cardstock and start applying the lightest shade of ink (Tumbled Glass). Starting with the lightest ink and gradually building up darker colours is easier since the application of the first ink makes it easier to apply the darker shades smoothly. I used a torn paper as a mask for the snowy hill. You can use any ink-blending tool. To get the look of wispy clouds on gloss cardstock, I like to use the
Colorbox Stylus Tool with
Oval Blender tips.
After gluing the trees to the background, with matte multi-medium, which doesn't show if some seeps out, I added a shadow with a Hickory Smoke Distress Marker. I also splattered the background with some Black Soot ink - smear on craft sheet, mist with water, pick up with a paint brush and tap the paint brush.
The
Crinkle ribbon was dyed with the same Distress Inks as used on the background. I added a
Snowflake Adornment to a Loop Pin.
The second card is the most textured one, using
Natural Sticky Back canvas for the background and
Paper Leather trees.
Paint with watered down Distress Paints, and let them run down the canvas a little.
Splatter some Black Soot ink on this background too and glue the trees in place. Add a shadow to one side of the trunks with the Hickory Smoke Distress Marker.
The sentiments were die cut with the
Holiday Words Script die from gray paper. Die cutting sandwich: Sizzix Multipurpose Platform tab 2, Precision Base Plate, paper, die facing down, Cutting Pad. I matted the panels on white cardstock and then on folded grey Core'dinations cardstock.
This card was tied with twine and again I used a Snowflake Adornment.
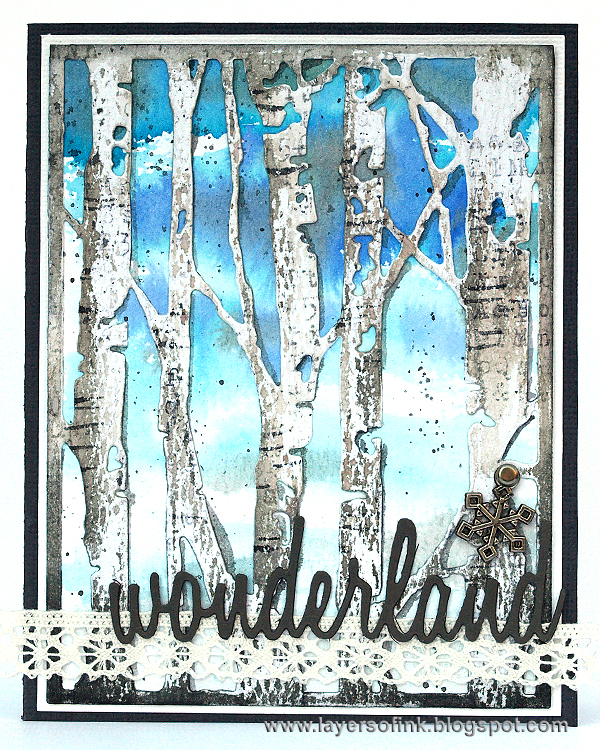
For the third card, I used Ranger's
watercolour paper as my background and a second watercolour
tree panel.
This background is the quickest one. Smear Distress Inks on a craft sheet and mist with water. Paint a piece of watercolour paper with clean water first, then drop in the colours. Leave some white showing as clouds and snow. Leave to dry and watch the colours blend.
Again, I splattered the background with Black Soot. Smear Hickory Smoke Distress Ink on a craft sheet, mist with water and pick up with a paint brush. Paint a shadow on one side of the trunks and branches.
On the third card, I used a piece of lace as a border, and attached a snowflake with a brad.
Thank you so much for watching! I hope the tutorial inspired you to try out some new surfaces, or to do a new technique on an older surface.
Happy Thanksgiving to everyone who celebrates it!
Anna-Karin
Supplies:


Stunning! Love the way you do shades of blue. Thank you for the tutorial, also.
ReplyDeleteStunning! Love the way you do shades of blue. Thank you for the tutorial, also.
ReplyDeleteMore birch trees. That's what we need more birch trees. Those are beautiful trees. Thank you for showing us tips on using that die. I haven't used mine yet, but I will and I will certainly use your ideas. Thank you.
ReplyDeleteLove this die! Thank you for the tutorial, I am looking forward to trying your magic tips!
ReplyDeletethese are fabulous Anna-Karin!! I just love the birch tree die too. =)
ReplyDeleteYour cards are so beautiful! I love the backgrounds behind the trees as well as the finish on the trees themselves.
ReplyDeleteYou always take a plain piece of paper and turn it into art! Thank you for sharing this wonderful tutorial! :)
Wow, these are all so beautiful! I hope to get more time this weekend, so I can use some of the techniques you've used on these; yummie techniques and colours!! Have a colourfull weekend!
ReplyDeleteOh I have to find that die and the embossing folder one too. It is so pretty and I love what you have done here.
ReplyDeleteBeautiful!!!!!!
ReplyDeleteJust saw this, beautiful! Thanks for all the technique information.
ReplyDelete