Hi friends! I have a
Sizzix tutorial for you today, decorating a rustic wood panel. I like to work on wood and should remember to do so more often.
I used new dies, stamps and an embossing folder by
Jillibean Soup, and the
wood panel (6 x 6 x 2 in) is also from them. First, I was planning to use more colours, but then I changed my mind and stuck to neutral colours instead, to fit with the colour of the wood. As you probably know, I like to add photos to projects and I have used this particular photo of Anton in a similar way before (on this
scenic layout). The print was a little too large for the balloon, but I used it anyway.
Start by smearing some gesso on the panel (I forgot to take a photo of that step), and when dry, apply Wendy Vecchi's Crackled Texture Paste with a palette knife, not completely covering all the gesso. My dad visited while I was working on this project and asked why they had made the panel ugly with white paint. :)
When the paste dries cracks appear, the thicker the paste, the larger the cracks. When it is completely dry, paint with watered down Distress Paints.
When the first layer of paint had dried, I dry-brushed some black paint all over the panel, and added touches of gold here and there.
Die cut a ticket using the Photo Love Thinlits set by Lori Whitlock. It is a smaller version of the ticket die, from the same set, that I used for my
Ticket Notebook. Use this sandwich: Sizzix Magnetic Platform, Cutting Pad, paper, die facing down, second Cutting Pad.
Emboss the ticket in the
Postage Telegram folder. This is a great folder, and you can either use the whole thing or just sections of it.
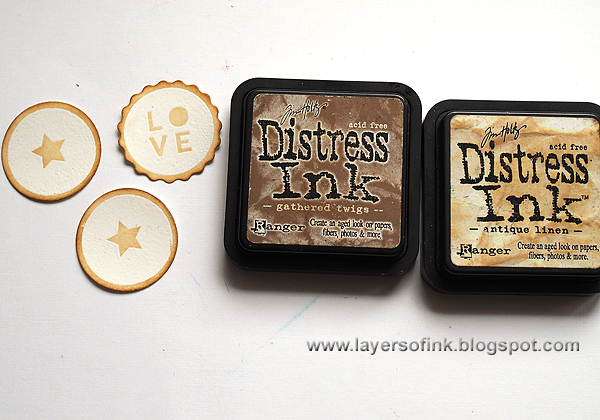
These are the two die and stamp sets that I used, the
Circle Words Framelits w/Stamps and the
Hot Air Balloon. I have a thing for hot air balloons.
Stamp two of the circles on white paper with embossing ink and emboss with white powder.
Ink with Antique Linen and Gathered Twigs.
The Framelits with coordinating stamp sets work the best together with the Sizzix Magnetic Platform, since the platform keeps the dies in place. Place the die as shown and place the second Cutting Pad on top before running it through your Big Shot or Vagabond.
Stamp the balloon on Wendy Vecchi's
Clearly For Art Modeling Film, and die cut. You might need to run it through the machine more than once.
Colour the balloon on the back with alcohol ink. If you colour it on the front, the alcohol ink removes the stamped impression.
Heat the Modeling Film with a heat gun and give it a dimensional balloon shape. Be careful not to burn yourself. I forgot to take a photo of this step, so instead, you see the finished balloon here. The flag was glued to a piece of twine.
Die cut 'away' from gold
Metallic Kraft Core cardstock and from white cardstock. Also die cut a flag from the gold cardstock.
Die cut three
clouds from watercolour paper and emboss in three different sections of the
embossing folder. You can get many different looks from this one folder.
Ink with Gathered Twigs.
Everything was glued down with matte multi-medium, except for the balloon which was stapled to the ticket. I also added a piece of calico, a vintage dictionary page, lace and some buttons. The word on the top right on the dictionary page is 'hem', which means 'home' in Swedish.
Here you can maybe see the dimensional effect of the Modeling Film balloon better. This is a favourite surface of mine, and it keeps its shape perfectly.
I cut a piece of foam to place behind the basket, to lift it from the background. The Alpha Tile was distressed with white paint.
Here's one of the clouds, and a little wooden bird.
Among the other clouds, you can find one of the sentiments from the
Hot Air Balloon set, and a little wooden potty person.
I ended up covering up quite a bit of the painted and crackled background, but it peaks out here and there.
I like the touches of gold here. This sentiment is a mix of stamping and a die cut word.
This will hang in the living room, I think, probably after it's been hanging in Anton's room for some time. He doesn't have space for everything he wants to hang on his walls. There is a happy mixture of his own drawings and projects of mine.
Thank you so much for looking!
Happy crafting!
Anna-Karin
Supplies:


This is fab! So many lovely details and the colours are great. I particularly liked your Dad's comment ;)
ReplyDeleteThis is absolutely adorable! I love everything about it. May have to try and do something like this for my son.
ReplyDeleteI loved seeing your process! Thanks for taking the time!
ReplyDeleteAnna Karin...your work is always just so so exquisite! I totally love this piece. You would think that with it being all sepia tones, it might be boring but oh my goodness...it is anything BUT boring! :) I love your hot air balloon. So cute and gives nice dimension to your piece. Anton in the wicker basket is SUCH a cute addition to this wood panel. I love the background texture and colors. That sets the mood for the entire piece. There are just so many layers of cool stuff here. Beautiful job!
ReplyDeleteAnna Karin...your work is always just so so exquisite! I totally love this piece. You would think that with it being all sepia tones, it might be boring but oh my goodness...it is anything BUT boring! :) I love your hot air balloon. So cute and gives nice dimension to your piece. Anton in the wicker basket is SUCH a cute addition to this wood panel. I love the background texture and colors. That sets the mood for the entire piece. There are just so many layers of cool stuff here. Beautiful job!
ReplyDeletethis is just absolutely darling Anna-Karin!! I love it. =)
ReplyDelete