Hello! First, a big thank you to everyone who commented on
my forest tutorial last week on the
Simon Says Stamp & Show blog. This week we have a another fun challenge for you, with lots of possibilities, 'S is for...', anything you can think of that is inspired by 'S'.
Once I started thinking, I couldn't just stop at one item, and this layout was inspired by: stamps, Stamper's Anonymous, Sizzix, stencils, scrapbooking layout, sentiments,
Salty Ocean,
Squeezed Lemonade:
I wanted to use some great Tim Holtz sentiment stamps to give an important message to my son on this layout. The large sentiment on
Way with Words set is the perfect size for a tag and two more sentiments were displayed on
Artful Dwellings houses (one of my favourite dies). I used watercolour paper for the background and applied molding paste through a
Mini Numerals and
Mini Mosaic stencil. When the paste was dry, the paper pressed into Squeezed Lemonade and Wild Honey Distress Ink, on my craft sheet, first misted with water. Then I added some stamping with Tim Holtz stamps. Love the new
Tiny Things set, I like such small details.
This is such a great sentiment stamp. I dragged a piece of
manila cardstock through Distress Inks (Salty Ocean and
Peacock Feathers) smeared on my craft sheet and misted with water. When it was dry, I misted with
white Dylusions ink, for a great chalky effect. The
tag, title letters and roofs were die cut from this piece of paper, and inked around the edges with Black Soot. Three small
wood veneer stars were painted with Picket Fence Distress Paint and glued to the tag. I twisted tissue tape together to tie it with.
The
heart was die cut from
grungeboard and coloured with Brushed Pewter Distress Stain, and the large letters were die cut with the
Word Play die. I also added strips of tissue tape here and there, picking words that fit the layout.
I love the little bird stamp. The
star was die cut from white cardstock.
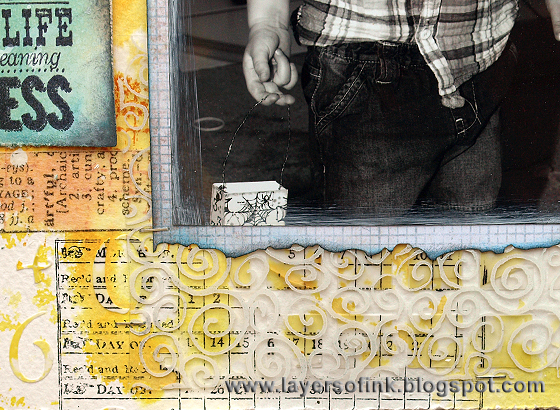
I painted Picket Fence Distress Paint around the edges of the photo and die cut the photo mat with the
Torn Notebook On the Edge die. After die cutting the houses from mat board, I covered them with strips of tissue tape (you can use grungeboard too) and then added several layers of
Picket Fence Distress Paint, letting it dry in between. This paint is perfect for a white wash effect. The roofs were die cut from left over inked manila paper and also die cut with the
Torn Notebook die. Sentiments were stamped on top and one of the houses got a curtain. This photo was taken on my son's third birthday, so I added a
Cargo Stencil Number 3, and also some
gears. They were die cut from grungeboard and coloured with
Brushed Pewter Distress Stain, which is such a quick way of getting a metallic effect.
I had a piece of acetate on my desk which had been stamped with a Tim Holtz swirl stamp and
white Stazon ink, and decided to add that to the layout for an additional layer. Do you spot the little spider bag in his hand? It comes from
this tutorial of mine and is now used as a little handbag, mainly storing coins that have 'fallen' (with a bit of help) out of my handbag.
Join us this week and you can be the lucky one to win a $50 gift voucher from our fabulous sponsor
Simon Says Stamp (lots of 'S' inspiration here!).
Thank you for the visit!
Happy Crafting!
Anna-Karin
Supplies:
Dies: Sizzix:
Artful Dwellings,
Mini Openings,
Tag & Bookplates,
Mini Gears,
Cargo Stencil Numbers,
Word Play,
Heart & Label,
Star & Circle,
Torn Notebook On the Edge
Surfaces: Tim Holtz Idea-ology:
Grungeboard; Ranger
manila cardstock;
7 Gypsies Ledger Postale 8 x8 pad; watercolour paper
Stamps: Stamper's Anonyous Tim Holtz:
Tiny Things,
Way With Words,
Words for Thought,
Tiny Textures,
Ultimate Grunge,
School Desk,
Warehouse District; Hero Arts:
Printer's Lowercase
Ink: Distress Ink:
Squeezed Lemonade,
Salty Ocean,
Peacock Feathers,
Black Soot,
Wild Honey;
Ranger Archival Jet Black;
Stazon Cotton White
Paint: Distress Paint:
Picket Fence
Stain: Distress Stain:
Brushed Pewter
Mist: Dylusions:
White Linen
Medium: Golden Molding Paste
Stencils: The Crafter's Workshop:
Mini Numerals,
Mini Mosaic
Embellishments: Tim Holt Idea-ology:
Symphony Tissue Tape,
Crinkle ribbon; Studio Calico wood veneer
Tiny Stars


Anna-Karin, This is wonderful. Love the colors, the techniques, and most of all...the details that make your work so special. Thanks for all you do to make tim's stuff look great.
ReplyDeletepaula
Fabulous! The yellows and blues are gorgeous as is your layout! Your son looks so sweet and the sentiment is wonderful!
ReplyDeleteAnna-Karin...this layout is truly beautifully done. I love the yellows and blues together. The detail you put into everything that you do is just amazing. Love the little numbers and shapes that are subtly embossed into the background. The sentiments you've added to this page are so perfect for that little man in the center. The addition of the ransom stamping and the tissue tape are such cool added touches. I also love the little acetate swirls under your photograph. It's just a beautiful page and one I'm sure you are proud of! <3 Candy
ReplyDeleteThis has to be one of my all-time favourites of your many amazing layouts... that glowing golden inky background is gorgeous, and the numbers, stamping and tape add so much interest and texture. The texty houses are brilliant for showcasing the sentiments - completely love this!
ReplyDeleteAlison x
Gorgeous photo and I just love the yellow/blue/green color combo!!
ReplyDelete*mwah*
Stephanie
Simon Says Stamp!
Ohh what a great layout Anna-Karin! Love all the sentiments! And that picture is so cute! Hugs, Sandra
ReplyDeleteWhat a wonderful layout! Love how you've used the dies and all the inspirational stamping. And what a cutie pie you have there, too!
ReplyDeleteBeautiful colour combo Ann-Karin. The touches of blue focus you in on your son. What a cutie pie.
ReplyDeleteYour son is a handsome boy, and you've created a page with words of wisdom for him to become a good man. Blessings!
ReplyDelete