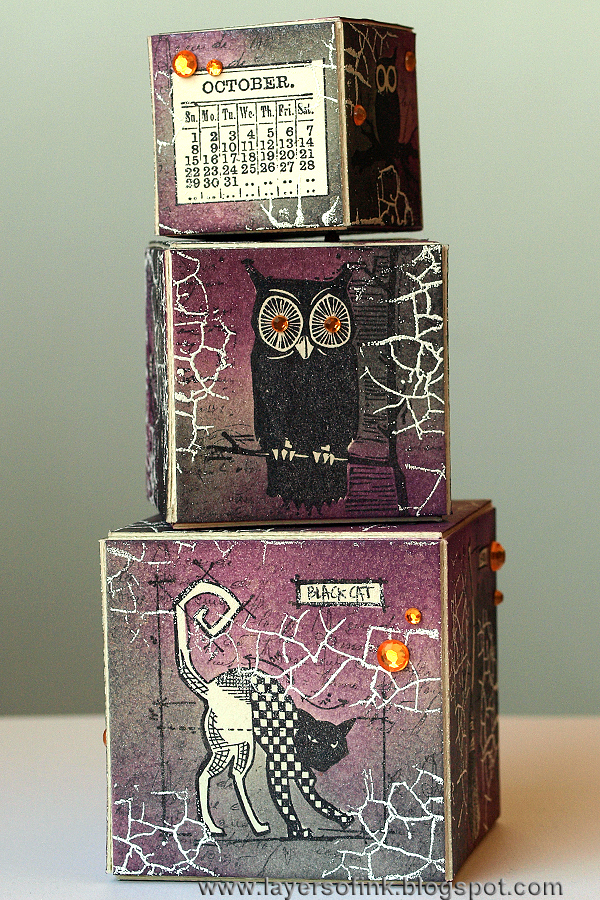
Hello all! This month the challenge at Eileen Hull's Art With heart challenge is 'Tricks and Treats', my project is a little bit of both. I hope you'll join us in the challenge and there is a great prize to be won.

I made three Halloween Artist Trading Blocks, but they also double as gift boxes, or rather a gift box where you have to open three boxes to get to your gift, which is inside the smallest box. These boxes are all done with the 3-D Blocks/Cubes die, and I used Tim Holtz stamps and Distress Ink to decorate them.

Start by die cutting two of each size of the three boxes (sorry about the poor photo).

Stamp the boxes with different Halloween stamps, and remember to stamp them in the right direction.

Ink with Antique Linen Distress Ink.

Stamp most of the images again on sticky-note paper or masking paper. Cut them out and mask the images. You don't need to mask the areas which are a solid black.

Ink the blocks with Seedless Preserves, Dusty Concord and Black Soot, using an ink blending tool. Mat board takes ink beautifully.

Leave the masks on and mist the blocks with Pewter Perfect Pearls. It is hard to capture the shine in photos.

When dry, stamp with two different script stamps, to add texture.

Remove the masks and you'll have all the images in the light Antique Linen ink. You can add more colour to them if you want to, I decided to leave them.

The blocks were a little too dark for my liking, so I white embossed the fabulous Cracks stamps here and there.


The three boxes fit perfectly inside one another. My son is going to enjoy opening one after the other.

Let's have a look at the other sides of the blocks. I used blueprint stamps on the larger blocks, carved stamps on the middle one and various small stamps on the smallest block.

There had to be a spider web and a scary witch.

The blocks were embellished very simply with a few orange rhinestones. Since I am giving these to my son, it was better not to add too many things to the boxes.

These are the three lids, would you dare opening those boxes?

Here you can better see the layers of stamping and inking. The Distress Inks hadn't dried fully with I did the white embossing so there is a quite a bit of stray white powder, which I thought added to the effect. If you don't want any stray powder, dry the inks with a heat gun first.

You might be able to see the metallic effect of the Perfect Pearls better on this photo.
Thank you for visiting today!
Happy crafting!
Anna-Karin
Supplies:
Surfaces: Sizzix Little Sizzles Cream Mat Board
Dies: Sizzix: 3-D Blocks/Cubes
Stamps: Stamper's Anonymous Tim Holtz: Mini Halloween, Mini Halloween 3, Mini Halloween 4, Carved Halloween, Specks & Cracks, Mini Blueprints 7
Ink: Ranger Archival Ink: Jet Black; Distress Ink: Seedless Preserves, Dusty Concord, Black Soot
Mist: Ranger Perfect Pearls: Pewter
Embossing powder: Ranger Seafoam White

Supersnyggt!
ReplyDelete/Anna
You are so right about the cracks stamp, it really has made all the images stand out beautifully on your gorgeous stack of blocks! I love how the boxes fit so beautifully inside each other too. Anne x
ReplyDeleteOh wow I love them all. You're the reason I got these dies and I ADORE them. I love your stamping technique. MUST TRY.
ReplyDeleteAnton will love opening these spooky boxes! Super cool techniques and colors. Love them Anna-Karin!
ReplyDeleteGreat tutorial! I love the look of the blended inks and the stamped images go with them so well. The white cracks and lines along with the orange blings are the perfect accents pops. I am sure your son will treasure these special keepsake boxes. :)
ReplyDeletelove the step by step!! and that cracked stamp is by far is one of the most versatile of them all i'd say... what a wonderful fun way to use the ATB's
ReplyDeleteHow beautiful (Y) :)
ReplyDelete