Pages

Thursday, March 28, 2019

Watercolor Art Journal Page

Hi everyone! I hope you are well! I have a quick art journal page to share with you. I was in the mood for some color, and particularly for larger areas of color, and this was the result. 

Layers of ink - Watercolor Art Journal Page by Anna-Karin Evaldsson. With stamps by Dina Wakley.

The page was done in my Dina Wakley Media Journal, with one of Dina's Lovely Women stamps. I like how large she is on the page. The stamp is just the face and the neck, but I prefer it when there is some kind of body attached to a head, so I drew a simple upper body, to give her more life. I used a bunch of encouraging sentiments on this page, inspired by both the determined look on her face, and by a stamp set by Simon Says Stamp

Layers of ink - Watercolor Art Journal Page by Anna-Karin Evaldsson. Watercolor the page.

I forgot to take step photos when starting with the project. I worked on one of the cotton-rag watercolor pages. She was stamped with Jet Black ink and then painted with watercolors. When the paint was dry, I added more lines with a black pen.

Layers of ink - Watercolor Art Journal Page by Anna-Karin Evaldsson. Add stamping.

Next came the stamping of the sentiments, using Dina's Handwritten Quotes and Scribbly Women sets, and Simon Says Stamp You Got This set. I wanted the background to be fairly clean, but also doodled some circles and added splatters of dark brown paint. It is hard to stamp on the cotton-rag paper in Dina's journal, but if you place something hard underneath the page, it is much easier. I used a Sizzix cutting pad.

Layers of ink - Watercolor Art Journal Page by Anna-Karin Evaldsson. Shadows give dimension.

I painted the skin tone pretty pale, since I wanted her to look serious. By adding some shadows, you give more dimension to the face.

Layers of ink - Watercolor Art Journal Page by Anna-Karin Evaldsson. Found poetry.

I cut out words and sentences from old book paper, to create a form of found poetry/journaling. It is really fun to sit and do this, and you'd be surprised to see the sentences you can find and piece together.

Layers of ink - Watercolor Art Journal Page by Anna-Karin Evaldsson.

The stamped sentiment comes from the SSS You Got This set. The set is from the Fresh Bloom release.

Layers of ink - Watercolor Art Journal Page by Anna-Karin Evaldsson.

This sentiment is so great and bold, and also works really well on cards.

Layers of ink - Watercolor Art Journal Page by Anna-Karin Evaldsson. Sizzix Pansy die by Eileen Hull.

The flowers were die cut with Eileen Hull's Sizzix Pansy Flower die and the leaves with her Caddy Bag die. They were left over from the leather wrapped journal I posted recently. The flowers look even better if you make them dimensional by giving them some shape, but I try to keep the pages in my art journal relatively flat, to make it easier to work in.

Layers of ink - Watercolor Art Journal Page by Anna-Karin Evaldsson. Tim Holtz Sizzix Letterboard.

I die cut the title with Tim Holtz's Letterboard die, and sanded them slightly.

Thank you so much for stopping by here today! I hope you the project gave you some inspiration.

Happy crafting!

Anna-Karin

Supplies:

* Please note: the links are affiliate links, for which I receive a small percentage of sales generated by the link, at no extra cost to you.
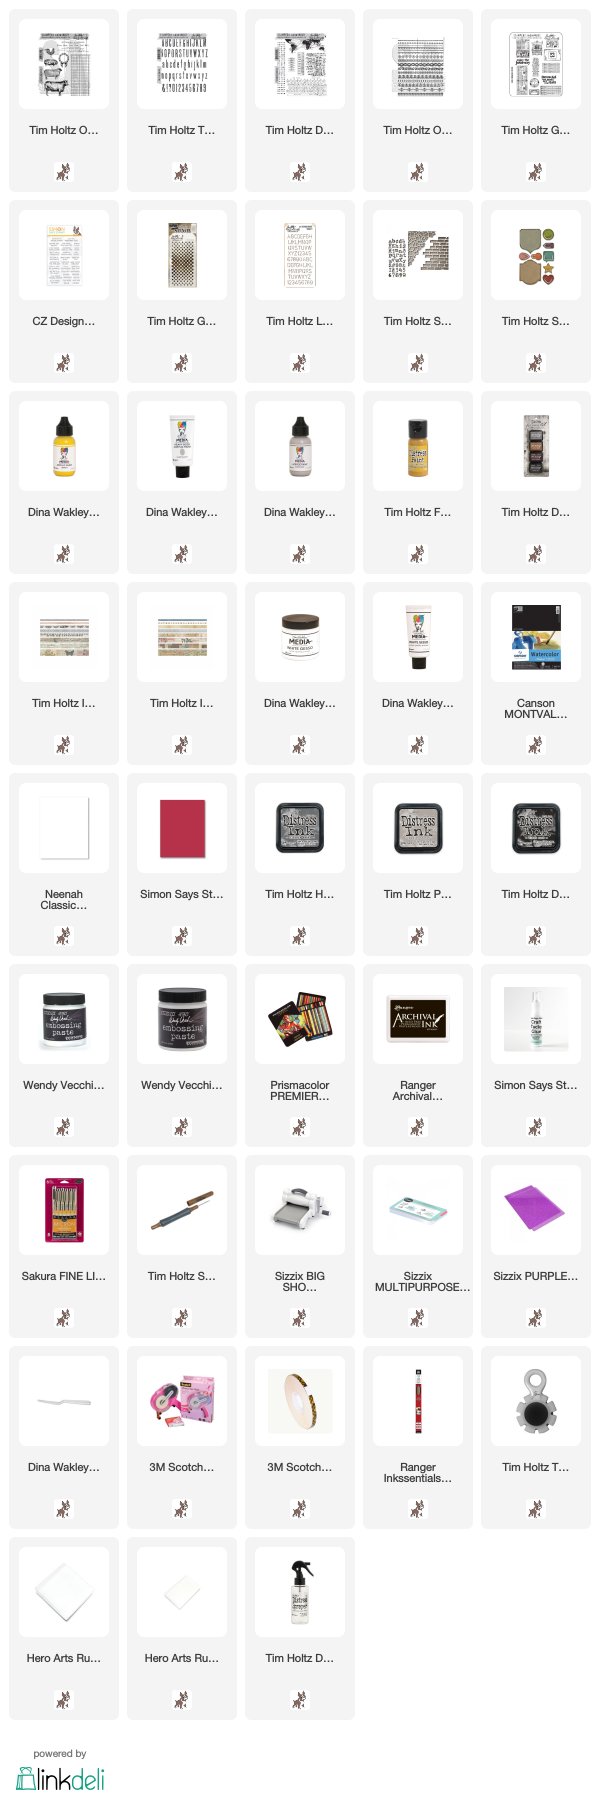


Additional supplies:

Stamps: Dina Wakley Scribbly Birds in Flight
Paint: Daler & Rowney watercolor paint

Monday, March 25, 2019

Yellow Textured Background

Hi friends! I hope you are well and that you had a good weekend. We had lovely sunny weather and I went on one of my favorite walks, where I also saw this year's first coltsfoot flowers. It is usually the second spring flower to make its appearance here, with the snowdrop being the first one. The flower is called Tussilago in Swedish, which is also its scientific name. I always thought it was such a pretty word. 


This week at the Simon Says Stamp Monday Challenge Blog we have a Play With Paint theme. So take out your paints and start crafting. Don't miss the lovely project by our March guest designer Lisa Rabellino.

I made a layout this week, and it is about a pretty special story to me.

Layers of ink - Yellow Textured Background Tutorial by Anna-Karin Evaldsson.

This is a story about one of my very first memories, and about an event that I have thought about so often through the years. I am glad that it is now down on paper. When I was between two and three years old, my favorite book was about a boy called Tom who walked around playing his drum and all kinds of animals started to follow him. In a bout of anger, I tore apart pages in the book. I was always very careful with my things, so this was an out of the ordinary event. One of my very first memories is from the moments after having torn the book, and of how sad I was about it. I decided never ever to hurt another book, and I think I kept that promise quite well through the years.

My parents pieced the book together and I can remember reading it with tape on the pages, but somewhere along the line it fell apart, or was thrown away. In either case, it disappeared, and I have been looking for it every since. I was convinced the title of the book was Tom Tommeli Tom, and my parents thought so to. Then a couple of weeks ago, I was inspired to try googling some key words instead, like 'boy' and 'drum' and suddenly there it was, staring at me from my computer screen. The long lost book. In fact, it was not at all called Tom Tommeli Tom, but this phrase was just a part of the rhyme inside the book (but actually Tum Tummeli Tom). The English title is The boy with the drum.

I immediately looked in an online second hand store and found my very edition of the book, which was yellow (the most common edition being blue). I ordered it right away and was so happy to finally have it in my hands. I can remember every single illustration, after all these years. Now, Leo loves the book, and the first time I read it to him, he started saying 'Tom Tommeli Tom', so it has come full circle. And will never be lost again.

Layers of ink - Yellow Textured Background Tutorial by Anna-Karin Evaldsson. Stencil with embossing paste.

I started out with a watercolor paper which had been coated with gesso. I always have a couple of these ready to be used. Texture paste was applied through Tim Holtz Gradient Dot stencil. You need to let it dry, before continuing the pattern, but it is easy to line up, so that you get a seamless look. Just place the first dots, on top of the last dots from the previous application.

Layers of ink - Yellow Textured Background Tutorial by Anna-Karin Evaldsson. Paint with acrylic paint. Tim Holtz Gradient Dot stencil.

When the paste was dry, I painted the background first with watered down Elephant paint, and then immediately started to drop in two shades of yellow. Mist now and then to help the paints blend and run. This is one of my favorite effects with acrylic paint.

Layers of ink - Yellow Textured Background Tutorial by Anna-Karin Evaldsson. Stamp the background.

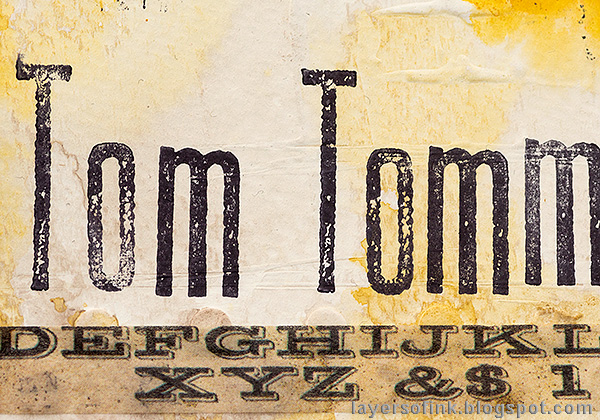
Next, I stamped a title with Tim's Tall Text stamps, and added some alphabet stamping in Hickory Smoke and Jet Black.

Layers of ink - Yellow Textured Background Tutorial by Anna-Karin Evaldsson.

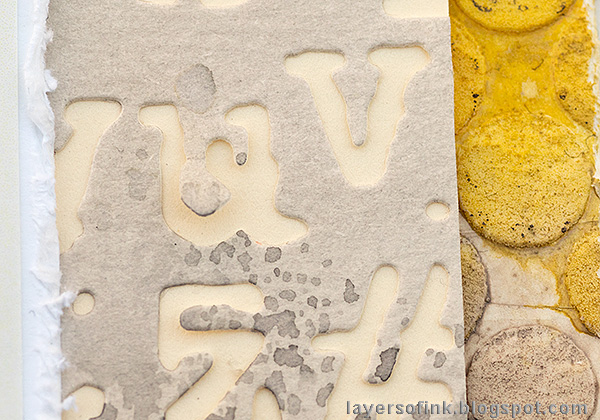
Mix a little white paint into texture paste, and apply through an alphabet stencil. Although the paste is opaque white, it has a slight grey/translucent tint, and if you mix a little white paint into it first, you get a brighter look.

Layers of ink - Yellow Textured Background Tutorial by Anna-Karin Evaldsson. Die cut with Tim Holtz Sizzix Mixed Media 3.

A piece of watercolor paper was die cut with the alphabet die from Tim's Mixed Media 3 set and colored with grey Distress Inks.

Layers of ink - Yellow Textured Background Tutorial by Anna-Karin Evaldsson. Acrylic paint background.

This textured, but yet flowing look, is easy to achieve with acrylic paint. All you need is a bit of patience to let the watery paint dry. The edges of the paper were distressed.

Layers of ink - Yellow Textured Background Tutorial by Anna-Karin Evaldsson.

I went with an alphabet theme, and also used some Design Tape here and there.

Layers of ink - Yellow Textured Background Tutorial by Anna-Karin Evaldsson.

The Tall Text are handy, and since they are so narrow, even a longer title doesn't take up too much space.

Layers of ink - Yellow Textured Background Tutorial by Anna-Karin Evaldsson. Tim Holtz On The Farm stamps.

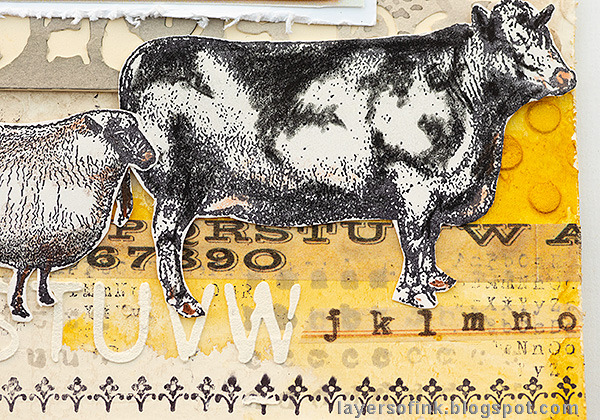
The book has lovely colored pencil illustrations by Eloise Wilkin, and Tim's On The Farm stamps were perfect for this layout, since all the animals feature in the book (except for the sheep). I colored them with Prismacolor pencils.

Layers of ink - Yellow Textured Background Tutorial by Anna-Karin Evaldsson.

This cow is probably not meant to be a black and white cow, but the one in the book is, so I used a black pencil to get that same effect. The border at the bottom is stamped with one of the Ornate Trims stamps.

Layers of ink - Yellow Textured Background Tutorial by Anna-Karin Evaldsson.

I placed a piece of cream paper under the die cut  paper and attached the panel with brads. The journaling is typed on notecards and placed in the pocket.

Layers of ink - Yellow Textured Background Tutorial by Anna-Karin Evaldsson.

Here's a close-up of the cool texture effect with the Gradient Dots, paint and partial stamping.

I hope you will join us this week in our Play with paint challenge. As always, you have a chance to win a $50 gift voucher to do some fun shopping at Simon Says Stamp. You have until next Monday 8am Ohio time. 1pm UK time, 2 pm CET to join in.


Don't forget to follow Simon Says Stamp on Instagram, they post great stuff daily. 


Do you use Instagram? If so please add #sssmchallenge so we can see your entries there too.


Thank you so much for taking the time to visit my blog! Enjoy your day!

Happy crafting!

Anna-Karin

Supplies:

* Please note: the links are affiliate links, for which I receive a small percentage of sales generated by the link, at no extra cost to you.


Monday, March 18, 2019

Springtime Altered Tin Tutorial

Hello and welcome to my blog on this beautiful day! I hope you had a fun weekend and got some crafty time in. We had everything from outdoor soccer in a combination of sleet and wind, to beautifully spring weather later in the day. Nothing makes you quite as wet and cold as sleet, but it was still a fun day.


At the Simon Says Stamp Monday Challenge Blog we have a Miniature/Tiny Things challenge. How fun! I love small details, as you probably already know. Don't miss the lovely project by our March guest designer Lisa Rabellino.

Layers of ink - Springtime Altered Tin Tutorial by Anna-Karin Evaldsson. With Sizzix dies by Tim Holtz.

I had such fun making my project, an altered tin, with lots of tiny details, and telling the story about a tiny boy out on adventures in nature on a beautiful spring day. He has met a friendly bunny, butterflies, ants and ladybugs. I was also inspired by the movie Minuscule: Valley of the Lost Ants, about a ladybug and an ant who becomes friends. We watched it on Friday, and it is really great. Leo loved it. Have you seen it? There is a second movie out now.

I altered an Altoids tin, but you could also make a little shadowbox from a box, or create a springtime scene on a card.

Layers of ink - Springtime Altered Tin Tutorial by Anna-Karin Evaldsson. Stamping with Entomology set.

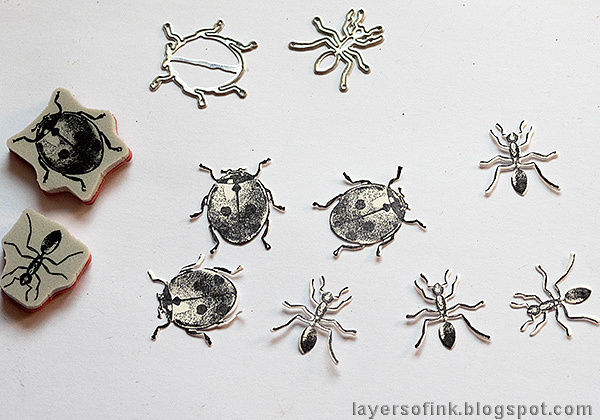
I started out with the ladybugs and ants, stamping them with Tim Holtz Entomology set on watercolor paper and die cutting with the coordinating Sizzix dies. The coordinating dies are very helpful on those thin legs.

Layers of ink - Springtime Altered Tin Tutorial by Anna-Karin Evaldsson. Coloring the ladybugs and ants.

Watercolor the ladybugs and ants with Candied Apple and Peeled Paint Distress Ink, by smearing the ink on a craft sheet, misting with water and picking it up with a paint brush. Add details with Distress Markers.

Layers of ink - Springtime Altered Tin Tutorial by Anna-Karin Evaldsson. Applying Glossy Accents.

Cut the wings off from one ladybug and coat them with Glossy Accents, also coat the head of the ladybug and the head and body of the ants.

Layers of ink - Springtime Altered Tin Tutorial by Anna-Karin Evaldsson. DIY dimensional ladybug.

When the Glossy Accents is dry, adhere the wings with foam dots, for dimension.

Layers of ink - Springtime Altered Tin Tutorial by Anna-Karin Evaldsson. Die cut with Tim Holtz Sizzix Funky Floral and Mini Tattered Floral.

The flowers and foilage was die cut from watercolor paper using: Funky Floral 1, Funky Floral 2, and Mini Tattered Florals. I watercolored the green paper before die cutting. The bunny and butterflies were die cut with the Springtime Side-order set. I ended up not using the branches and pine cones.

Layers of ink - Springtime Altered Tin Tutorial by Anna-Karin Evaldsson. Color the springtime bunny.

The bunny was watercolored with Distress Inks. I later added an eye with a pen.

Layers of ink - Springtime Altered Tin Tutorial by Anna-Karin Evaldsson. DIY paper flowers.

The photos were taken in a field of Wood Anemones, so I kept the flowers mainly white, with just a few of Blue Anemones mixed in. Shape them with the Sizzix Paper Sculpting Tool set.

Layers of ink - Springtime Altered Tin Tutorial by Anna-Karin Evaldsson.

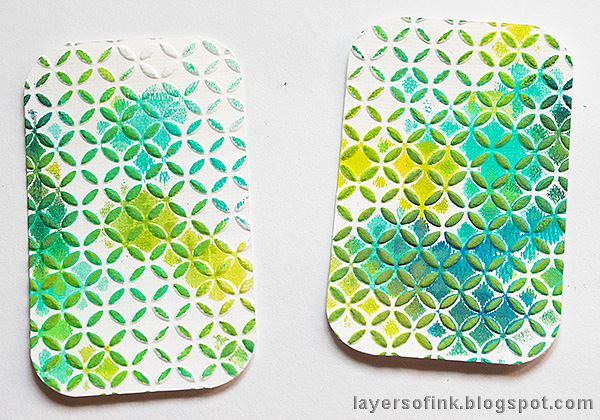
The two inside panels were in my scrap paper box. They were leftover from a gel printing session, and I really like the colors and textures. They had been embossed with Tim's Courtyard folder before using them for gel printing.

Layers of ink - Springtime Altered Tin Tutorial by Anna-Karin Evaldsson. Mini shadowbox in a tin.

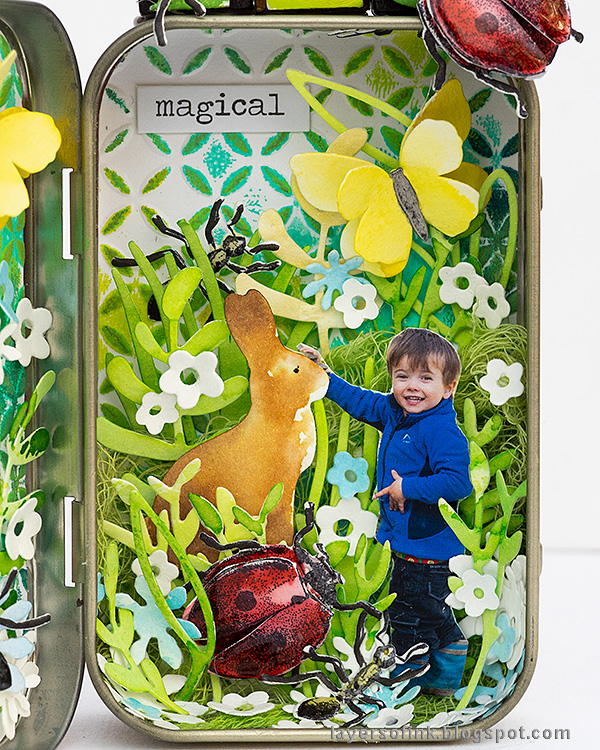
I dyed cheese cloth with Distress Ink, to build up the greenery in the background and then layered with foliage, leaves and flowers. In the original photo, Leo holds his hand on a tree stub, but here he is saying hello to the bunny instead. Both of these were mounted with foam dots.


I painted letterpress letters first with white and then with shades of green, and glued them on top of the tin.

Layers of ink - Springtime Altered Tin Tutorial by Anna-Karin Evaldsson. Paper butterfly,

The butterflies are meant to be Brimstone butterflies, usually the first butterflies that we see in spring. Shape the wings a little and layer them.

Layers of ink - Springtime Altered Tin Tutorial by Anna-Karin Evaldsson. Paper ant.

Here is the ant saying hello. You can see the cool effect of the Glossy Accents.

Layers of ink - Springtime Altered Tin Tutorial by Anna-Karin Evaldsson.

I also tucked some ants in here and there.

Layers of ink - Springtime Altered Tin Tutorial by Anna-Karin Evaldsson. Sentiment stamp.

On the other side of the tin, I stamped a sentiment from Tim's Warehouse District set, and added more foliage, flowers and bugs.

Layers of ink - Springtime Altered Tin Tutorial by Anna-Karin Evaldsson. Ant and ladybug meeting.

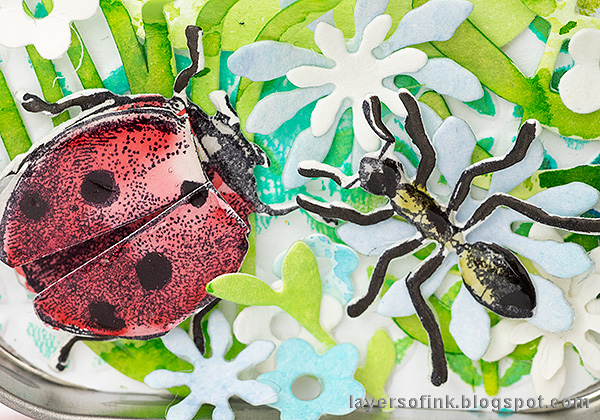
Here are the two friends from the movie.

Layers of ink - Springtime Altered Tin Tutorial by Anna-Karin Evaldsson.

On the front of the tin, I added a larger photo taken on the same day, in the field of Anemones. I am looking forward to them making their appearance again soon.

Layers of ink - Springtime Altered Tin Tutorial by Anna-Karin Evaldsson. Dimensional paper ladybug.

Here you can see the great effect of the Glossy Accents on the ladybugs. It is one of my oldest favorite products, both as a glue and as a coating.

Layers of ink - Springtime Altered Tin Tutorial by Anna-Karin Evaldsson.

Around the edge of the tin, and on the inside edge, I added some design tape.

Layers of ink - Springtime Altered Tin Tutorial by Anna-Karin Evaldsson.

Here you can better see the dimension of the different elements. This was such fun to make and the recipient loves his altered tin, with the accompanying story, and already made up new scenarios. For more altered tin inspiration, check out: Vintage Christmas Tin and Winter Scene Tin.

I hope you will join us this week in our Miniature/Tiny Things challenge. As always, you have a chance to win a $50 gift voucher to do some fun shopping at Simon Says Stamp. You have until next Monday 8am Ohio time. 1pm UK time, 2 pm CET to join in.


Don't forget to follow Simon Says Stamp on Instagram, they post great stuff daily. 


Do you use Instagram? If so please add #sssmchallenge so we can see your entries there too.


Thank you so much for taking the time to visit my blog today!  

Happy crafting!

Anna-Karin

Supplies:

* Please note: the links are affiliate links, for which I receive a small percentage of sales generated by the link, at no extra cost to you.