Today we are celebrating Midsummer's Eve in Sweden. It's a very traditional celebration of summer, usually involving dancing and singing around a maypole. All that has been cancelled this year. But at least the sun is shining and we will perhaps go and swim in a lake.
Recently, I found my old Tombow Dual Brush Pens and was impressed to see that they were still juicy and working perfectly. I bought those first pens very long ago in South Africa. I only had a few, so I decided to get more shades and I am having fun with them now. For today's tutorial I used them together with acrylic stamp blocks to create backgrounds. It is a fun and easy technique and I couldn't stop so I ended up making two projects. It is also a great technique if you want to play around with color combos and color mixing.
You can get a similar look with Mini Distress Inks, but you have more control with the markers. Mix and match the acrylic blocks that you have at home to get different sizes.
Start by scribbling three colors Tombow Dual Brush Pens on an acrylic block.
Mist fairly generously with water.
Stamp the block on a piece of watercolor paper. This could be the base for a mini summer scene on a card. I used Tim Holtz watercolor paper, working on the textured side.
Continue with three shades of orange and yellow, using a small block.
Add blocks until you are happy with the look. You can use blocks in the same size only too.
I also made a tag, using shades of pink, purple and blue.
I wanted some big, fluffy flowers on these projects and decided to make tissue paper flowers. It is a favorite technique that I hadn't used for a while. Fold up a piece of Tim Holtz Plain Collage Paper.
Cut a rough circle from the folded up paper. Do the same thing with a smaller fold of paper, until you have circles in three sizes.
Assemble a whole bunch of circles together and staple them in the center.
Start scrunching up the center of the flower. It looks nicer if you work one or two tissue papers at a time.
Continue until you are happy with the look of the flowers.
Use Tombow pens to add a bit of color to the edges of the tissue paper flowers.

I used the two smaller flowers for the tag and added a piece of lace trim underneath them. The sentiments come from the SSS Tabbed Sentiments set and was stamped with blue SSS Hybrid Ink from the Key West set. The tag was die cut from watercolor paper.
You can also make tissue paper flowers from recycled gift tissue paper.


I already had the small flower from before, with a yellow brad in the center. It was made with gift wrap tissue paper, which is a little thinner than Tim's Collage Paper.
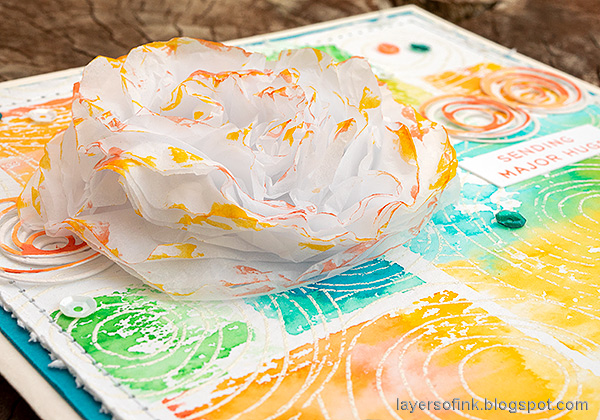
The tissue paper flowers are fluffy, delicate and dimensional.
The second panel was turned into a square 6 x 6 in card. I like the color combo on this one and the texture from the white embossed circles.

The Spinner Trail die was die cut from Neenah cardstock and from white SSS Glimmery paper. I colored the Neenah piece with the same Tombows as used for the background. The sentiment was stamped with one of the SSS Hybrid inks from the Key West set.
I distressed the edges and stitched a border with my sewing machine.
The sequins come from the SSS Fall Festival set.
I used the largest flower on the card and this flower also has more layers of collage paper than the others.
Thank you so much for taking the time to visit my blog today!
Happy crafting!
Anna-Karin
Supplies:
* Please note: the links are affiliate links, for which I receive a small percentage of sales generated by the link, at no extra cost to you.
* Please note: the links are affiliate links, for which I receive a small percentage of sales generated by the link, at no extra cost to you.


Hi Anna-Karin,
ReplyDeleteI's always a joy and a real pleasure to come on your blog from time to time and look at your gorgeous projects. I love them ALL :)
This one is no exception!!
Beautiful card and tag, with a fun and very clever way of creating them.
Brilliant as usual, as all you do dear Anna-Karin!
Sending hugs and love,
Corinne