Hello friends! I am happy to take part in an Eileen Hull blog hop, to celebrate the release of her new Pocket Notebook die. Don't miss all the notebook inspiration along the hop. You should have come here from Betsy Skagen, who has a very creative project to share with you.

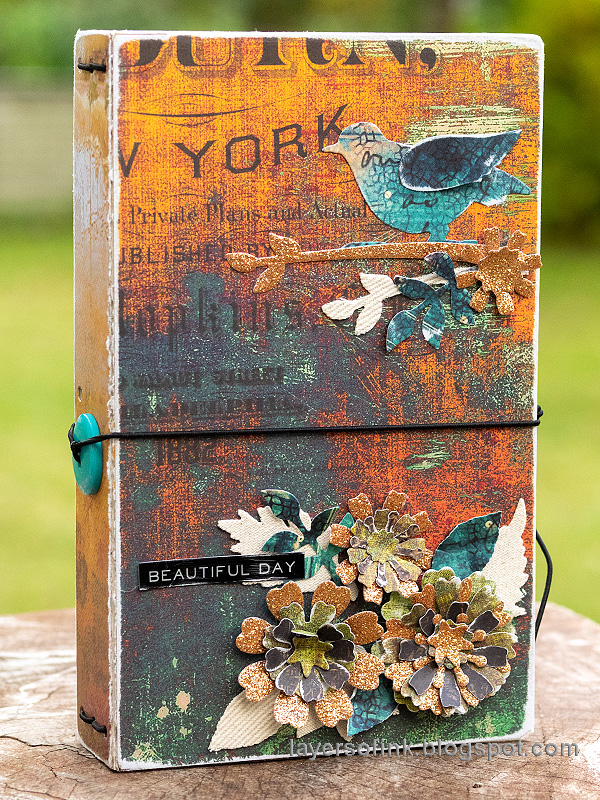
As you know, I love to make notebooks and little books. I made an autumn notebook for a friend, using Eileen's new Pocket Notebook die. It's a great size (4 x 6.7 in) and can be customized in so many different ways. You can, for example, easily make it thicker or thinner.

Start by die cutting two covers from mat board. The die is very versatile and also includes a page element and other details. I only used the cover part today.

Die cut covers from Tim Holtz's Abandoned Paper Stash and glue to the mat board with matte medium. Place under a heavy book. I used two different papers for the front and the back and a third one for the spine.

Glue patterned papers to the inside covers too.

Glue the spines together as shown, using matte medium, and again place under a heavy book.

Sand the edges, to reveal the white core of the paper and give a worn look to the journal.

I used Eileen's Journaling Cards, Flowers & Leaves set to die cut leaves and flowers, from Abandoned paper, canvas, and from the Simon Says Stamp Copper Glitter paper. This is a stunning glittery paper, and doesn't give off any glitter at all.

The bird, from the Birds & Butterflies, was die cut from another piece of Abandoned paper, and the branch from canvas. Later, I also die cut the branch from glittery paper.

Sand the edges of the paper flowers slightly. Shape the flowers with tools from the Tonic Craft Tool Kit and glue together.

Punch a hole in the center of the spine, as shown.

Thread a piece of elastic through the holes, to create space for three signatures.

I secured the elastic strings by tying them through a button and then again at the end to create a closure mechanism. As you can see there is an extra little hole which I didn't use. I covered it up with a tiny flower after taking these photos.

Cut papers and fold in half. Arrange into signatures of about seven papers, depending on the thickness of your paper. I used sketch paper, and cut two papers from an A4 sheet. I forgot to measure the size exactly before giving the book away. I love being able to pick my favorite papers for notebooks and journals. I stitched down the center of each signature with orange thread, but you can also use staples.

Tie the ends of the threads and tuck the signatures in under the elastic bands.

Glue the flowers and leaves to the cover and add a title with a sticker.

Glue the bird and branches to the cover. Give the bird an eye with a marker.

If you want a darker edge, you can ink the edges instead.

Here's the back of the notebook. You can add more details there if you want, but I often keep the back relatively plain. I love Tim's Abandoned papers, and for more inspiration on them check out these posts: Inky Bird Art Journal Page, and Heart Shaker Cards.

I gave the notebook away yesterday, since it was made for a friend who follow my blog and I didn't want her to see it beforehand.
Here you can see all the gorgeous projects made for the hop. Your next stop on the hop is the wonderful Tonya Trantham. If you get lost along the way, you can always head back to Eileen's blog.
These are all the stops along the hop.
Anna-Karin Evaldsson (you are here)
Thank you so much for taking the time to visit my blog today!
Happy crafting!
Anna-Karin
Supplies:
* Please note: the links are affiliate links, for which I receive a small percentage of sales generated by the link, at no extra cost to you.
* Please note: the links are affiliate links, for which I receive a small percentage of sales generated by the link, at no extra cost to you.

Other supplies:
Eileen Hull Sizzix dies: Pocket Notebook, Birds & Butterflies, Journaling Cards, Flowers & Leaves


Great project - I like the white edges and I bet the little bits of glitter are stunning in person!
ReplyDeleteAbsolutely gorgeous! I love the natural and distressed look together. Just lovely.
ReplyDeleteBookmaking is new, as is the terminology. I would have said "sections sewn together" but I see the correct word is "signature" (I read another blogger using the term but it didn't register) and it helped seeing the accompanying picture. Your book is a very clever use of autumn colors to accomplish a nice finished project.
ReplyDeleteLove the heritage look of your book .Very nice.
ReplyDeleteI absolutely love your notebook... you tempted me into buying those papers with your pair of cards the other day, and now I'm even happier that I gave in! Gorgeous.
ReplyDeleteAlison x
I have those papers and now I need the die to make this awesome book. It is beautiful!! Thank you for sharing all your ideas and inspiration!!
ReplyDeleteAnna-Karin - I knew I was going to be in awe when I stopped here on the hop - you never disappoint you know - amazing and stunning work TFS and for this hop!
ReplyDeleteLovely!!! Gotta get me some of that paper!!
ReplyDeleteWhat a nice, grungy look. I love the birdie :)
ReplyDeleteLove your use of the Abandoned Paper Stash. Will have to try the glitter paper. Thanks for sharing your beautiful ideas.
ReplyDeleteLovely lovely lovely!
ReplyDeleteI love your choice of papers and those layered flowers.
ReplyDeleteOh, so gloriously grungy and beautiful! The artistry here is amazing! xo
ReplyDeleteLovely. Beautiful colors.
ReplyDeleteI am in love with your notebook Anna-Karin, I love those papers too, they are so perfect for the notebook. The distressed edges are beautiful and I love how you added the bird and those lovely flowers to the front and the bright button is a lovely finishing touch! Anne xx
ReplyDeleteI am in love with the colours and textured look of your cover
ReplyDeleteVery nice. I love the colors
ReplyDeleteAnita Holte
Absolutely gorgeous book
ReplyDeleteA gorgeous creation Anna-Karin! Love these papers (I bought 4 pads so I wouldn't run out too soon!) Great layering of the flowers and bird - a beautiful book! xx
ReplyDeleteGorgeous project.
ReplyDeleteLoving the colours and distressed look of your journal.
ReplyDeleteLove the colors!
ReplyDeleteYour cover is gorgeous. I love the colors and flowers also the vintage feel-so pretty.
ReplyDeleteGorgeous Anna...I especially love how you sewed your signatures together. I need to dust off my machine and create some!!! Can't take away from your cover though...it is gorgeous, love all the details! Love the distress look and layers.
ReplyDeletewonderful creation, love how you secured the elastic great tip ! nice style to this x thanks for sharing and thank you for the hop xx
ReplyDeleteGorgeous, Anna! Thanks for sharing!
ReplyDeleteGorgeous, lovely autumnal colours.
ReplyDeleteA fantastic look, and a beautiful dove!
ReplyDeleteWhat a fabulous book. I love the color scheme. I always forget about sanding the edges of my book. Gotta remember that one of these days.
ReplyDeleteI just love those papers, oh the colors and patterns! Your cover is absolutely striking!
ReplyDeleteThis is gorgeous in an unexpected way. It is distressed by the colors are so striking it shines. I have to pull out my papers and start creating.
ReplyDeleteThis is beautiful! I love the colors!
ReplyDeleteLoving all the colors!
ReplyDeleteI love the way you created the flowers, and they go so well with your book!
ReplyDeleteNoreen
Crafty Journal
What a beautiful notebook. Love the vibrancy of the colors!
ReplyDeleteLovely notebook!
ReplyDeleteAnna-Karin I just love the look of this notebook! The abandoned papers as a base and building upon it with the beautiful flowers and bird it’s simply wonderful!
ReplyDeleteFascinating way to do the cover and insides! Love that you chose the 2nd concerto! :) Great book and effects here. TFS!
ReplyDeleteWhat an amazing pocket notebook Anna-Karin... Love the grungy look and the Fall colors... great textures! The stitched signatures look great.
ReplyDeleteEverything is art on that journal. Beautiful!
ReplyDeleteAnna-Karin your choice of gorgeous Tim Holtz Papers work spectacularly with the Pocket Notebook and I love how you've revealed the white core at the edges. The touch of glitter glamour really adds to the flowers and bird too x
ReplyDeleteI always look forward to seeing your projects! You have very creative ideas!
ReplyDeleteThis is gorgeous!
ReplyDeleteAnna-Karin this is beautiful! The paper is perfect for autumn- love how you added the unexpected gold glitter- really gives a nice pop! I also love the option os sewing the books together- not sure why I don't do it- so quick! Thanks for your gorgeous photos and great tutorial and always making my dies look amazing <3
ReplyDeleteLove your paper choice.
ReplyDeleteBeautiful. Love the papers you used and how you decorated with flowers and the bird.
ReplyDeleteHi Anna-Karin, I love how you have put this notebook, the sewing of the signatures is a great idea. I love the paper and the paper you have used.
ReplyDeleteThis notebook is so pretty. Love it. The colors are great.
ReplyDeleteAm in love with your beautiful album/journal! Love the tip about the elastic and the details of the flowery embellishments! So beautiful with the layers!
ReplyDeleteThis is very beautiful and vintage looking! I luv that look! Great job! I'm sure your friend was very tickled to receive it! TFS, Suzy Q
ReplyDeleteI love this! Just gorgeous!
ReplyDeleteSimply stunning cards highlighting this release!!
ReplyDelete